


Note: When multiple cases are loaded, the Default Case field enables you to specify which case the table values apply to. If the cases are in case-comparison mode, you have the option of creating a table that uses values from the differences in values between cases 1 and 2.
Changing the Default Case field removes all unsaved values and definitions from the table.
To enter data into a cell, select a cell and type in the information you want. To edit the current contents of a cell in the cell itself (rather than in the cell definition field), double-click the cell.
The cell contents can be formatted with bold, italic, and underline fonts; left, center, and right justification; word wrapping; font sizes; and text and background colors. Multiple cells can be merged into a single larger cell to enable large items (for example, titles) to span multiple cells. For details, see Table 12.2: Table Viewer Tools Toolbar.
To perform a formatting operation on multiple cells, click in the upper-left cell of the group and, while pressing Shift, click in the lower-right cell of the group. While the group is highlighted, toolbar operations are applied to all cells in the group.
Numeric data, (that is, numbers alone, numbers with units, and expression results), can be formatted to display in scientific or fixed notation with a specified number of significant digits.
Table contents can be cut (Ctrl+C) and pasted (Ctrl+V) into Microsoft Excel documents and vice versa.
To access the shortcut menu for a table, type = into a cell and right-click the cell, or right-click the field for
the selected cell above the table. The shortcut menu has all of the
commands listed in Table 12.1: Shortcut Menus Toolbar, plus
an Edit submenu that has the standard editing
commands.
For faster expression entry, there is also a Shortcut
Menus toolbar above the table with the following items.
Type = into the cell and click the given
menu to display a variety of items that can be inserted automatically
at the current cursor location. All, except Annotation, are also available in the details view for expressions.
Table 12.1: Shortcut Menus Toolbar
| Type of Item to Insert | Description |
|---|---|

|
Select from the following submenus:
|
| Enables you to specify CFD-Post expressions or expressions that you have created with the Expressions workspace. For an example of using the Expressions workspace, see Expressions Workspace: Example. |

| Select from a list of existing variables to insert into the cell. |

| Select from a list of existing locations to insert into the cell. |

| Select from a list of mathematical constants to insert into the cell. |
|
Select from the following menu items/submenus:
|
Tables in CFD-Post have the ability to evaluate and display expression results and update those results when variables and/or locations they depend on change.
To enter an expression, edit a cell and prefix a valid CFD-Post expression
with an equals sign (=). For example,
you may enter the following into a cell:
=2*areaAve(Pressure)@inlet
When the focus leaves the cell, the table displays the evaluated result of that equation in the cell. When selecting a cell containing an expression, the expression is displayed in the cell editor box immediately above the table. You can edit the expression in the cell editor box. Alternatively, you can double-click the cell and edit the equation from the cell itself. For details on how to enter common expressions and functions quickly, see Shortcut Menu.
If there is an error in evaluating the expression contained in a table cell, the cell will be colored red.
Units for expression evaluations that return a temperature will
always be displayed in K or R. For details, see Function Calculator.
The toolbar above the Table Viewer contains the following icons:
Table 12.2: Table Viewer Tools Toolbar
| Icon | Description |
|---|---|

|
Creates a new table. |

|
Opens the Load Table from file dialog box. Tables can be loaded from files in two different formats:
|

|
Opens the Save Table to file dialog box. Tables can be saved to several formats:
|

|
Edit operations for contents of cells: Cut, Copy, and Paste. To select a rectangle of cells for an operation, click in the cell in the upper-left corner, then Shift-click the cell in the lower-right corner. The cells become highlighted and can be operated upon as a unit. |

|
Font operations for text in cells: Bold, Italic, and Underline. |

|
Text-alignment operations: Left, Center, and Right. |

|
Makes all cells in the table wrap text. |

|
Launches the Cell Formatting dialog box, where you can specify scientific or fixed notation, the precision, and whether to show the value or the units (at least one of the value or units must appear). |

|
Changes the size of the font used in the cell. |

|
Opens the Select color dialog box for setting the background color. |

|
Opens the Select color dialog box for setting the text color. |

|
Causes a cell to span rows or columns (Merge Cells) or reverses that operation (Unmerge Cells). |
Here is an example of formatting applied to a table:
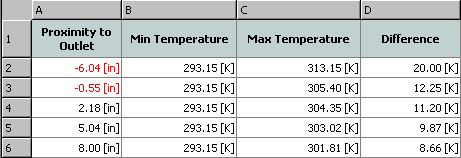
To format the table shown above:
Cells A1-D1: Applied bold font, background color, and text centering. Manually resized cell widths individually.


Cell A1: Applied text wrapping and resized cell height manually.

Cells A2-D6: Right-justified text.

Cells A2-A3: Manually changed the font color.

Note: To perform a formatting operation on multiple cells, click in the upper-left cell of the group and, while pressing Shift, click in the lower-right cell of the group. While the group is highlighted, toolbar operations are applied to all cells in the group.