


The following example analyses that use cross sections are available:
Several Ansys, Inc. publications, particularly the Mechanical APDL Verification Manual, describe additional related analyses.
The Mechanical APDL Verification Manual consists of test case analyses demonstrating the analysis capabilities of the program. While these test cases demonstrate solutions to realistic analysis problems, the Mechanical APDL Verification Manual does not present them as step-by-step examples with lengthy data input instructions and printouts (unnecessary if you have at least some finite element experience). Be sure to review each test case's finite element model and input data and accompanying comments.
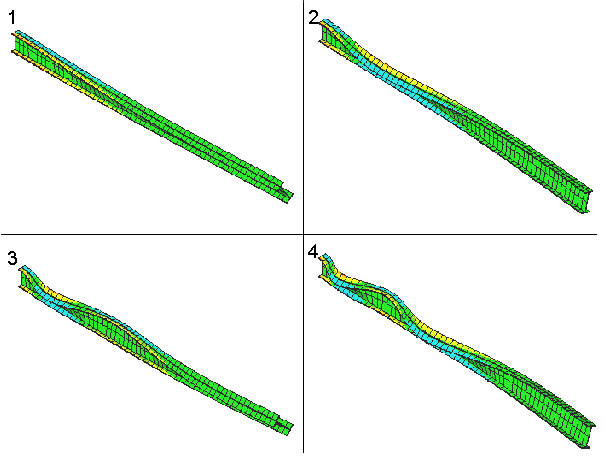
You can use BEAM188 and BEAM189 elements to model not only straightforward beam bending and shear response but also to model beam response that involves lateral-torsional buckling. To create this type of model, you will need to create an adequately fine mesh of beam elements. You typically need to model a single beam member using a series of short beam elements, as shown in Figure 12.4: Lateral-Torsional Buckling of a Cantilever I-Beam.
Buckling Analysis in the Structural Analysis Guide documents buckling analysis in detail. This sample problem shows what happens when a cantilever beam is subjected to a concentrated end load, which causes lateral-torsional buckling.
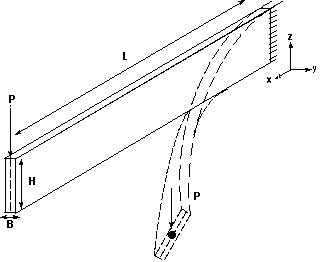
A straight, slender cantilever beam has one fixed end and one free end. A load is applied to the free end. The model is analyzed using eigenvalue buckling calculations, followed by a nonlinear load versus deflection study. The objective is to determine the critical value of the end load (indicated by P in Figure 12.5: Diagram of a Beam With Deformation Indicated) at which the beam undergoes a bifurcation indicated by a large displacement in the lateral direction.
The following material properties are used for this problem:
Young's modulus = 1.0 X 10⁴ psi
Poisson's ratio = 0.0
The following geometric properties are used for this problem:
L = 100 in
H = 5 in
B = .2 in
Loading for this problem is:
P = 1 lb.
Eigenvalue buckling calculation is a linearized calculation, and is generally valid only for elastic structures. The yielding of materials occurs usually at loads lesser than that predicted by eigenvalue buckling analysis. This type of analysis tends to need less computation time than a full nonlinear buckling analysis.
You can also perform a nonlinear load versus deflection study, which employs an arc length solution strategy to identify critical loads. While the approach is more general, a collapse analysis may be computationally intensive.
The nonlinear collapse analysis must be performed on a structure with imperfections built in to the model, since a perfect model will not show signs of buckling. You can add imperfections by using eigenvectors that result from an eigenvalue buckling analysis. The eigenvector determined is the closest estimate of the actual mode of buckling. The imperfections added should be small when compared to a typical thickness of the beam being analyzed. The imperfections remove the sharp discontinuity in the load-deflection response. It is customary to use one to ten percent of the beam/shell thickness as the maximum imperfection introduced. The UPGEOM command adds displacements from a previous analysis and updates the geometry to the deformed configuration.
Select menu path .
Enter the text "Lateral Torsional Buckling Analysis" and click .
Start the model creation preprocessor and define the keypoints for the beam. Select menu path , and enter these keypoint numbers and the coordinates in the dialog as indicated:
Keypoint Number X Location Y Location Z Location Click This Button to Accept Values 1 0 0 0 2 100.0 0 0 3 50 5 0 Create a straight line through keypoints 1 and 2. Select menu path . The Create Straight Line picker appears. Select keypoints 1 and 2 in the Graphics window and click in the Create Straight Line picker.
Save the model. Select menu path . Enter buckle.db in the “Save Database to” field and click .
Select menu path and select the "Structural" check box. Click to continue.
Select menu path . The Element Types dialog appears.
Click Add ... The Library of Element Types dialog appears.
In the scroll box on the left, select "Structural Beam."
In the scroll box on the right, click "3D finite strain, 3 node 189" to select BEAM189.
Click , and then click in the Element Types dialog.
Define a rectangular cross section for the beam. Select menu path . The BeamTool is displayed. The section ID is set to 1, and the subtype to RECT (signified by a rectangle on the subtype button) by default. Since you will be creating a rectangular cross section, there is no need to change the subtype.
In the lower half of the BeamTool, you will see a diagram of the cross section shape with dimension variables labeled. Enter the width of the cross section, 0.2, in the field labeled B. Enter the height of the cross section, 5.0, in the field labeled H. Click to set the cross section dimensions.
Use the BeamTool to display information about the cross section. Click on the BeamTool. A diagram and data summary of the cross section appear in the Graphics window. You can also preview the mesh of the cross section by selecting the button. Click in the BeamTool to continue.
Select menu path . The Define Material Model Behavior dialog appears.
In the Material Models Available window on the right, double-click the following: Structural, Linear, Elastic, Isotropic. A dialog appears.
Enter 1E4 for EX (Young's modulus).
Enter 0.0 for PRXY (Poisson's ratio), and click . Material Model Number 1 appears in the Material Models Defined window on the left.
Select menu path to close the Define Material Model Behavior dialog.
Replot the line by choosing menu path .
Select the line and define the orientation node of the line as an attribute. Select menu path . The Line Attributes picker appears. Select the line in the Graphics window and click in the Line Attributes picker.
The Line Attributes dialog appears. The program includes the material attribute pointer to the material set 1, the element type attribute pointer to the local element type 1, and the section attribute pointer to the section ID 1 by default. Click on the radio button beside the Pick Orientation Keypoint(s) label to change it to Yes and click .
The Line Attributes picker reappears. Type 3 in the picker, press Enter, and click .
Save the model. Select menu path . If the buckle.db file is not already selected, select it. Select , and when prompted whether you want to overwrite the existing file, click .
Define the mesh size and number of divisions. Select menu path . Enter 10 in the “No. of Element Divisions” field and click .
Mesh the line. Select menu path . Click MESH on the MeshTool and the Mesh Lines picker appears. Pick the line in the Graphics window, and then click in the Mesh Lines picker. Click in the MeshTool to close it.
Rotate the meshed line. Select menu path . The Pan, Zoom, Rotate tool appears. Select and click . The beam is rotated in the Graphics window.
Verify the beam orientation. Select menu path . Select the radio button next to the /ESHAPE label to turn /ESHAPE on and click .
Define a boundary condition to the fixed end. Select menu path . The Apply U,ROT on KPs picker appears.
Define keypoint 1 as the fixed end. In the picker, type 1, press Enter, then click . The Apply U,ROT on KPs dialog appears.
Click "All DOF" to select it, and click . The boundary condition information appears in the Graphics window at keypoint 1.
Apply a force to the free end. Select menu path . The Apply F/M on KPs picker appears.
Identify keypoint 2 as the free end. Type 2 in the picker, press Enter, and then click . The Apply F/M on KPs dialog appears.
In the drop down list for Direction of force/mom, select FY.
Enter 1 for the Force/moment value in the Apply F/M on KPs dialog, and click . The force symbol appears in the Graphics window at keypoint 2.
Save the model. Select menu path . If the buckle.db file is not already selected, select it. Click and when prompted whether you want to overwrite the existing file, click again.
Set analysis options. Select menu path . The Static or Steady-State Analysis dialog appears.
Use the sparse solver for the solution. In the Static or Steady-State Analysis dialog, make sure that Sparse solver is selected in the drop down box beside the Equation solver label.
Include prestress effect, which will be stored for later use in the eigenvalue buckling calculation. In the drop down list labeled Stress stiffness or prestress, select "Prestress ON." Click to close the Static or Steady-State Analysis dialog.
Select menu path . Review the summary information in the /STATUS command window, then select Close from its menu bar. Click in the Solve Current Load Step window to begin the solution.
When the Solution is Done! window appears, click to close it.
Select menu path .
Select menu path .
Select the "Eigen Buckling" option, then click .
Select menu path . The Eigenvalue Buckling Options dialog appears. Select the “Block Lanczos” option. Enter 4 in the “No. of modes to extract” field, then click .
Set the element calculation key for the MXPAND command. Select menu path .
In the Expand Modes dialog, enter 4 in the “No. of modes to expand” field, change the “No” to “Yes” beside the “Calculate elem results” label, and click .
Select menu path . Review the summary information in the /STATUS command window, then select Close from its menu bar. Click in the Solve Current Load Step window to begin the solution.
When the Solution is Done! window appears, click to close it.
Select menu path . Be sure the radio button beside the label Display of element shapes ... (/ESHAPE) is set to On and click .
Display the results summary. Select menu path . After you have reviewed the results, click to close the window.
Select menu path .
Plot the first mode shape of the beam. Select menu path . The Plot Deformed Shape dialog appears. Select “Def + undef edge” and click .
Select menu path .
Introduce model imperfections calculated by the previous analysis. Select menu path . In the Update nodes using results file displacements dialog, enter 0.002 in the “Scaling factor” field, 1 in the “Load step” field, 1 in the “Substep” field, and file.rst in the “Selection” field. Click .
Select menu path .
Select the "Static" option, then click .
Select menu path and be sure the drop down lists display All Items and All entities respectively. Select the Every substep for the File write frequency radio button and click .
Select menu path . Select the radio button beside Large deform effects, then click .
Set the arc-length method, and set parameters for the termination of the solution. Select menu path . Select the Arc-length method on/off radio button and set it to On. Select the pull down menu next to the Lab label and select Displacement lim. Enter 1.0 in the “Max desired U” field. Enter 2 in the “Node number for VAL” field. From the pull-down menu (next to the “Degree of freedom” label), select “UZ.” Click .
Define the number of substeps to be run during this load step. Select menu path . Enter 10000 in the “Number of substeps” field and click .
Solve the current model. Select menu path . Review the summary information in the /STATUS command window, then select Close from its menu bar. Click in the Solve Current Load Step window to begin the solution. A Nonlinear Solution window with a Stop button appears. A convergence graph is built, and can take several minutes to complete.
You may receive a warning message. You should review the information in the message but you do not need to close it. Continue waiting for the solution to complete. When the Solution is Done! window appears, click to close it.
Select menu path .
Replot the beam. Select menu path .
Define the load point deflection to be read from the results file. Select menu path . When the Defined Time-History Variables dialog appears, select .
When the Add Time-History Variable dialog appears, be sure the Nodal DOF result option is selected. Click .
The Define Nodal Data picker appears. In the Graphics window, pick node 2 (the end node on the right side of the beam) and click .
The Define Nodal Data dialog appears. Be sure the Ref number of variable and Node number are both set to 2. Enter TIPLATDI in the “User-specified label” field. Select Translation UZ from the menu and click .
Define the total reaction force to be read from the results file. Select from the Defined Time-History Variables dialog.
When the Add Time-History Variable dialog appears, select the Reaction forces radio button and then click .
The Define Reaction Force picker appears. Pick the end node on the left side of the beam and click .
The Define Reaction Force Variable dialog appears. Be sure the “Ref number of variable” is set to 3 and “Node number” is set to 1. Select “Struct Force FY” from the menu and click . Click to close the Defined Time-History Variables dialog.
Select menu path . In the Multiply Time-History Variables dialog, enter 4 in the “Reference number for result” field, -1.0 in the “1st Factor” field, and 3 in the “1st Variable” field. Click .
Display the X variable. Select menu path . Select the single variable button, enter 2 in the “Single variable no.” field, and click .
Plot the load versus deflection curve to confirm the critical load calculated by the eigenvalue method. Select menu path . Enter 4 in the “1st variable to graph” field. Click .
List the variables versus time. Select menu path . Enter 2 in the “1st variable to list” field and 4 in the “2nd variable” field and click .
Check the values in the PRVAR Command window to see how they compare against the values generated by the eigenvalue buckling analysis. Expected results are: Critical buckling load, Pcr = 0.01892. Close the PRVAR Command window.
Replot the beam. Select menu path .
Define the compression stress at the base to be read from the results file. Select menu path . When the Defined Time-History Variables dialog appears, select .
When the Add Time-History Variable dialog appears, be sure the “…by seq no.” option is selected. Click .
The Define Element Results picker appears. In the Graphics window, pick element 1 (the end element on the left side of the beam) and click .
The Define Element Results by Seq No. dialog appears. Be sure the Ref number of variable is set to 5 and Element number is set to 1. Enter BASESX in the “User-specified label” field. Select “LS” from the menu.
To retrieve the X component of Stress from the bottom middle of the section (this is node 3, or the 2nd node where stress is stored), type 4 for the Comp Sequence number and click .
Plot variable versus time. Select menu path . Enter 5 in the “1st variable to graph” field. Click .
List the variable versus time. Select menu path . Enter 5 in the “1st variable to list” field and click .
Select menu path Main .
In the Toolbar, click .
Select a save option and click .
Here is the input file for the problem described in the previous section:
/filename,tutor-sag13s

/graphics,power
/gst,on
/show,buckle,grph
/prep7
k,1,0,0,0
k,2,100.0,0,0
k,3,50,5,0
lstr,1,2
et,1,beam189
sectype,1, beam, rect
secdata, 0.2,5.0
slist, 1, 1
mp,ex,1,1e4
mp,nuxy,1,0.0
lsel,s, , , 1, 1, 1
latt,1, ,1,0, 3, ,1
lesize, all, , ,10
secnum,1
lmesh,all
/view,,1,1,1
/eshape,1
eplot
dk,1, , , ,0,all
fk,2,fy,1.0
finish
/solu
pstres,on
eqslv,sparse          ! eqslv,sparse is the default for static and full transient
solve
finish
/solu
antype,buckle
bucopt,lanb,4
mxpand,4,,,yes
solve
finish
/post1
/eshape,1
/view, 1 ,1,1,1
/ang, 1
set,list
set,1,1
/show,jpeg
pldisp,2
/show,close
finish

/prep7
upgeom,0.002,1,1,tutor-sag13s,rst
/solu
antype,static
outres,all,all
nlgeom,on
arclen,on,25,0.0001
arctrm,u,1.0,2,uz
nsubst,10000
solve
finish
/show,jpeg
/post26
nsol,2,2,u,z,tiplatdi
rforce,3,1,f,y
prod,4,3, , , , , ,-1.0,1,1
xvar,2
plvar,4
prvar,2,4
esol,5,1, ,ls,4
plvar,5
/show,close
prvar,5
finish