


Configuring an app builder project consists of two primary steps:
On the second page of the ACT App Builder, you add the Ansys product for which you want to add a product feature. Currently, the ACT App Builder supports wizard creation for these products: DesignModeler, Electronics Desktop, Fluent, Mechanical, SpaceClaim, and Workbench.
To add the product, do the following:
Click the Add Product block. The Add Product window opens.
For Product, select the product for which you want to create one or more wizards.
For example, select Mechanical if you want to create a wizard that is to run from Mechanical.
Click OK.
In the navigation menu, the name of the selected product displays as the name of the third page. You can now add the ACT wizards that are to run from this product.
On the third page of the ACT App Builder, you add the wizards that are to run from the previously selected Ansys product. While the ACT App Builder currently supports only the wizard product feature, you can open the XML editor to view and add other features such as custom interfaces.
For each wizard to add, do the following:
Click the New Wizard block. The New Wizard window opens.
Supply the name, label, number of steps, and the icon to display.
By default, the label is the name that you specify for the wizard.
Click OK.
In the navigation menu, the name of the wizard displays as the name of the fourth page. You can now define each of the steps for this new wizard by adding properties and callbacks.
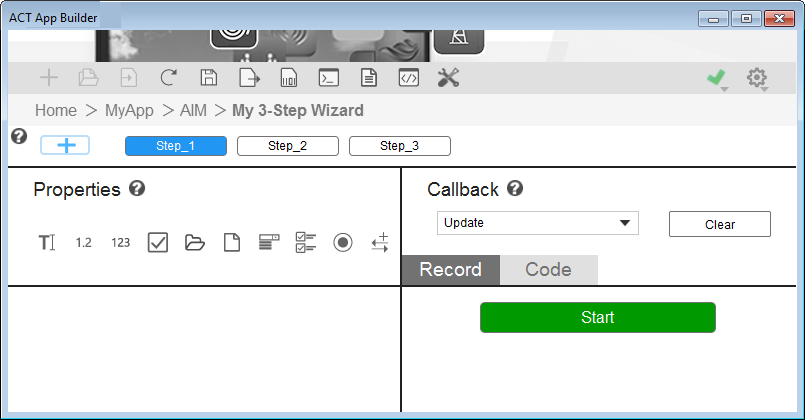
This page has a step map for step creation and navigation in the upper left corner. It also has two panes for step definition: Properties and Callback. Clicking the help icons for each of these panes displays an overview and relevant workflow information.
The step map provides buttons for navigating to existing steps and for inserting a new step. Clicking a button for an existing step displays its properties and callbacks. Clicking the plus sign button allows you to insert a new step after the existing step that you specify.
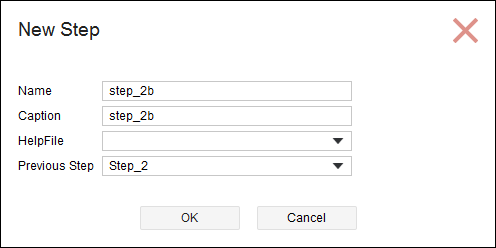
If you have first used the resource manager to import a folder with HTML files to use for custom help, for HelpFile, you can select the file that is to display for the step. All HTML files in the imported help folder are available for selection.
These files typically contain content that explain how to complete the steps. For more information, see Custom Wizard Help Files.
In the XML editor, you can also always use the optional attribute
helpfileto assign HTML files to steps.When you right-click a step in the step map, you can select a button for either editing or deleting the step.

The Properties pane displays a toolbar for defining the properties that the step uses.
The Callback pane provides for defining the callbacks for the step. You typically use the Record tab to capture in a journal the actions that you take in the associated product. On the Code tab, you then view and edit the IronPython code recorded for callbacks to replace arguments with properties.
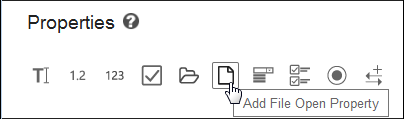
Using the toolbar buttons in the Properties pane, you define the properties required for the active wizard step. For example, if the step is for opening a geometry file, you click the button for adding a file open property:
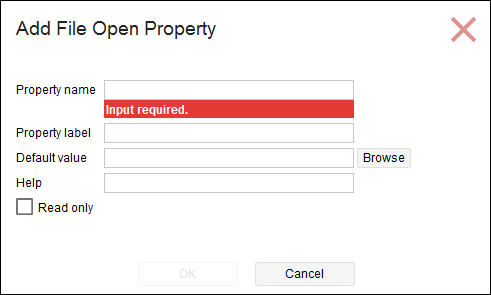
You then define this property:
Tip: For convenience, you can click a property in the toolbar and then drag and drop it into a particular location in the Properties pane. Additionally, you can drag and drop properties within this pane to rearrange them in the order in which you want them to display in the wizard.
In the main toolbar, clicking the button for uploading the temporary extension for
the app builder project  allows you to see the newly added properties when the wizard is loaded in
the Ansys product. For more information, see Testing Temporary Extensions.
allows you to see the newly added properties when the wizard is loaded in
the Ansys product. For more information, see Testing Temporary Extensions.
Descriptions follow for all attributes that can possibly display for properties. The product with which a wizard is associated determines which toolbar buttons for properties display.
| Attribute | Description |
|---|---|
| Group name | Name to assign to the property group. This property displays only for a group property. |
| Group label | Text to display for the property group in the wizard step. This property displays only for a slider property. |
| Property name | Name to assign to the property. |
| Property label | Text to display for the property in the wizard step. |
| Default value | Value to use if no value is entered or selected when this step of the wizard is run. For a property that opens a folder or file, click Browse to navigate to and select the desired folder or file. |
| Help | Help text to display for the property. This attribute provides for easily defining the help text for a property directly in the XML file. You can also choose to define property-level help in HTML files. For more information, see Custom Wizard Help Files. |
| Options | List of values to display for a selection-based property. This property displays only for select, multiselect, and radio button properties. |
| Unit | Units for the property. This property displays only for float values. |
| Min | Minimum value to display for a slider control. This property displays only for a slider property. |
| Max | Maximum value to display for a slider control. This property displays only for a slider property. |
| Read-only | Indicates whether the property is read-only. |
A callback invokes an IronPython function. For each wizard step, you define the
callbacks that can be invoked from this step in the Callback pane.
For example, the callback <onupdate> specifies the function to
invoke when Next is clicked to move to the next step. Similarly,
the callback <onreset> specifies the function to invoke when
Previous is clicked to return to the previous step to reset it if
the step has not been completed correctly.
Note: In the Callback pane, the list for selecting a callback
includes choices such as Update and Reset
rather than XML-formatted tags such as <onupdate> and
<onreset>, which are used in the XML definition file that
is created for the ACT extension.
You use the Record and Code tabs in the Callback pane to define callbacks.
On the Record tab, you click Start to record in a journal the actions that you take to change project data in the interface of the associated Ansys product. Once you finish, you return to the Record tab and click Stop. To easily change the value of a journal entry, you can click it and then link the entry to a property that you have defined in the Properties pane.
On the Code tab, you can view and modify the journal, which is recorded as an IronPython script. For example, you might need to replace arguments with properties. For information on using journaling and scripting, as well as a complete list of all available data containers, namespace commands, and data types, see the Workbench Scripting Guide.
Note: If you are recording and go to the Code tab, a message on this tab indicates that the code is currently read-only. If you want to make the code editable, you can click Make Editable. However, this will disable the recording.
When you click the toolbar button for saving the app builder project  , the IronPython code for
the callback is saved.
, the IronPython code for
the callback is saved.