


To view and manage the files in your ACT extension, you click the last toolbar button
 to open the resource manager. While you are using the resource manager, this
button is replaced with the button for switching back to the ACT App
Builder
to open the resource manager. While you are using the resource manager, this
button is replaced with the button for switching back to the ACT App
Builder .
.
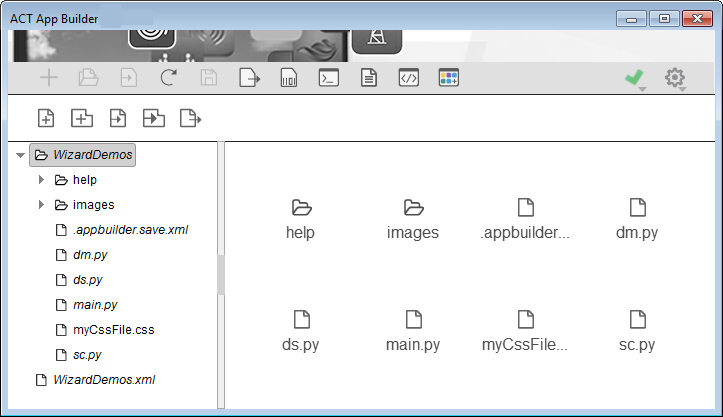
The resource manager displays the folders and files managed by the ACT App Builder in italics to indicate that they are in use and are read-only. You cannot edit the name of the extension folder. You also cannot edit the app builder project's XML file or the extension’s XML definition file or IronPython scripts.
Clicking a folder expands it so that you can see child folders and files. You can use drag-and-drop operations to organize folders and files. You can use the following toolbar buttons to add, import, and export files and folders.
| Button | Action |
|---|---|

| Add a new file. In the window that opens, specify the filename and folder location. You might use this option to add a new text file in which to enter information about the extension. |

| Add a new folder. In the window that opens, specify the folder name and location. |

| Import a file. In the window that opens, select the file to import. |

| Import a folder. In the window that opens, select the folder to import. Importing a folder also imports all files within the folder. |

| Export a file or folder. In the window that opens, select the file or folder to export. Exporting a folder also exports all files within the folder. |
In the resource manager, you can edit the names of files and folders that do not display in italics. You can also edit the content of text files and custom HTML help files. For more information, see Editing Files and Folders.
When finished, you click the last toolbar button to switch back
to the ACT App Builder.
During extension creation, you can use the resource manager to easily add new files and folders. For example, you can add a text file in which to enter notes about your extension. You can also add a folder and then drag and drop existing files into this folder.
To add a file, do the following:
In the toolbar, click the button for adding a new file. The Add New File window opens.
For Name, enter the name for the file, followed by the extension.
For example, to create an HTML file to display as custom help for the first wizard step, you might enter
step1.html.For Location, select the folder in which to add the file.
For example, for an HTML file to display as custom help, you would select the child folder help. If this folder doesn't yet exist, before performing these steps, you would first want to add this folder by performing the steps indicated in the next bullet.
Click OK.
To add a folder, do the following:
In the toolbar, click the button for adding a new folder. The Add New Folder window opens.
For Name, enter the name for the folder.
For Location, select the folder under which to add the new folder.
Click OK.
You add content to a new file by opening it in an editor. For more information, see Editing Files and Folders.
If files and folders for an extension exist elsewhere, you can use the resource manager to import them. For example, you can import a single image file or a folder with many image files from an existing extension into the current extension.
To import a file, do the following:
In the toolbar, click the button for importing a file. The Import Existing File window opens.
For Path, click Browse to navigate to and select the file that you want to import.
The name of the selected file appears for Name. You can rename the file if you want.
For Location, select the folder in which to add the file.
Click OK.
To import a folder and all the files within it, do the following:
In the toolbar, click the button for importing a folder. The Import Existing Folder window opens.
For Path, click Browse to navigate to and select the folder that you want to import.
The name of the selected folder appears for Name. You can rename the folder if you want.
For Location, select the folder under which to add the imported folder.
Click OK.
The folder and its files display in the left pane as they are imported.
You can edit the names of imported files and folders and edit content in certain files by opening them in an editor. For more information, see Editing Files and Folders.
From the resource manager, you can edit the names of folders and files that do not display in italics. The names that display in italics cannot be edited because the ACT App Builder is using them.
When you right-click a file or folder that can be edited, a toolbar displays.
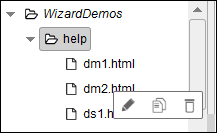
You use the following buttons to edit, duplicate, and delete the selected file or folder.
| Button | Action |
|---|---|
 | Edit resource. When you click this button, the Edit Resource window opens so that you can edit the name of the file or folder. |
 | Duplicate resource. When you click this button, a copy of the resource is
made. The new file or folder is given the same name as the original followed by
a space and then the suffix (0). For example, if you
copied dm1.html, the newly created file would be named
dm1 (0).html. If you copied dm1
(0).html, the newly created file would be named dm1 (0)
(0).html. |
 | Delete resource. When you click this button, the Delete Resource window opens. You then confirm or cancel the deletion by clicking Yes or No. |
From the resource manager, you can export the currently selected file or a folder. Exporting a folder exports all files in the folder.
To export a file or folder, do the following:
In the directory where you want to export the folder or file, optionally create a new destination folder.
Select the file or folder to export.
In the toolbar, click the button for exporting the selected file or folder. The Export Selected File or Folder window opens.
For Type, select Folder or Archive.
Select Folder (default) if you want to export the selected file or folder to the path indicated in the next step.
Select Archive if you want to export the selected file or folder to a compressed file (ZIP) to the path indicated in the next step.
For Path, click Browse to navigate to and select the destination folder.
The name of the selected file or folder appears for Name. You can rename the file or folder if you want.
Click OK.
The file or folder or file is exported to the destination directory. A notification briefly appears at the top of the window when the export completes.