Configuring ASDforEV CAN Reader for NI Hardware

This procedure explains how to configure the ASDforEV CAN reader application with National Instruments' CAN-reading hardware device.

Prerequisites: CAN-reading software must be installed as described in Installing NI-XNET. Make sure the NI Hardware device is connected to your computer.
  1. Run the NI-XNET Database Editor application
  2. Click Open Database under the Start heading and select the required DBC file.

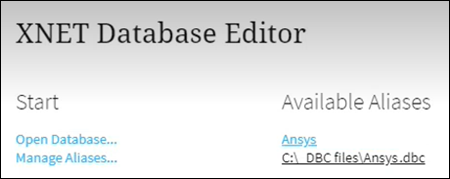
    The selected DBC file should then appear under Available Aliases.
    Note: The local filesystem path to the selected DBC file must not contain any comma characters, otherwise an alias will not be created and the DBC file cannot be used further in the CAN reader.
  3. Click Manage Aliases.
  4. Click the Settings button next to the .dbc file name.
  5. When working with a CAN bus:
    1. Make sure ISO is selected in the CAN FD ISO MODE field.
    2. Set PRESET BAUD RATE to the correct value matching your CAN bus configuration (for example, 500.00 kBaud). The second PRESET BRS BAUD RATE field is irrelevant in this case.
  6. When working with a CAN-FD bus:
    1. Adjust the CAN FD ISO MODE to the value matching your CAN-FD bus configuration.
    2. Set PRESET BAUD RATE and PRESET BRS BAUD RATE to the correct values matching your CAN-FD bus configuration (for example, 500.00 kBaud and 2.00 MBaud, respectively).
  7. Start ASDforEV CAN reader from Windows Start menu or Desktop shortcut.
  8. In the ASDforEV CAN reader window, ensure that National Instruments is selected from the Hardware menu.
  9. Tick Initialize device connection to initialize the connection with the device(s).

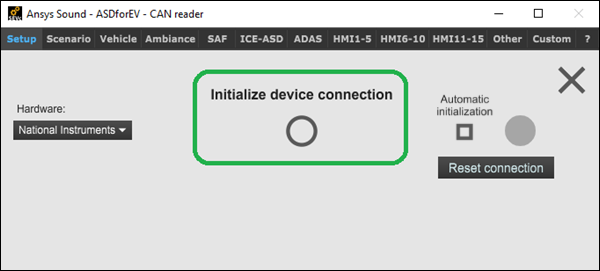
    Once the connection has succeeded, a green light appears.
  10. Load the DBC files by selecting the required alias from the Port menu.

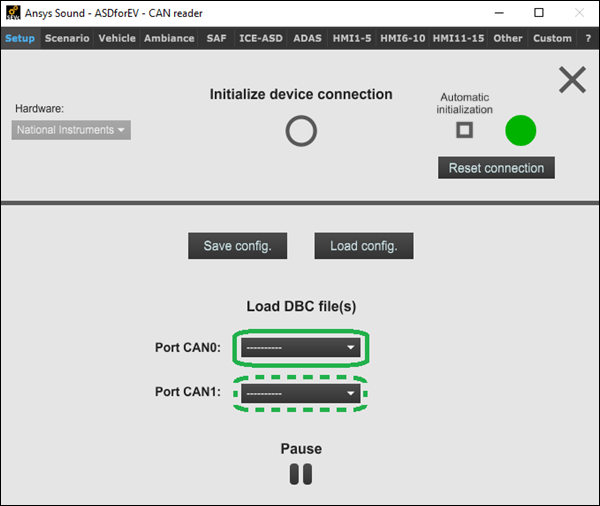
    Note: The Hardware connection must be refreshed if new aliases are added using the NI-XNET Database Editor.
  11. Alternatively, you can load an existing configuration by clicking Load config.
    Note: Only configuration files created with version 2022R2 and later are supported.
  12. If required, you can save this configuration for reuse by clicking Save config.
You can now set up CAN signal connections.