
Adding New Materials
You can add a new material to a project or global user-defined material library. To make the new project material available to all projects, you must export the material to a global user-defined material library.
Materials are added using the View/Edit Material dialog box, which can be opened from either the Select Definition window or the Edit Libraries window.
To open the Select Definition window:
- Click Modeler > Assign Material.
The Select Definition window appears.
To open the Edit Libraries window:
- Click Tools > Edit Libraries > Materials. In the project tree, you can also right-click Materials, and select Edit Library.
The Edit Libraries window appears.
To add a new material:
- From either the Select Definition window or the Edit Libraries window, click Add Material.
The View/Edit Material dialog box appears.

By default, only properties commonly used by the selected product are displayed. To view the complete table of properties, see Filtering Materials.
- Type a name for the material in the Material Name text box, or accept the default.
- Use the radio buttons in the View/Edit
Material for section to specify whether the new materials apply to Active Design,
Active Project, or All Properties. When All Properties is selected, Physics classification options are enabled to show or hide properties based on simulation type (Electromagnetic, Thermal, or Structural).
Note:
If a material is edited in a design type for which the Physics type has not been set (e.g., an
You can also enable the View/ Edit Modifier check box for Thermal Modifier. Checking this box causes the Thermal Column to display at the right side of the Properties of the Material table. Selecting Edit rather than None causes display of the Edit Thermal Modifier dialog.
- Enter a Material Name, or accept the default.
- For each available material property, select a Type from the drop-down menu. Only applicable types appear for each material property. Some properties only use the Simple
type, while others offer four or more types.
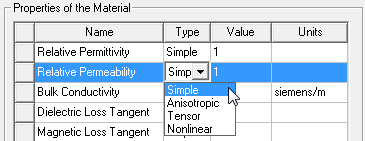
-
- Relative Permeability
- Relative Permittivity
- Bulk Conductivity
- Dielectric Loss Tangent
- Magnetic Loss Tangent
If the material is a ferrite, enter a value greater than 0 in the Magnetic Saturation Value box. You may also choose to enter values in the Lande G Factor and Delta H Value boxes. Because Delta H values are measured at specific frequencies, you should also enter a - Measured Frequency value (default 9.4 GHz).
Note:You may enter a variable name or mathematical expression in the Value box.
- If one or more of the material properties are dependent on frequency, click Set Frequency Dependency, and then follow the directions for defining frequency dependent materials.
- To modify the units for a material property, double-click the Units box and select a new unit system.
- For Material Appearance, you can check the box to enable the fields for you to specify a color and transparency. Clicking the color bar opens a color selection window:

- Clicking the Transparency box opens a Transparency dialog box with a text field and slider bar for selection.

- Click OK.
- To modify the units for a material property, double-click the Units box and select a new unit system.
- Click OK.
- If you want to add descriptive notes for the new material, click the ellipsis button [...] next to the Notes field. This opens a dialog box in which you can enter text.

- Click OK to add the Notes.
- Click OK on the View/Edit Materials dialog to add the new material to the material library.