Creating a Virtual Desktop
You can add a virtual desktop to a project space if you are a tenant administrator or have Admin permission in the project space.
When you create a virtual desktop you specify the following properties:
- Availability zone (regional data center) providing the hardware
- Licensing settings
- Operating system
- Applications to be installed
- Hardware type
- Disk size and type
- Tags
You can specify these properties individually or use a predefined template (if available) to automatically populate property values with those defined in the template. Both methods are covered in the instructions below.
Once a virtual desktop has been created, users can connect to it to launch a virtual desktop session.
To create a virtual desktop:
-
Open the project space to which you want to add a virtual desktop.
-
On the project space page, select . A wizard is launched.
On the Details screen, specify the availability zone where the compute resource will be provisioned.
In the Licensing section, review or specify the licensing settings for Ansys applications.

By default, the global licensing settings that are configured for your tenant will be used. To view them, expand the Global licensing settings panel.
If global licensing settings have not been configured, or you want to override the global licensing settings for this particular resource, enable Use custom licensing settings for this virtual desktop and then configure the settings of the licensing type(s) you want to use.
Note:If you proceed with using the global licensing settings, and the global settings are later changed, the changes will be applied to the virtual desktop when it is restarted.
If you enable Use custom licensing settings for this virtual desktop, the virtual desktop can only ever use custom settings (the global settings will never apply, even if you do not specify any custom settings). If you do not specify at least one licensing type, Ansys applications installed on the virtual desktop will not function. You will need to configure licensing manually on the virtual desktop after it is created (for example, by modifying ansyslmd).
If you do not choose to use custom licensing settings, the virtual desktop will be configured to use global licensing settings by default, even if a tenant administrator has not yet defined any global licensing settings. In this case, if you manually configure licensing on the virtual desktop after it is created, the manually configured licensing settings will be used every time the virtual desktop is started. However, if global licensing settings are subsequently configured for the tenant, the virtual desktop will start to use the global settings the next time the virtual desktop is restarted.
To use Shared Web Licensing, click Configure next to Shared Web Licensing and then upload a shared web token file.
To use FlexNet licensing, click Configure next to FlexNet licensing.
In the Configure custom FlexNet licensing dialog:
Specify the IP address and optionally the port of a FlexNet server that you want to use. If a port is not specified, 1055 will be used by default.
To add another server to the list, click Add FlexNet license server and specify the server's settings.
When multiple servers are listed, use the arrows in the Priority column to arrange the servers in the order they should be used.
To provide licensing for the LS-DYNA application, specify license server settings in the LSTC license server (optional) area. This is a server where LSTC License Manager is hosted.
Note: Only one LSTC license server can be specified.
- To use Ansys Elastic Licensing, click Configure next to Ansys Elastic Licensing and then specify the Elastic License server ID and Elastic License server PIN.
If you have configured more than one licensing type, use the arrows in the License Priority area to arrange the list in the order in which you would like licensing types to be used. If the first type is not available when licenses are requested, the next type in the list will be used.
Note: Ansys Elastic licensing cannot be moved up in priority. It is always used last.
Note:Once the virtual desktop has been created, you cannot change its licensing settings unless you modify ansyslmd on the virtual machine. If you do so, the modified settings will not be reflected in the virtual desktop's Licensing details in Ansys Gateway powered by AWS. Alternatively, to use different licensing settings, you must create a new virtual desktop.
If you choose to use global license settings, and the global license settings are changed after the virtual desktop is created, the changes will be applied to the virtual desktop when it is restarted.
-
On the Use a template (optional) screen, choose how you want to specify the virtual desktop settings:
To manually specify settings instead of using a template, click Next to skip template selection and advance to the next screen.
To use a template to configure the virtual desktop, select the desired template in the list (if available). A template contains predefined values for the virtual desktop’s Operating system, Applications, Hardware, Storage, and Tags settings. Note that the templates shown are based on the availability zone selected on the previous screen. Templates created in one availability zone are not available in other availability zones.
In the template details view, review the settings and then click Use template.
Confirm that you want to use the selected template.
The remaining virtual desktop settings are automatically populated with the values defined in the template, and you are taken directly to the Review screen where you can finish the virtual desktop creation process. If you need to change a setting, simply navigate back to its screen and make the desired change.
(If not using a template) On the Select operating system screen, select the desired operating system platform (Windows or Linux), then select the desired operating system image. An image is a template for creating new virtual desktop instances. It is a file that contains a virtual disk that contains a bootable operating system. For information about the available images, including conditions for their use, see Operating System Support.
Note:If creating a Linux virtual desktop using the Rocky Linux by CIQ image, see What You Should Know About the Rocky Linux OS Image by CIQ.
Your company must subscribe to the Rocky Linux by CIQ image to be able to use it.
The list of images may include custom images that were created by converting existing virtual desktops into OS images. Such images may contain applications. If present in the image, applications are listed on the next screen.
On the Select and configure applications screen, select and configure the applications to install on the virtual desktop.
Note:On a Windows virtual desktop, Ansys recommends that you create the virtual desktop without any applications, and then add applications after the virtual desktop has been created. See Adding Applications to a Virtual Desktop in the User's Guide. Sometimes, Windows updates are triggered on newly created virtual machines, causing application installation to fail.
If you selected a custom OS image in the previous step, any applications included in the image are listed in the left pane and will be installed on the virtual desktop.
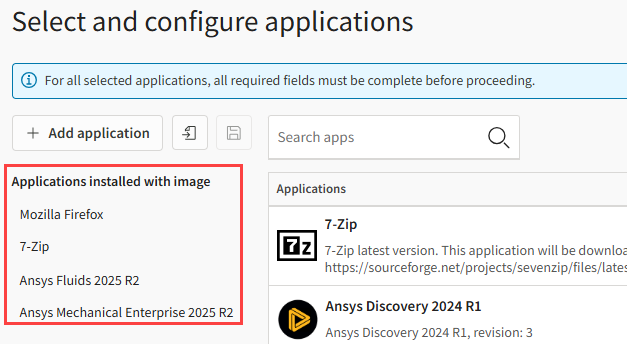
Since these applications are already installed with the image, the same applications cannot be selected in the right pane. You can, however, select other applications to install if desired.
If you want to select applications for installation, there are two ways to do this:
Select Applications Individually from a List
Select an application in the right pane.
Note: If an administrator has allowed access to beta applications, a Show beta applications toggle is available above the applications list, enabling you to display and select beta applications in the list if desired. For information about allowing access to beta applications, see Allowing or Preventing Access to Beta Applications.Use of beta applications is subject to the Beta Disclaimer.
The application is added to the left pane as an application to be installed.
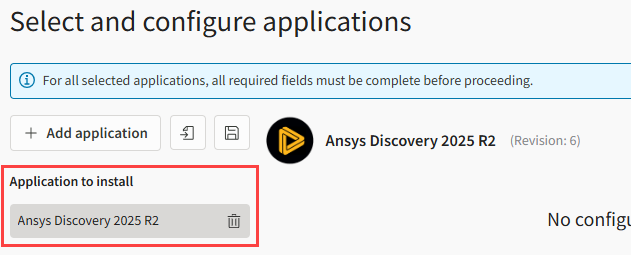
If applicable, specify application configuration settings for applications to be installed. When you select an application in the left pane, its configuration settings (if any) are displayed in the right pane.
To add more applications, click Add application. In addition to the main application, consider installing any third-party applications that may help you perform your work. For example:
KDE Desktop Environment (provides a graphical user interface on a Linux virtual desktop)
Mozilla Firefox
Notepad++
CAUTION: On a Linux virtual desktop, selecting multiple applications with GNOME Desktop as a dependency may result in conflicts when the applications are installed in parallel. To avoid this issue, Ansys recommends that you:- Install one application when creating the virtual desktop and add other applications one at a time after the virtual desktop has been created.
- Install GNOME Desktop last so that the RDP connection to the Linux virtual desktop is not affected by the installation of other applications.
For a full list of Ansys applications and third-party applications that are available in Ansys Gateway powered by AWS, see Application Support in the Recommended Usage guide.
Load a Preconfigured Application Package
If previously configured applications have been saved to application packages, loading an application package automatically populates your list of applications to install with the preconfigured applications contained in the package.
To load a package:
Click
 next to the Add
Application button.
next to the Add
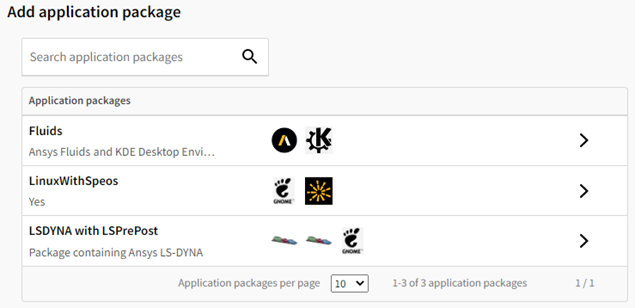
Application button.On the Add application package screen, select the desired application package.
 Note: If an administrator has allowed access to beta applications, a Show packages with beta applications toggle is available above the list of packages, enabling you to display and select packages that contain beta applications if desired. For information about allowing access to beta applications, see Allowing or Preventing Access to Beta Applications. Use of beta applications is subject to the Beta Disclaimer.
Confirm that the selected package is one that you want to install, then click Add Package.
The applications in the package are listed in the left panel of the applications screen, and each application is configured as it was when the package was created.
On the Configure hardware screen, select the desired hardware configuration for the virtual machine. Each hardware configuration has an hourly usage cost associated with it. The virtual hardware features and functions correspond to the hardware available on a physical host.
When you select an instance type, the following options may be available depending on the instance type's hardware configuration:
- Simultaneous Multithreading
-
A technology that allows a single physical processor core to behave like two logical processors, essentially allowing two independent threads to run in parallel. This enables more data to be processed in less time, improving performance and efficiency. This option is available for instance types with AMD or AWS processors.
- Hyper-Threading
-
Similar to simultaneous multithreading (described above). This is Intel's brand name for the technology and is therefore the option shown for instance types with Intel processors.
Note: For most applications, Ansys recommends turning off multithreading/hyper-threading. When disabled, the number of CPUs is the number of virtual CPUs (vCPUs) divided by two. For example, if an instance has 16 vCPUs, it provides 8 cores per node. - GPU driver options
-
Displayed for instance types with NVIDIA GPUs.
Choose one of the following options:
GPU display/compute (GRID drivers). GRID drivers are certified to provide optimal performance for professional visualization applications that render content such as 3D models or high-resolution videos.
GPU compute only (Tesla drivers). Tesla drivers are intended primarily for compute workloads in which you want to use the GPU along with the CPU for computational tasks such as Fourier transformations.
None. A GPU driver will not be installed. Choose this option if you do not need to use the GPU or would prefer to install a driver after the virtual desktop has been created.
For guidance on selecting the right GPU-based instance type and GPU driver option for the Ansys application you intend to use, see NVIDIA GPU Driver Support in the Recommended Usage Guide.
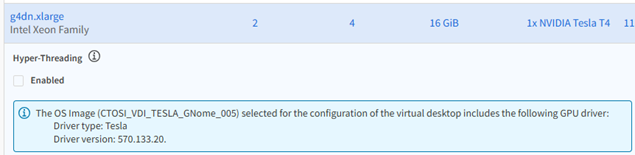
Note:If a custom OS image was selected for the configuration of the virtual desktop, and the OS image contains an NVIDIA GPU driver (GRID or Tesla), only instance types that are compatible with that driver type (and instance types with no GPUs) are available for selection in the hardware list. If you then select an instance type with GPUs, the GPU driver options are not displayed, as selection of a GPU driver type is not required in this case. Instead, a message is displayed indicating the driver type that will be installed. For example:
You can choose an instance type that does not have GPUs. In this case, the virtual desktop will function but will not make use of the GPU driver as the instance has no GPUs.
To determine whether the chosen image has a GPU driver installed, and which type of driver is installed, you can check the image's properties on the page.
If you selected a custom OS image that does not include a GPU driver, it is not possible to install one on the virtual desktop. To create a virtual desktop with a GPU driver, you must select a default OS image (such as Windows Server 2022 or Rocky Linux 8.10 by CIQ), or select a custom OS image that includes a GPU driver.
To see which hardware configurations have been tested and recommended for different Ansys applications, refer to Recommended Hardware for VDI Workflows in the Recommended Usage Guide.
Note:Windows virtual machines should have a minimum of 2 vCPUs and 8 GB RAM. To ensure quick startup and efficient operation, Ansys recommends a minimum of 4 vCPUs and 16 GB RAM.
Some instance types are only available in certain regions/zones.
The prices shown in the table reflect on-demand pricing in the selected availability zone.
Ansys Discovery will not start unless a GPU driver is installed.
On the Configure storage screen, create the desired disk configuration for the operating system, and optionally specify additional storage disk size if needed.
Note:If you are installing multiple applications, make sure that the disk is large enough to handle this.
Pricing varies for different disk configurations. To learn more about disk types, refer to Amazon EBS volume types in the AWS documentation.
On the Tags screen, if tags are available, specify their values.
Tag availability depends on the tags defined on the page.
To apply a custom tag, click Apply custom tags, then select the custom tag to apply. You are then prompted to define its value.
For more information about tagging, see Tags.
On the Review and create screen, specify a meaningful name for the virtual desktop and optionally a description to provide users with additional information about the resource.
-
Review the virtual desktop configuration. If you need to change a setting, simply navigate back to the screen containing that setting and make the desired change. To save the settings to a template for future reuse, click Save as template.
If you are satisfied with the settings, click Create virtual desktop.
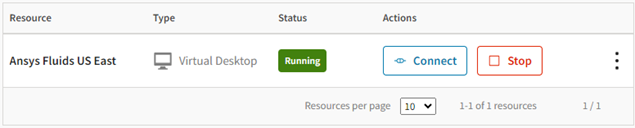
The virtual desktop is created. This may take a few minutes. A new resource becomes available in the project space.
The new resource will go through a few different states before it starts running. For more information, see Resource States in the User's Guide.
Operating system setup and basic installation takes 10 to 15 minutes on average. It may take up to 20 minutes if a GPU driver needs to be installed. Note that this is a rough estimate. Creation time varies depending on a number of factors, some of which may be related to AWS.
When the resource is in the Running state, users can connect to it to launch a virtual desktop session.