


To create a new project, complete these steps.
In the main menu, navigate to > , or click the New Project icon (
 ) in the main toolbar.
The project wizard opens and guides the creation process.
Enter a name for the new project.
All projects in a workspace must have a unique name and shall not contain any special characters.
Select a template.
Template selection has an impact on the project structure, content, UI, and certain features. The tool comes with a set of predefined built-in templates for different verticals, so-called safety domains in the tool. For more information, see Safety Domain Profiles.
Click .
The new project is added to the workspace. Depending on the template selection, the project has a certain structure, initial catalogs, and constraints.
Note: The tool includes a set of sample projects and templates. You can easily load them using > .
Using templates ensures consistent settings for all newly-created projects. You can use the default project templates installed with medini analyze. Or, you can add company-specific templates to medini analyze. These are then available in the project creation wizard.
To add new templates, complete the following steps.
Navigate to > > > .
Click the button ( + ).
Add a template either by typing the name and URL or by dragging a file or link into the list.
Remote locations are supported using HTTP protocol. You can register as many templates as required with different safety domains. For more information, see Safety Domain Profiles.
Click .
After you add templates to the list, they are available in the project creation wizard in the Template drop-down menu.
Note: Settings are stored in the workspace. To make them available to other users, you have to export them.
To export settings, navigate to > > > .
To import settings, navigate to > > > .
If you want to install templates always together with the tool, contact the Ansys medini technical support team for custom installations.
Example
The following screenshot shows the Preferences page with two registered templates:
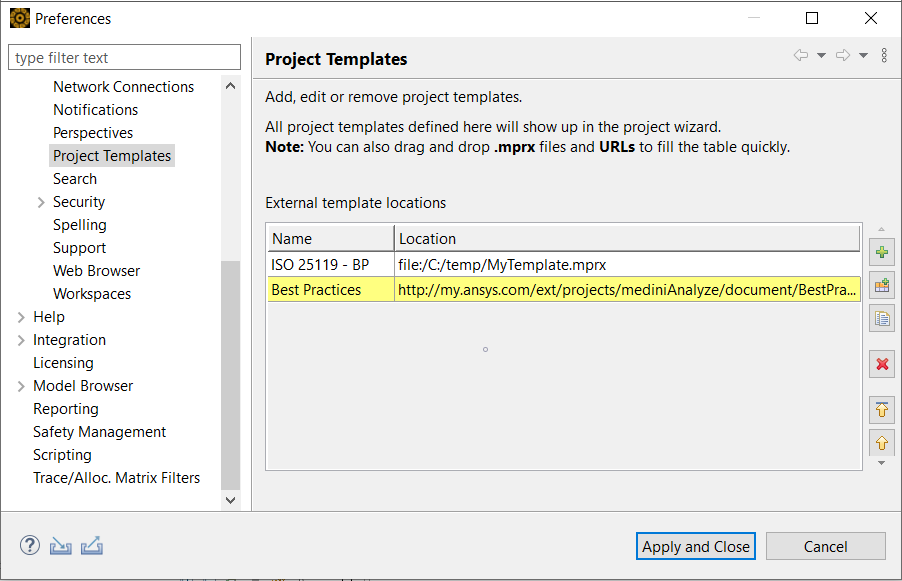
The first template is a local file reference that was added by dragging the MPRX file into the list, while the second resides at a remote location (HTTP URL).
When a new project is created, the wizard shows the new templates in the corresponding list.
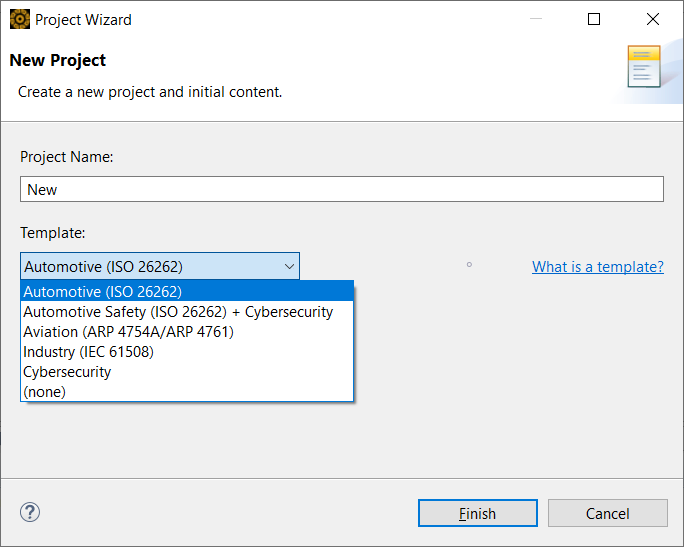
If you choose the remote project template, it is downloaded when you click the button. Note that remote templates require network access, so be sure all users have access to the referenced templates.
If "(none)" is selected as a template, medini analyze creates a generic project without any specific safety domain. You can use this as a starting point to build a template project for a new domain using the profiling mechanism. For more information, see Profiling mechanism.
Instead of using a built-in template, you can create a new project by using another project as a template. To do this, in the Model Browser, select the project you want and in the context menu select Derive > New Project. This opens a wizard similar to the normal project creation wizard, but in this wizard, no additional template selection is necessary or possible.
Note that all company-specific settings and profiles are typically store in a project template, so that you can apply the same style for all projects. A project template can also contain model elements, such as system model elements, that can be reused and shared among projects that are created based on that template.