


Establishing the consistency of project artifacts is one of the key benefits when working with medini analyze. The tool enforces automatically whenever feasible consistency rules and relationships, but there are a lot of use cases where a deferred validation of the consistency is required. For example, this might be the case if project artifacts have relationships which are created incrementally (e.g. requirement allocation, safety integrity level assignment), if models are updated using an import or during compare/merge within teams, if projects have been migrated from previous tool versions, and so on.
For this purpose the tool supports two features to validate and indicate that project data is consistent:
The definition and checking of constraints as a set of customizable rules (see Project Validation and Definition and management of constraints.
Built-in checks that report (potential) inconsistencies in the models. The most important ones are the failure rate computation checks and the check for issues of project migration.
All problems are reported into the Problems View, which is available for each project in the workspace. This view contains problem markers that allow a convenient navigation to the elements in question. Moreover, all reported problems can be exported from that view into a report.
Projects can be validated against a set of predefined dynamic constraints. The validation is started by selecting one or more elements in one or multiple projects and using the "Validate" tool from the main toolbar. In addition, a scoped validation can also be performed for parts of a whole project only - in order to do that you can select the "Validate" action in the context menu of any of the project's sub-folders, models or even elements.
The "Validation" view is opened at the beginning of any validation. The validation is "executed modally", that means a dialog blocks any user input while the validation is running. Depending on the selected projects or scopes, the size of each project and the number of constraints to be applied the validation may take a while. A progress indicator will be shown for your convenience.
Once the validation is completed, all issues which have been found will be listed in the "Validation" view, grouped by scope and constraints. Results are reported as Passed (OK) or as Failed - the later according to the severity of the problems as Errors, Warnings or Information. The number of passed and failed elements are highlighted in the top of the view.
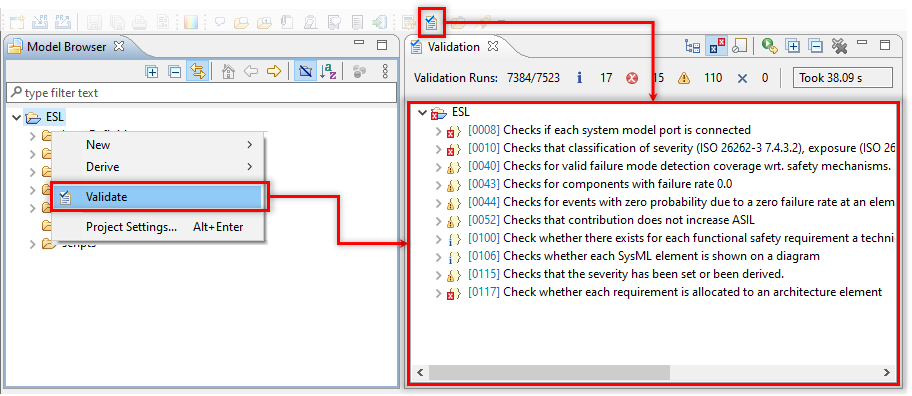
For each failure a short informative description, the Problem ID and optionally the location of the concerned model element is given. A number of filters are available in the view toolbar to reduce the visible elements to certain types. Double-clicking on a failure entry in the view will open the editor for the concerned model element and mark the erroneous element in the editor, choosing "Show in model browser" from it's context menu will reveal the element in the browser view. The user may take care of the problem and re-validate the project by using the revalidate tool directly in the "Validation" view - all issues which have been solved will disappear from the list after the revalidation.
There are more options on root scope nodes in the tree. The user can navigate to the project constraints or open the project specific "Problem" view. In order to avoid mixing error messages from different projects, a separate problem view will be used for each project. Error markers will stay attached to the model elements as long as the related error message is displayed in the Problem view. You can remove them by resolving the indicated problem and re-validating the project. All problems found during such a re-validating are indicated by a yellow background color. On the other side, problems found during a previous validation which have not been re-validated in the last validation run are indicated by a white background color (this may happen e.g. if you make a re-validation only for a selected package of the overall project). Note, you can also delete an error message (or all error messages) from the Problems view by clicking on one or the delete-buttons on the right-top corner of the problem view.
The validation of medini analyze projects is highly customizable. You can
select which constraints shall be applied
select the severity of a constraint
modify the error message itself
modify the full constraint
specify when the constraint shall be validated
define additional constraints
All these tasks can be performed in the "Dynamic Constraints" section of the medini analyze project settings (see Project Settings).
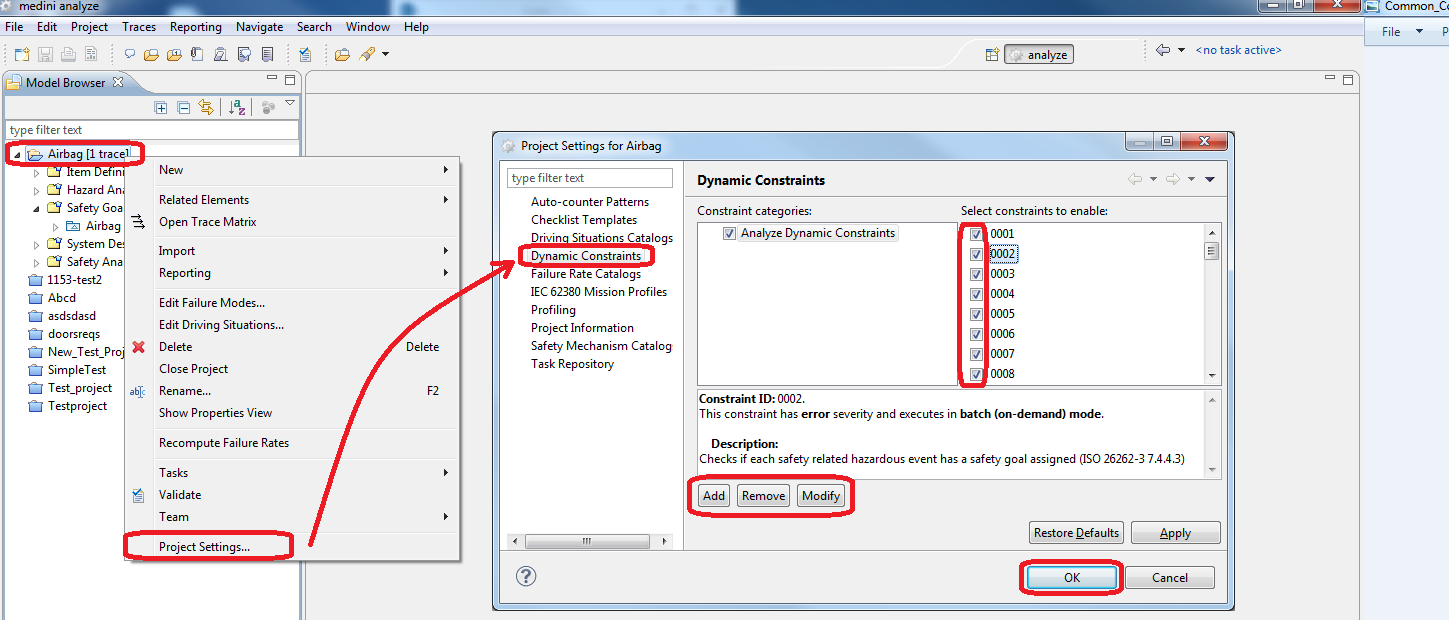
You can browse through the list of available constraints. For each constraint the severity is shown together with a more detailed description of the constraint. Using the check-boxes you can select which constraints shall be applied. Moreover, with "Remove" a selected constraint may be completely removed from medini analyze.
When clicking on "Modify" a dedicated constraint editor for the selected constraint will open. Here you may adapt the constraints according to your needs.
Please note constraints are all specified using the language OCL (Object Constraint Language). Only users who have sufficient knowledge and experience in using OCL and in the medini analyze meta-models should modify the constraint target class and the OCL expression of a constraint in the constraint editor!
In the lower part of the constraint editor you may choose the severity of the constraint (INFO, WARNING, or ERROR) and also modify the description, the ID of the constraint and the error message itself. The pattern "{0}" in the message specification serves as a placeholder for the name of the erroneous element.
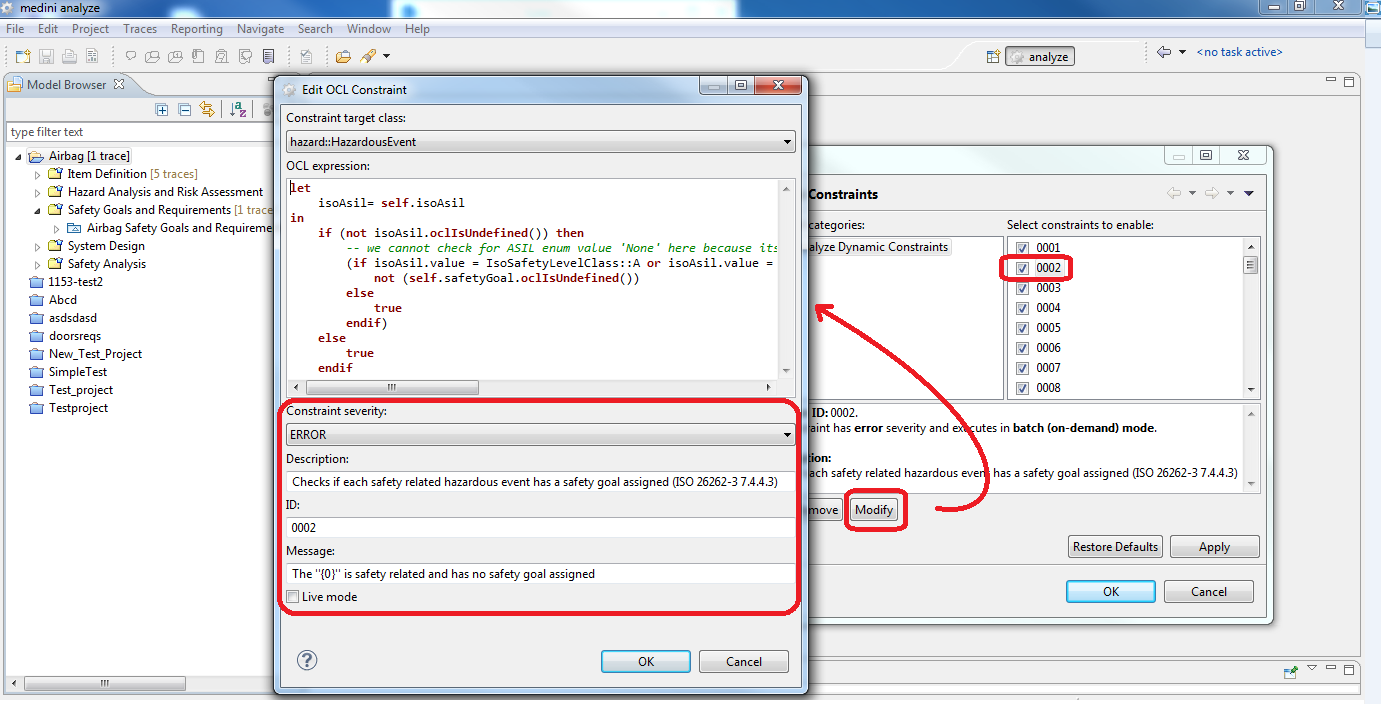
With the check-box "Live mode" you can decide at which point in time the constraint shall be validated: If live mode is selected the constraint will be checked continuously on the fly during all editing operations concerning the model element. If live mode is deselected, the validation of the constraint will only performed on request. For performance reasons it is recommended to keep the number of constraints which are evaluated in live mode small or even zero (default).