


Checklists provide a flexible means to track activities in a medini project. Moreover, they can be highly customized using the profile mechanism. To create a checklist, do the following:
Select a package in the Model Browser and choose New > Checklist... from the context menu.
In the dialog, add a name for the checklist. You can then choose a checklist template (see Checklist Template Definition).
If you use a template, the checklist editor contains the elements defined in the template and shows any predefined columns
If you do not select a template, the editor is initially empty.
Whether or not you use a template, you can edit all entries after creating the checklist.
To finish creating the new checklist, click .
The checklist editor opens.
You can now edit your checklist. Use the button area on the right side to manipulate the structure of the checklist itself. For example, you can add new rows or change the order and hierarchy of entries. You can also drag and drop entries from one checklist to another inside the same project.
With the checklist editor, you can walk through the list of all checks or to-do tasks and add information, such as any related artifacts or the date of the check. The following default columns are available for data input:
Checked: Check this checkbox to indicate that the selected check was performed or the selected task was completed. The current date and time of the check is inserted into the corresponding cell in the Date of checkcolumn.
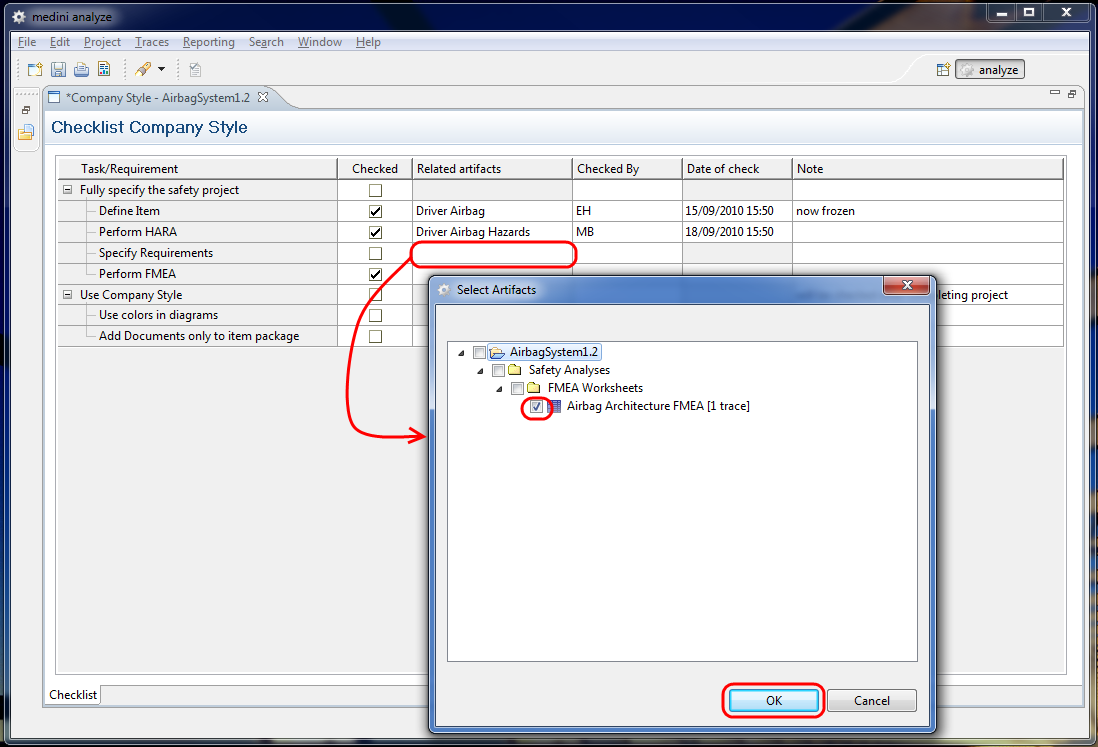
Related Artifacts: When you double-click this field, an artifact selection dialog is opened. It shows all model elements in the current project which match the type description for this entry in the checklist template. If the checklist is not based on a template, all model elements are shown. Select one or more artifacts which are related to the current task or requirement as shown in the screenshot below. The names of all selected artifacts are the shown in the table.
To highlight all related artifacts in the Model Browser, right-click in this cell and select Show Element(s) in Browser.
Checked By: Enter the name or other identifier of the user who performed the task or checked the fulfillment of the requirement.
Note: Add any additional information or comments about the current entry here.
If additional checklist properties were defined by the profiling mechanism (see Profiling mechanism), corresponding columns are shown in the checklist. You can also add, hide, and sort columns, as described in General aspects for table editors.
As with all other table-based data, you can generate reports for checklists. For more details, see Reporting and Document Generation.
Checklists can become quite populated. To help organize checklist entries, you can create headlines that span all columns.
You create a headline from an existing item in your checklist. When the headline is created, all checklist item properties except name and profile properties are cleared. (To keep this additional information, you can enter it in the profile properties.)
Creating a headline is a toggle action and not permanent. When you toggle back, the individual cells, such as Checked, reappear, but without the information that was there before you created the headline.
Note that headlines appear in the model browser with the headline icon ( ). Headlines are not included in counts of
checked entries.
). Headlines are not included in counts of
checked entries.
To create a headline row, complete these steps:
In a medini analyze project, open a checklist.
In the checklist, select a row where you want the headline and click the headline button.
Click OK in the dialog to create the headline.
A headline row appears where the checklist entry was, with the name of the checklist entry.
Repeat step 2 to toggle back to a checklist row.