


Solve process settings are individual solving configurations that you set up prior to initiating solves. Settings include specifying a synchronous or background solve, as well as solve manager machine and queue designations for background configurations. Using the Solve Process Settings dialog box, you can:
Add a remote solve process
Specify a default solve process
Modify existing solve process settings
Delete an existing solve process
Rename a solve process
Solve Process Settings
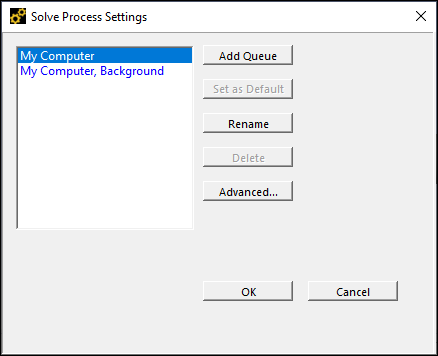
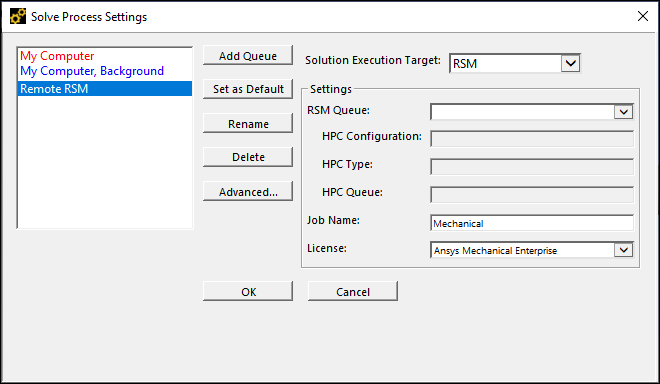
You access the Solve Process Settings dialog by selecting the option from the File tab or the option on the bottom right corner of the Solve group of Model Context tab. A dialog similar to the displays as illustrated below based. The left pane displays the available solver options.
Based on your selected solver option (My Computer, etc.), you can use the following options:
: Specify a remote handler. This option displays an entry pane wherein you enter a name for your remote solution handler.
: Specifies the solve process as default across Workbench sessions.
: Renames the selected solve handler. You can rename any handler.
: Deletes the selected solve process. Only handlers that you create can be deleted.
: Displays the Advanced Properties dialog box associated with either My Computer, My Computer, Background, or specified Remote handler (see below).
Requirement: Each solve handle must have a unique name.
Specifying Solve Handlers
The left pane of the dialog displays the available solver handlers. These are the options available in the Solve Handler drop-down menu from the Home tab. This portion of the dialog contains the options My Computer (default) and My Computer, Background. When you create remote solution option, it is also displayed in the menu, as illustrated below. Solver handler is described below.
- My Computer
The setting My Computer is the default setting. When using this setting, the application solves and finalizes the solution on the local computer in the current Workbench session.
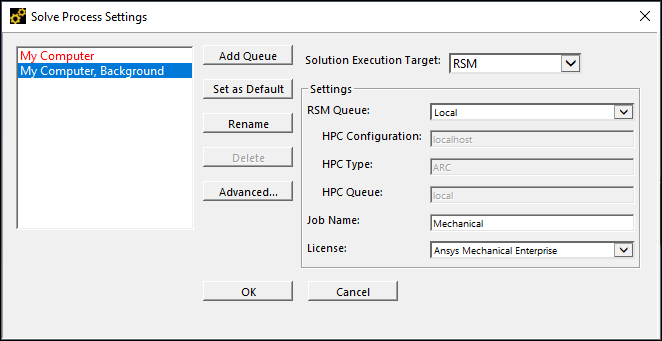
- My Computer, Background
Selecting this setting, solves on the local machine but is not restricted to finalizing in a particular Workbench session. You need more than one solver license to use this setting. However, you can perform Rigid Dynamics and Explicit Dynamics analyses with one solver license by selecting the Use Shared License, if possible option on the Advanced Properties dialog box. Although solved locally, the Solution Execution Target menu is set to .
- Remote
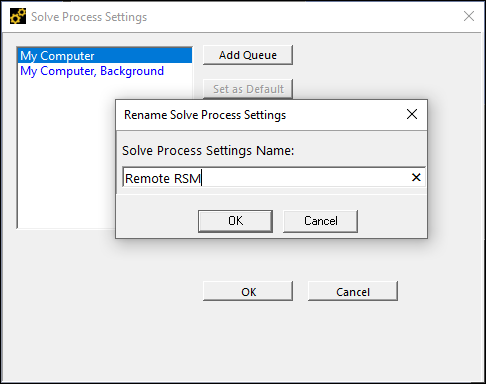
To create a solve handler for a remote location, you need to create a new handler and specify the required properties.
Select the option, you can create and name a remote solve handler. For this example, the handler is named to be used with RSM.
Provided by the Solution Execution Target menu, shown below, there are two types of remote solve handlers that are supported: (Ansys Remote Solve Manager) and (see Ansys HPC Platform Services Guide). For this example, is specified for the "Remote RSM" handler created in the last step.
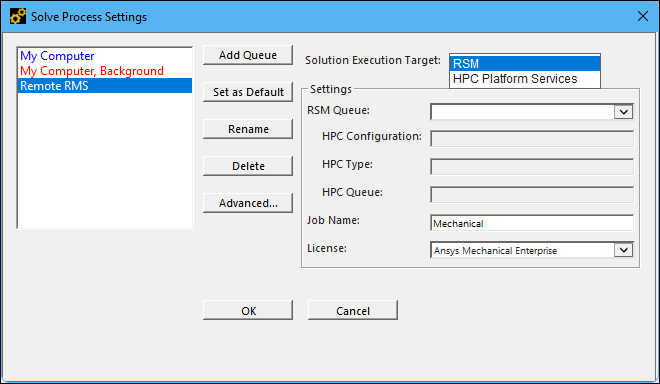
Now, based on the target you select, you specify the settings, including:
Ansys Remote Solve Manager Ansys HPC Platform Services To create a RSM handler, define the following: RSM Queue: This field provides a drop-down menu of all available queues configured using the RSM Configuration tool. If RSM queues are not available, use the RSM Configuration tool to check your RSM configurations.
HPC Configuration: Read-only field that reports the name of the RSM configuration with which the selected RSM queue is associated.
HPC Type: Read-only field that reports the type of HPC resource to which the job will be submitted.
HPC Queue: Read-only field that displays the name of the HPC-side queue with which the RSM queue is associated.
Job Name[a]: Specify the name to be used to identify the job. For RSM, this is the job on the HPC resource. See the Remote Solve Manager documentation for more details.
To create a HPS handler, you need to specify a Url to identify the location on a remote machine. You can verify your connection to the remote machine using the Test Connection option. As necessary, specifies the name of a valid Ansys product license to be used for the solution on the server.
This handler requires you to specify and Authenticate your network User Name.Interface Example
Interface Example

[a] Your Job Name must adhere to the following naming requirements:
Acceptable naming characters include alphanumeric characters (letter or numbers) as well as the following characters: ~#%^&,'()-_+=/<>.
The job name must begin with a letter or a number (i.e. an alphanumeric character).
The maximum length of a job name is 16 characters.
Note:You must specify a valid Ansys product license because a separate instance of an Ansys application is being used.
The license from your current Ansys Workbench client session cannot be accessed from the remote Ansys application executable.
Note:
For the built-in solve process, no settings are required or available.
The solve process in red indicates that the process is selected as the default solve process and persists across Workbench sessions.
RSM Queue fields are required for all Remote background configurations.
When you submit a job to a Remote Queue and you have not defined corresponding credentials in the Accounts section of the RSM Configuration, you are prompted with the Remote Solve Cache Credentials dialog box. Enter your User Name and Password to continue.
See the Submitting Solutions to Remote Solve Manager section of the Workbench User's Guide for additional information for using the Remote Solve Manager during your solution processes.
Limitation: If you have two sessions of Mechanical open and you solve one session using either the or option, the second session will automatically use this same setting if you execute a solution, regardless of the option selected in the handler menu. That is, if you solve session one with the option and then solve the second session using the option, the second session solves using the background option. You can clear the second session’s solution and resolve to correct the situation.
Advanced Properties
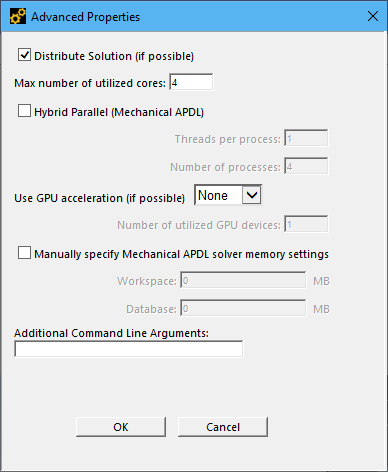
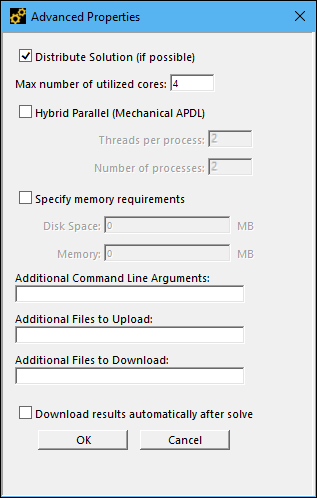
Selecting the button on the Solve Process Settings dialog displays one of the following Advanced Properties dialog boxes. The available options are based on whether you select My Computer, My Computer, Background, or Remote.
| My Computer | My Computer, Background/Remote RSM | Remote HPS |
 |
 |
 |
The Advanced Properties are described below.
| Property | Description |
|
Distribute Solution (if possible) |
This option is selected by default. It enables and disables the ability for a distributed solution. Note: This option supports the Mechanical APDL Solver and Explicit Dynamics Solver only. For specific support specifications for the Mechanical APDL Solver, see the Supported Analysis Types and Features section of the Mechanical APDL Parallel Processing Guide for more information. Important: If you solve a Modal system using this setting, and you have linked the analysis to either a Harmonic Response, Response Spectrum, or a Random Vibration, or a follow on Mechanical APDL (turn on the Distributed property in Project Schematic), these downstream systems must also have this setting selected in order to properly solve. The application alerts you to this situation with a warning message. |
|
Max number of utilized cores |
Sets the number of cores to use during the solution. The default is value is
For more information on parallel processing in Mechanical APDL, see HPC Licensing in the Parallel Processing Guide. For analyses using the Explicit Dynamic solver, this setting is used to determine the number of cores unless this has been specified in the Additional Command Line Arguments. Note:
|
|
Hybrid Parallel (Mechanical APDL) Important: Not supported for Structural Optimization analyses. |
This option is available when the Distributed Solution check box is selected (default setting). This capability reduces memory usage, more effectively uses hardware, and improves the scalability of large models with high element load balance ratios. For more information, see Chapter 5: Using Hybrid Parallel Processing (SMP + DMP) of the Mechanical APDL Parallel Processing Guide. Even if this option is not checked and Distributed Solution is selected, the application may automatically choose to use the Hybrid Parallel ("auto-hybrid"). Note that when the application performs an auto-hybrid solution, the Solution Statistics page displays the solution process as "Automatic Hybrid" instead of "Hybrid Parallel." The Hybrid Parallel process includes two associated settings:
Note: There are instances when the Hybrid Parallel feature may not use the entire number of requested cores. In this case, the remaining cores are idle for the duration of the calculation. |
|
Use GPU Acceleration (if possible) |
Provides access to the Graphics Processing Unit (GPU) acceleration capability offered by the Mechanical APDL solver. It supports the NVIDIA and AMD acceleration cards. To enable the feature, select or from the drop-down menu. HPC Platform Services (HPS) does not support this option. See the Requirements for the GPU Accelerator in Mechanical APDL section in the Windows and Linux installation guides for specific card requirements. |
|
Number of utilized GPU devices |
Specifies the number of GPU accelerator devices to be used when the Use GPU acceleration property is set to use a valid accelerator type. This value can be an integer in the range of 1 to 20. The default value is 1. For additional information, see the GPU Accelerator Capability section of the Mechanical APDL Parallel Processing Guide. |
|
Manually specify Mechanical APDL solver memory settings |
Helps you specify the amount of system memory, in MB, used for the Ansys application workspace and database. Note: This setting can also be used to specify memory use for the ABAQUS and Samcef solvers. For more information, see Memory Tuning the Samcef Solver and Memory Tuning the ABAQUS Solver. This setting is not valid when using the LS-DYNA solver. |
|
Specify memory requirements (HPS Only) |
Specify the amount of memory and disk space needed to run the solution. See the computational Requirements topic in the Defining Tasks section of the HPC Platform Services documentation for more information. |
|
Additional Command Line Arguments |
Specifies arguments that you would normally enter into a command line input, for example, -machine option for a distributed solution. This setting is ignored for non-remote and non-background LS-DYNA calculation. Important: For Structural Optimization analyses, entries for this property only supports the or settings of the Solution Execution Target property. |
|
Additional Files to Upload |
This field enables you to specify desired files to upload into the Remote Machine from the Solution Directory of your local machine. Use a semi-colon to separate file names. Use the asterisk character (*) as a wild card to automatically select multiple files for the given criterion. For example, you can include certain files based on extension, such as *.PNG, and/or files with a specific string in the name. |
|
Additional Files to Download |
This field enables you to specify desired files to download from the Remote Machine to the Solution Directory of your local machine. Use a semi-colon to separate file names. Use the asterisk character (*) as a wild card to automatically select multiple files for the given criterion. For example, you can include certain files based on extension, such as *.PNG, and/or files with a specific string in the name. |
|
Download results automatically after solve |
Selecting this option instructs the application to automatically download the results once the HPS solution is complete. Ansys recommends that you keep the Mechanical application open until the download finishes. For linked systems that you can submit synchronously (see Using HPC Platform Services to Solve Linked Analyses), the download of the results happens independently of the submission. As a result, the downstream system’s solution does not need to wait for a completed download of the upstream results, unlike the solution process for the synchronous mode that is available for RSM. |
|
Custom Executable Name (with path) |
Specifies a custom Ansys application solver executable name and path. This executable will be used for the Ansys application solve rather than using the default. Note: Depending on the requirements of your operating system, you may need to specify the path in quotations. |
|
Manually specify Linux settings |
Enter a valid User Name and Working Folder to override the RSM compute server proxy settings. Note:
|
|
Use Shared License, if possible |
Enables the use of a Shared License Note:
|
|
License Queuing: Wait for Available License |
Instruct the Mechanical APDL solver to wait for an available license when solving remotely via RSM. |
|
Solve in synchronous mode (Mechanical APDL solver only) |
Select to mimic the default My Computer behavior while leveraging the computation power of a remote machine. See this section from the Mechanical APDL help for more information: HPC Licensing in the Parallel Processing Guide. For Explicit Dynamics analyses, this setting is used to determine the number of processors unless this has been specified in the Additional Command Line Arguments. Note:
Clear the check box to deliberately download results from a remote machine (by issuing on a right-mouse click the Solution object). This precludes the solution of linked analyses or multiple convergence loops automatically on a single click of the button. This is the default and enables you to close the Mechanical editor or solve an unrelated analysis. See the Understanding Solving help section for additional information. |
|
|
Selecting the button commits all changes in the Solve Process Settings dialog box and closes the dialog box. You must choose OK for the Solve Process Setting configurations to be used when you initiate the solve. |
|
|
Selecting the button closes the dialog box and ignores all changes. |