


Overview
The Keyframe animation feature enables you to string together snapshots of your model in the Geometry window to create an animation. Each Keyframe is a Start and End point that the application then links together by drawing Subframes (by default 30 Subframes) to create the animation. The application interpolates the transition from frame to frame to create a smooth animation. For example, you can create an animation of your model rotating.
Application
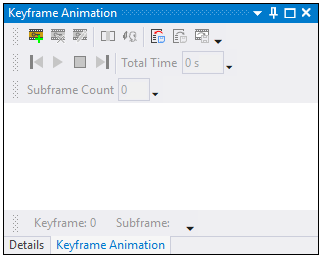
You create Keyframes using the Keyframe Animation Views window. To display (or close) the window, select the Keyframe Animation option from the Tools group on the Home tab. The window, as shown here, provides the interface for using the feature.
Create a Keyframe
To create Keyframes, you need to first position your model as desired in the Geometry window. Then, select the button in the Keyframe Animation window. A new entry displays in the window. The application assigns a numerical value to each Keyframe (Keyframe 0, Keyframe1, etc.). Each Keyframe is a snapshot of the model.
Once you define a Keyframe animation in the window, you can double-click the Keyframe to view its position.
Modify a Keyframe
To change an existing Keyframe, select the Keyframe in the window, position your model as desired, and select the button.
Delete a Keyframe
Select the Keyframe in the window and click the button.
Save/Load/Export Animations
The window provides options to Save your defined Keyframes as an XML file, to load a saved XML files of Keyframes, and an export option that enables you to save your Keyframe animation as a video file (AVI, MP4, WMV, or GIF). Any and specifications apply to exported files types except the GIF format.
Insert Keyframe
Insert a new keyframe before the currently selected keyframe.
Apply Keyframe
Set the graphics window's camera settings to the currently selected keyframe's camera settings.
Note:
When exporting your animation as a video file, make sure to keep the Mechanical application window is in front of any other desktop windows until the export process is complete. Opening other windows in front of the application window before the export process is complete could include those windows in the video capture.
The GIF file format does not support the Workbench Gradient settings (the default setting). For this file format, the application automatically changes the Workbench appearance setting to Uniform. As a result, exported GIF files have a plain background compared to exported videos.
Frame Animation Control Options and Displays
The window provides the following options/displays:
: Start or Resume the animation.
: Pause current animation
: Stop the animation
/: These options move the animation backwards or forwards one frame at a time.
: Specify the desired number of subframes (0 to 200) between each Keyframe. Subframes define the number of interpolations performed between each frame. This affects the smoothness or lack thereof of the animation. This setting applies to exported animations.
: Specify a desired amount of time for your animation. This property defines presentation speed. This setting applies to exported animations.
: Read-only field that displays the Keyframe being displayed.
: Read-only field that displays the subframes (per Subframe Count property) as the animation progresses. You can use the Previous/Next Frame options to view specific frames/subframes. Otherwise these fields automatically cycle through the animation.