


A context menu is displayed when you right click in the list view. The context menu has the following options:
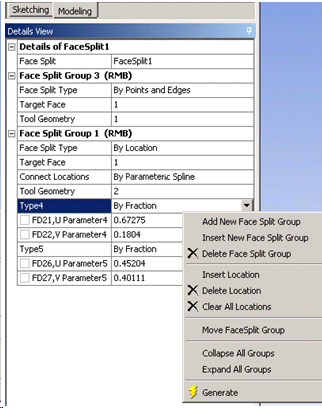
Add New Face Split Group: Add a new Face Split Group at the bottom.
Insert New Face Split Group: Inserts a new Face Split Group just above the currently selected group.
Delete Face Split Group: Deletes the selected face split group. The face split feature must have at least one group. So, the delete option is available only if the total number of groups is more than one.
Move Face Split Group: The feature is generated sequentially starting from the first face split group to the last one. Therefore the results could change if the order of groups is changed. It has the following options:
To Top: This will move the current selected group to the very top.
Up: Moves the selected group up by one position.
Down: Moves the selected group down by one position.
To Bottom: Moves the selected group to the very bottom.
Clear All Locations: This option is available only when face split type is "By Location" and number of tool geometry is more than one. It clears all the split locations of the current face split group.
Insert Location: This option is available only while context menu is displayed by clicking on a split location property. You can insert split location before/after the current split location.
Delete Location: This option is available only while context menu is displayed by clicking on a split location property. It deletes the current split location.
Expand All Groups: Expands all the groups. Shows properties belonging to all groups.
Collapse All Groups: Collapses all the groups. Hides properties belonging to all groups. Only the group headers are visible.
Other Face Split topics: