The Microsoft Office Excel system launches Microsoft Office Excel 2013 or 2016, allowing you to use it as a calculator in Workbench This feature exposes Excel ranges as input and output parameters to Workbench. You can use these ranges to create design points and Design Exploration studies.
Note:
The Excel add-in is included with Workbench. It does not require DesignXplorer or any other specific Ansys product, but it must connect to a locally installed seat of Microsoft Excel (purchased separately).
In the Trust Center options for Excel, the File Block Settings page specifies the older versions of Excel files to block. If Workbench is unable to open an Excel file formatted in an older version, on the File Block Settings page, clear the check boxes for the older Excel versions that you use and click . After you close and reopen Workbench, it should be able to open Excel files formatted in these older versions.
Related topics:
To be exposed as parameters in Workbench, the ranges must be named in Excel. The names are filtered during the addition of the Excel file to the project; only the ranges matching the prefix defined by the Named Range Key property in the Properties pane of the Analysis cell are made visible in Workbench.
Note: By default, no filtering prefix is defined at either the Workbench or the project level. You set a filter by either of the following methods:
Set a default prefix that will be used for all new projects (see Microsoft Office Excel).
Set a prefix at the project level by entering it in the Named Range Key property in the Properties pane of the Microsoft Office Excel Analysis cell.
To name a range in Excel:
Open the file in the Microsoft Office Excel application.
Right-click a cell and select from the context menu.
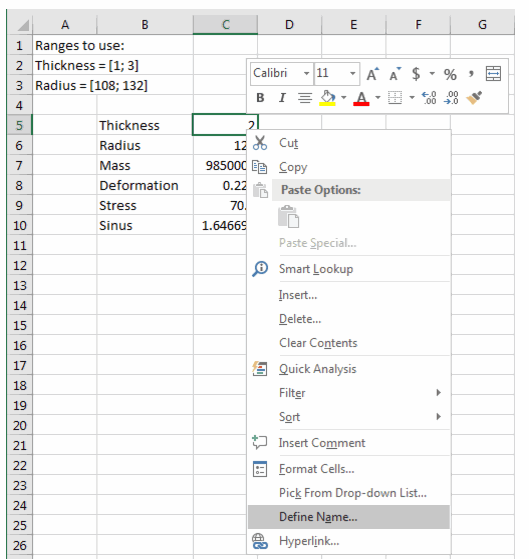
Enter the name.
To review and modify all the defined names in Excel, select > .
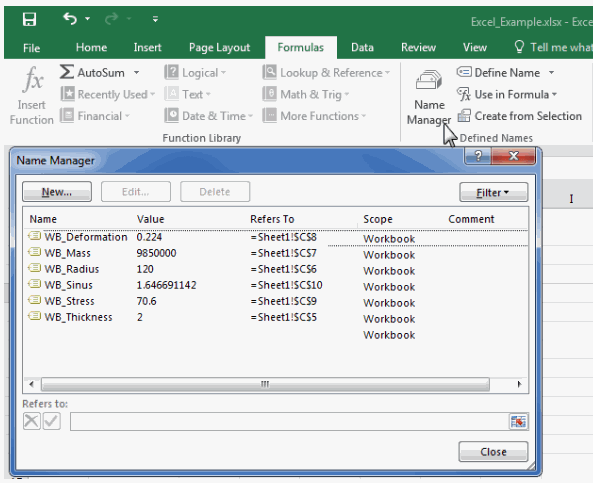
A named range can contain several cells. Workbench expects the named ranges to contain either one or two cells, the first cell being reserved for the value and the second cell being reserved for the unit string, if any. If a named range contains more than two cells, it is ignored.
Note: If you added the file to the Excel system in Workbench before naming the ranges, or if you want to edit the names of the ranges after the addition of the file, you can right-click the Analysis component or the file node in the Outline and select . This opens the Excel file used by Workbench in Excel.
All changes performed in Excel impact the state of the data in Workbench and invalidate the results; make sure you save your changes and reload the file afterwards (when editing the Analysis cell, right-click the file node and select ).
Complete the following procedure to set up Excel as a calculator in Workbench.
To add a file and set macro property usage:
To add a Microsoft Office Excel component system, drag the system from the Toolbox to the Project Schematic or double-click the system in the Toolbox.
Right-click the Analysis cell and select to the context menu.
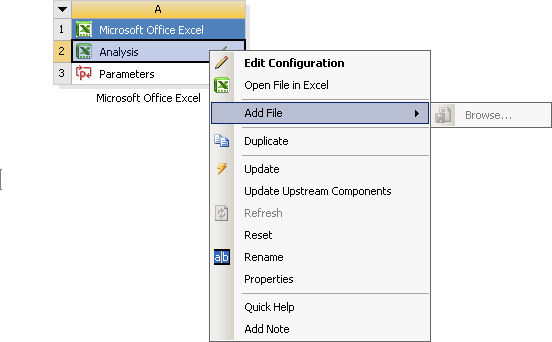
Browse to the Excel file that you have prepared.
Select the file and click .
To review the list of named ranges retrieved from the Excel file, right-click the Analysis cell and select from the context menu.
For each listed named range, select the check boxes in the Input or Output column to publish the range as an input parameter or an output parameter in the Workbench project.
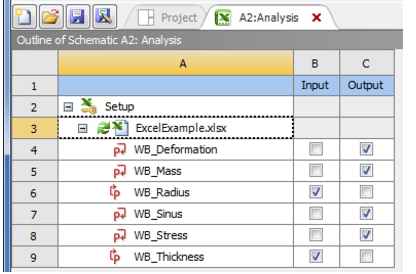
If the calculation in Excel requires the execution of a macro:
In the Outline pane, select the added file.
In the Properties pane, select the Use a Macro check box.
In the Macro Name field, enter the name of the macro.
Note: If a button is used to start the calculation and you do not know the name of the macro associated with it, right-click the button and select to discover the name to use.
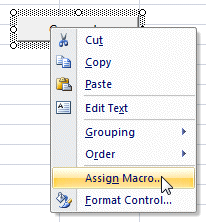
Switch to the Project tab.
On the Project Schematic, the Microsoft Office Excel system is linked to the Parameter Set bar.
The project is ready to create design points and Design Exploration studies.
Units are handled by the Excel system. A valid Workbench unit string must be used and included in the named range.
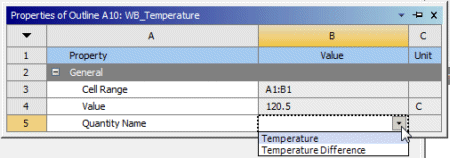
For instance, if an input parameter is a length in millimeters, you can name WB_Length the range A1:B1 where the cell A1 contains the length value (for example, 120.5) and the cell B1 contains the unit string (mm). When selecting the WB_Length range in the Outline pane, the Properties pane looks like the following image. In this case, the Quantity Name is automatically identified as a Length.

If there are several possible Quantity Names for the same unit string, you have to select the Quantity Name in the properties of the range for the unit conversion to be performed as expected. For instance, if A1:B1 was actually a temperature in degree Celsius, the Quantity Name could be a Temperature or a Temperature Difference.
For detailed information on working with units in Workbench, see Configuring Units in Workbench
When the Excel file is added to the Analysis cell of the Microsoft Office Excel system, it is copied inside the Workbench project files. Any modification made to the original file is not seen by Workbench except if you delete and add the file again.
To modify the file copied in the Workbench project files, right-click the Analysis cell, or the file node in the Outline pane, and select . Once modifications are done, save the file. The state of the file in Workbench changes to Refresh Required, which indicates that data is not synchronized anymore. Results such as design points and Design Exploration systems in the Workbench project are outdated. Refresh the project to synchronize all the pieces of the project.
If a change in the Excel file was not detected by Workbench, you can force a reload of the file (right-click the file node and select ).
It is not necessary to close the workbook or the Excel application to proceed with design points or Design Exploration updates. Interaction with the Excel application are frozen, but you can see the performed calculations.


