


Another option for connecting nodes is to use the Connect nodes dialog box.
Optionally, to restrict the number of nodes available in the dialog box, select the relevant nodes in the Scenery pane.
Open the Connect nodes dialog box using one of the following options:
From the menu bar, select > .
On the toolbar, click
 .
.Right-click the white space on the Scenery pane and select from the context menu.
The dialog box is displayed.
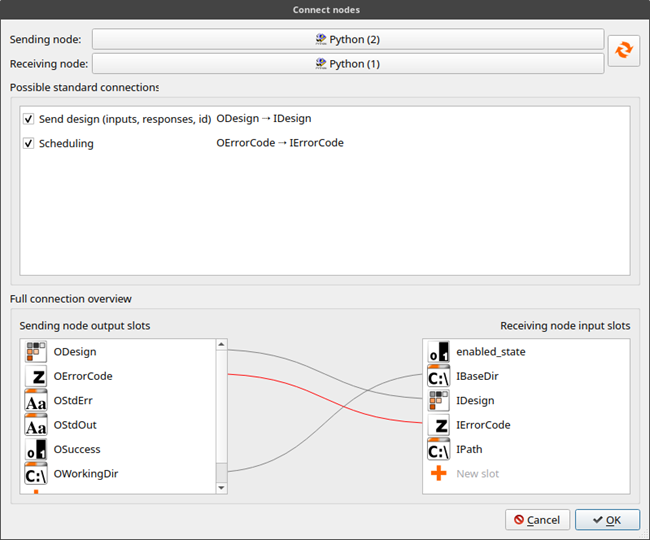
The sending node and receiving node are set automatically depending on what nodes you have selected or are available on the Scenery pane. To change one or both of them, click the button next to the Sending node or Receiving node text and select a different node.
The Select node dialog box contains all previously selected systems and nodes in a hierarchical order. If less than two nodes have been previously selected, all available nodes are shown.
To swap sending and receiving nodes, click
 .
.The Possible standard connections field displays possible connections for the current sending and receiving node combination. To establish or remove a standard connection, select or clear the corresponding check box.
The Full connection overview section lists all output slots of the sending node and all input slots of the receiving node. It also shows the connections between input and output slots using lines. You can do the following in this view:
To add a connection, drag and drop single slots from left to right or vice versa.
Data types of connected slots must match, so once you select a slot, suitable connections are highlighted green. Multiple dynamic slots can be dragged to the New slot entry of the opposing node, establishing multiple connections at once.
Use the following context menu items by right-clicking in the Sending node output slots or Receiving node input slots fields.
: Show or hide all standard slots. Only dynamic slots are shown if you deselect this option.
> : Select standard and dynamic slots
> : Select only dynamic slots.
: Connect selected dynamic slots to new slots.
Selected dynamic slots are removed.
Select one or more connection lines:
Click a single line to select it.
To select multiple connections, press Ctrl and click multiple lines.
To select all connections, press Ctrl+A or right-click a line and select from the context menu.
To remove selected connections, press Delete or right-click the selection and select from the context menu.
To save the changes and close the dialog box, click .