


This node allows you to use Lumerical files (.ldev, .fsp, .icp, .lms, .lsf) within an optiSLang workflow. Open a file in the node and the parameters and results are displayed in the editor.
Lumerical's DEVICE Suite of component-level simulation products use multiphysics-style simulation workflows to model optical, electrical and thermal effects at the physical level. This custom integration of Lumerical in optiSLang provides an easy and convenient way of creating automated workflows involving not only various Lumerical solvers but also other tools that are available in optiSLang and also perform variation analysis and/or optimization of such workflows.
Setup
When the integration is used for the first time, the local Lumerical installation path will be automatically defined (the latest one installed will be selected if you have more than one version of Lumerical installed), but you are able to manually enter a path pointing to the bin folder of the Lumerical installation (e.g., C:\Program Files\Lumerical\v232\bin).
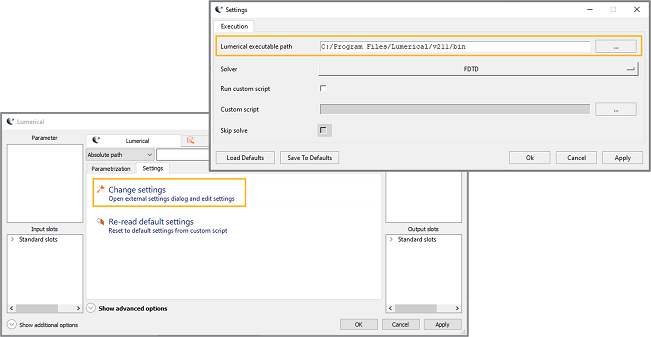
It is important that the Lumerical project is solved once and saved (in Analysis Mode ) before it can be used in optiSLang. If the project is not solved and no results are available, no results are shown in optiSLang.
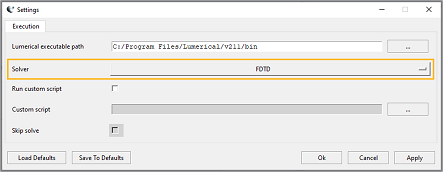
You must select the correct solver in the Settings dialog box before selecting a project file. The selection of the solver is important because the parameters and the results must be read from the correct objects which depend on the type of solver. It is possible that a project has more than a single solver and it is necessary to select the solver to be run.
Important: To apply the selected settings, click in the Settings dialog box, then click or in the Lumerical node window to apply the new settings to the current node.

Parameters and Responses
The optiSLang setting Customization:Customized integrations use tree view controls whether the parameters and responses are presented as a list or a tree structure. To use the setting, from the menu bar select > . After changing the setting, restart optiSLang.
The integration can access all the scalar model (or Root Element in case of the INTERCONNECT solver) parameters and results available in the selected project file. All of these values are available to be used inside optiSLang. Complex values are not supported in optiSLang, so any complex parameters or results must be split into real and imaginary parts and can be used separately.
For the solvers under the Finite Element IDE (CHARGE, DGTD, FEEM and HEAT), except the model results, the scalar results from the available monitors are also available as outputs in optiSLang.
Scripting
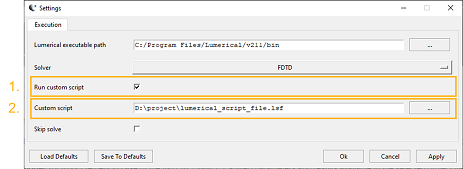
You can run a custom Lumerical script file (.lsf) after every simulation run. This feature is only available if the Lumerical script file (.lsf) is not used as an input file in the main integration dialog box. This feature can be used to perform postprocessing of results from the simulation using Lumerical's API functions. This allows you to transfer non-scalar values (or complex values as a whole) from one Lumerical node to another and even to other tools inside optiSLang by saving them into files.
To run a custom script file, select the check box in the Settings dialog box and select the required script file using the Custom script setting.
The integration can only handle custom script files with the following requirements. The script should have the following three functions defined, irrespective of whether or not they are used:
listScriptParameters(): A function that returns a struct with parameters used in the script with their reference values. An example for this function:
# returns a list of parameters with its reference values this
                                script uses function listScriptParameters(){ return {param_1_name:
                                param_1_value, param_2_name: param_2_value}; }
listScriptResults(): A function that returns a struct with results used in the script with their reference values. An example for this function:
# returns a list of results with its reference values this
                                script produces function listScriptResults(){ return {result_1_name:
                                result_1_value, result_2_name: result_2_value}; }
computeScriptResults(parameters): A function that computes the script results with script parameters. This function should always take in only one struct argument (parameters) irrespective of whether or not it is used inside the function. An example for this function:
# compute and returns a new list of results function
                                computeScriptResults(parameters){ # perform the required
                                computations result_1_value = parameters.param_1_name +
                                parameters.param_2_name; result_2_value = parameters.param_1_name -
                                parameters.param_2_name; return {result_1_name: result_1_value,
                                result_2_name: result_2_value}; }
Other than these three mandatory functions, the run script can have any number of other functions if required.
Scripting Example
The following simple example shows how to set up a custom script file with all required functions for direct usage. Copy the script and save it as an .lsf file. This file can then be used with the Custom script setting.
# Copyright Ansys Inc
##Prepare workspace
clear;
closeall;
clearfunctions;

## Declare Results
function listScriptResults(){
    return {'D': 0,'E': 0};
}

## Declare Parameters
function listScriptParameters(){
    A = 1; B = 2; C = 3;
    return {'A': A, 'B': B, 'C': C};
}

## optiSLang Calculate Results
function computeScriptResults(parameters){

A = parameters.A;
B = parameters.B;
C = parameters.C;

D = parameters.A+parameters.B+parameters.C;
E = parameters.A*parameters.B*parameters.C;
return {'D': D,'E': E};
}

parameters = listScriptParameters();
F = computeScriptResults(parameters);
Use Cases
The following table lists the supported use cases and how to set them up.
| Use Case | Setup |
|---|---|
| Project file by itself |
|
| Project file followed by a script file |
|
| Script file by itself |
|
| Script driven project file |
|


Settings
The node provides the following settings:
| Tab | Name | Default value | Description |
|---|---|---|---|
| Execution | Lumerical executable path | C:/Program Files/Lumerical/v232/bin | Path to the bin folder where the all solvers are placed |
| Solver | FDTD | Solver to run the simulation with | |
| Run custom script | False | When selected, enables the Custom script field | |
| Custom script | - | Custom script file to run | |
| Skip solver | False | When selected, only runs the custom script file and skips the solver |
Run Options
This node has general Run Options. The number of supported options is individual for each node.
Versions and Requirements
Operating System
Windows
Versions
See the Supported Integration Versions table.