Assemblies can be used in Ansys ICEM CFD to help organize data. An assembly is a collection of parts.
Note: It is important to note that an assembly is treated as a part with the syntax of ASSEMBLY / PART. The "/" character denotes an assembly. In as such, the base level assembly can contain entities, but this is not a recommended practice. Assemblies can contain other assemblies, denoted by the syntax ASSEMBLY1 / ASSEMBLY2 / PART, but it is recommended that assembly, sub-assembly, and part names be unique.
Assemblies with their constituent parts will appear in the Display tree as shown below.
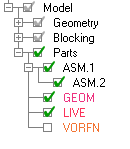
Note: Assembly names appear in black font, and part names appear in non-black colors. If a part color is set to white, a contrast background color will automatically appear in the Display Tree window to make the part names readable.
- Create Assembly
Assemblies can be created through the following ways:
Using the Create Part option and entering the syntax ASSEMBLY1 / PART1 as the Part name. Then entities can be selected to be added to PART1 in ASSEMBLY1.
Parts can also be dragged and dropped into assemblies through the Display Tree. Parts in an assembly can be moved into other assemblies, and entire assemblies can also be added to other assemblies.
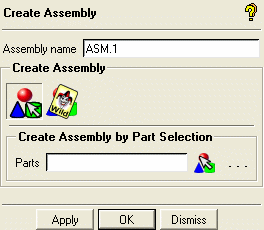
Selecting in the Parts Display Options menu will open the Create Assembly DEZ.
- Assembly name
Base level assembly that parts will be added to. If this assembly exists, the selected parts will be added to it. If the assembly does not exist, it will be created.
- Create Assembly by Part Selection
 This option allows you to select a set of parts to add to an assembly. Parts that are in existing assemblies can also be selected. These parts will be moved to the new base assembly. For example, if the Assembly name is defined as ASSEM2 and a part ASSEM1/PART is selected, the new part will be moved directly under ASSEM2 (named ASSEM2/PART).
- Create Assembly by Wildcard
 This option allows you to select a set of existing parts to add to an assembly. The Wildcard text to search will be used to compare part names and used to define which parts should be moved to the defined Assembly name. For example, if the parts BOX_FRONT, BOX_BACK, BOX_SIDE, INLET, OUTLET exist in a model, then entering the assembly name BOX_ASSEM and entering the Wildcard text BOX will create an assembly BOX_ASSEM containing the three parts BOX_FRONT, BOX_BACK, and BOX_SIDE.
- Remove Assembly
Selecting in the Parts Display Options menu will remove the assembly structure, flattening the Parts tree hierarchy renaming the parts to include the assembly name.
For example, if an assembly ASSEM contains parts PART1, PART2, and PART 3, then selecting will cause the tree to show parts named ASSEM#PART1, ASSEM#PART2, and ASSEM#PART3.
- Assembly Display Options
Right-click any assembly in the Display tree to view the Assembly Display options.
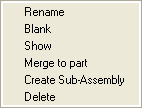
- Rename
allows you to rename the selected assembly.
- Blank
makes the selected assembly invisible.
- Show
displays the selected assembly.
- Merge to part
merges the constituent parts with the selected assembly.
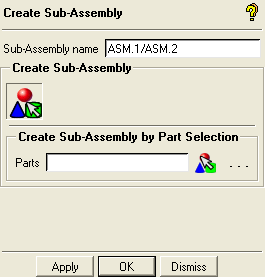
- Create Sub-Assembly
allows you to create a sub-assembly within an existing assembly from a list of selected parts. Selecting the Create Sub-Assembly option will open the Create Sub-Assembly DEZ.
- Sub-Assembly name
specifies the sub-assembly name. The name also indicates the base assembly within which the sub-assembly is created. For example, the sub-assembly name ASM.1/ASM.2 indicates that ASM.2 is a sub-assembly within ASM.1.
- Create Sub-Assembly by Part Selection
-
This field allows you to select a set of parts to
be added to the sub-assembly. Parts in existing
assemblies can also be selected, and will be moved
to the new sub-assembly.
Note: Parts can also be moved between assemblies and sub-assemblies by dragging and dropping within the tree.
- Delete
allows you to delete the geometry within the selected assembly.