


In order to create a simulation, a Fluent .cas(.h5) file or a FENSAP grid file must be loaded. Fluent Icing is mainly focused on computing particles and ice simulations from an airflow simulation case file. Therefore, it is strongly recommended to set-up your Airflow case file in a Fluent Solution workspace before launching Fluent Icing. If available, an airflow solution (.dat or .dat.h5) can also be loaded with the case file.
Note: To set-up a Fluent case file for icing calculations, consult Recommendations to Set up a Fluent Calculation.
Similar to the Fluent Remote Client, it is possible to add multiple cases, connected to local or remote solver sessions. However, each loaded case requires a separate Fluent license & CPUs
The Fluent mesh must respect the following properties:
3D only
2D Fluent mode is not supported. 2D geometries are supported via 2.5D meshes with symmetry planes.
Grids with polyhedral elements or adapted grids with hanging nodes are not supported.
Grids must not have deactivated zones.
When you load a case file into Fluent Icing, the solver launches using the number of CPUs that you specified. This uses the following license keys:
CFD solver level 3 (Enterprise)
HPC tokens linked to the number of CPUs requested
The Fluent Icing application does not consume license keys and can be used to invoke external postprocessors. A single post-processor can be launched from Fluent Icing and share the license seat as the Fluent solver. Additional post-processing tools will consume their own license seat.
If multiple case files are simultaneously loaded (see Loading Multiple Simulations), each additional session will require one additional set of license keys.
If a new project has been created, Fluent Icing will have no cases loaded and display an empty Project View window.
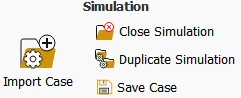
A new Fluent Icing simulation can be created by importing (copy) a case file.
Import Case
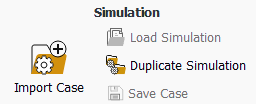
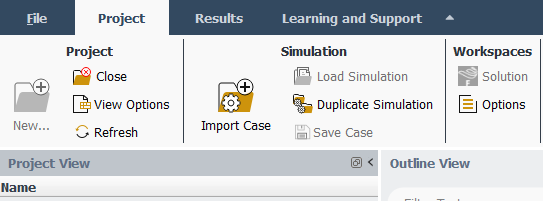
Select Simulation → to import a case file.
Note: Fluent Icing allows the modification of boundary condition types to those supported by Fluent Icing. A list of boundary condition types supported by Fluent Icing is provided in Boundary Conditions. Boundary condition types can also be modified from the Solution workspace session that is connected to Fluent Icing. These changes can be viewed in Fluent Icing by right-clicking any boundary condition type inside the Outline View and selecting Refresh BC List. Only supported boundary condition types are shown in Fluent Icing.
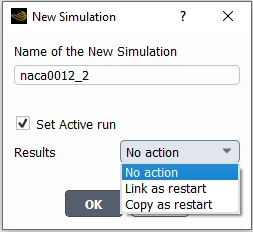
After a case file has been selected, a window will appear requesting a name for the new simulation. Clicking will create a new simulation in the currently open project folder. The case file will be copied into the new simulation folder and will be used as the primary case file for that simulation.
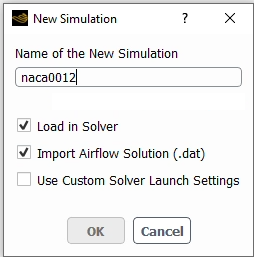
If enabled, the solver is loaded with the selected case file. This solver is loaded on your local machine using the default number of CPU processes. If disabled, the solver is not loaded, and you can choose to load the solver at a later time.
This option is visible if there exists a .dat or .dat.h5 file with the same root name as the .cas(.h5) file. If enabled, the data file is imported alongside the case file.
This option will show the Fluent Launcher and therefore enabling to configure the number of CPUs, queuing system and other start-up options for Fluent solver. If this option is disabled, the options provided in the initial Fluent Launcher will apply (Solver Processes and Scheduler options, if any).
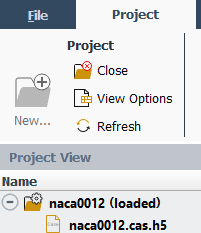
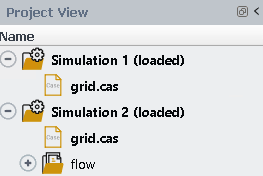
When the case import is complete, the new simulation folder appears in your Project View. This folder contains the case file that has been imported. If you selected Load in Solver, a solver session is loaded in the background, and the simulation folder is listed with (loaded) next to its name.
The simulation that is currently selected will be displayed in the bottom left corner of the Fluent Icing window, next to the currently opened project.

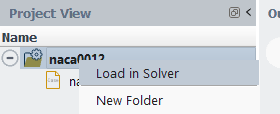
From the Project View, you can load a simulation by right clicking a simulation folder and selecting , by double-clicking it or by using Project → Simulation → .
Load in Solver
By default, will launch a solver on the same machine where Fluent Icing is open with your default number of CPUs. Once the simulation is loaded, (loaded) will appear next to the simulation folder name in your Project View, and the Fluent Icing ribbon will switch to the Simulation tab and display the Outline View on the left-side panel.
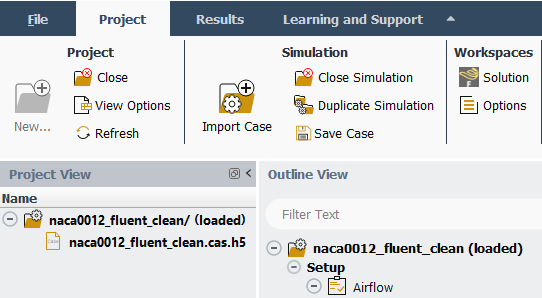
The latest solution files will be loaded upon the simulation load, and they will be shown in bold characters.
Use Custom Solver Launch Settings
By default, when you create or load a simulation using or Load in Solver, the Fluent Icing simulation will load a solver in the background on the same machine and with the same number of processes you used to launch Fluent Icing. However, it is also possible to use different settings to launch the solver on a different machine or with a different number of processes.
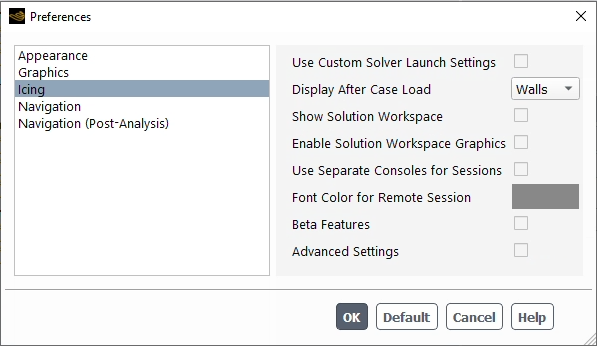
To do this, go to File → , select Icing and check to enable . Alternately, use Project → Workspaces → → .
If is enabled, the or Load in Solver command will first open a Fluent Launcher window, where additional settings can be applied to determine how the solver is launched. This allows you to load the solver on a different machine than where Fluent Icing is open, or to use a job scheduler to launch the solver on a cluster with a queuing system or with a different number of CPUs than what is specified in the initial launcher used to start Fluent Icing. If this option is disabled, the options provided in the initial Fluent Launcher will apply (Solver Processes and Scheduler options, if any).
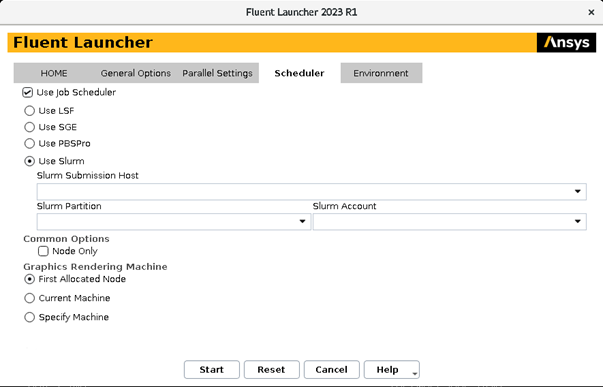
Inside the Fluent Launcher settings, it is required to enable Dimension → and Options → . It is not possible to use , Start Server or Solver GPGPUs per Machine.
From the Project View, you can close a simulation and its associated solver by right-clicking a simulation folder and selecting .
From the Outline View, you can close a simulation and its associated solver by right-clicking a simulation folder and selecting .
In both cases, the solver and the simulation will be closed and (loaded) will no longer appear next to the simulation folder.
Simulation Commands
The contextual menu from the simulation object in the Outline View provides options to interact with the solver process:

By default the Fluent Solution workspace window associated with the background solver is hidden. In order to access advanced Fluent options it can be displayed by using this command. Enabling the → Icing → option.
changes the default behavior so that the Fluent Solution workspace window is displayed by default when the solver is loaded.
Enable Solution Workspace Graphics
The graphics in the Fluent Solution workspace window (if shown) are disabled by default, and neither the graphical mesh display nor the residual curves are displayed in the Fluent Solution workspace window. Selecting this option enables the graphics of the Fluent Solution workspace window. The → Icing → changes the default behavior so that the Fluent Solution workspace window has it’s graphics enabled by default.
allows you to send a journal, text (Text User Interface) or scheme command to the solver session.
Closes a simulation and its associated solver.
Deletes a simulation.
This command enables you to hide unused graphics objects in the list. For example, if only a mesh object has been created, will reduce the list of objects under the dataset to show only the Meshes object. This can be helpful to reduce visual clutter when working with many datasets. Selecting will reveal the unused hidden objects.
Fluent Icing allows you to create a new simulation by duplicating another simulation.
Duplicate
First, select the simulation folder that you would like to duplicate. Next, select Simulation → in the Project ribbon tab. Alternatively, right-click a simulation and select .
A New simulation window appears requesting a name for the new simulation, as well as other duplicate options.
This option is only available when duplicating a simulation that is currently loaded. If enabled, the new simulation will be connected to your currently open background Fluent solver session, and (loaded) will be listed next to the new simulation folder. Any new run will be saved in this new simulation folder.
Note: The new folder becomes the current directory for the Fluent session. However, the current fluent transcript log file (if enabled) will continue to be updated at its original location.
Results
The simulation will be duplicated along with its primary case file. No results or runs will be copied.
The simulation will be duplicated along with its primary case file. Links will be created to all current result files from the duplicated simulation. When you load this simulation, the result files that are linked to will be loaded. The runs will not be copied.
The simulation will be duplicated along with its primary case file. All Current result files from the duplicated simulation will be copied into a Restart folder in the new simulation. When you load this simulation, the results files in the Restart folder will be loaded. The runs will not be copied.
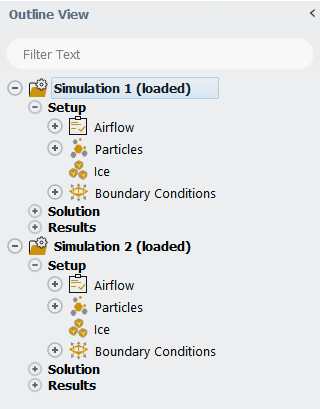
It is possible to use Fluent Icing to load multiple simulations at a time. When multiple simulations are loaded, Fluent Icing will have the following functionality and limitations:
Each simulation that is loaded will display (loaded) next to its name in the Project View and each will load to its own background solver session.
Each simulation that is (loaded) will consume its own license and CPU processes. For example, if two simulations are loaded with 4 CPU processes each, two licenses will be used and 8 CPU processes will be used.
Enable Use Custom Solver Launch Settings to configure the CPUs to use for each session.
Each simulation that is loaded will have its own object tree displayed in the Outline View, and (loaded) will appear next to its name.
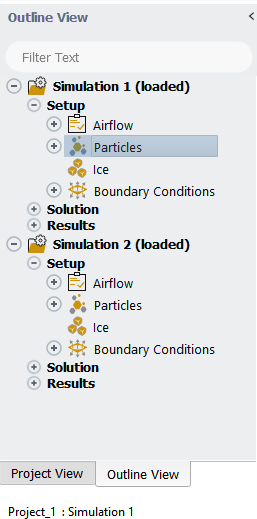
If any part of the object tree of a simulation is selected, that simulation will become the currently selected simulation.
The name of the simulation that is currently selected will be shown in the bottom left corner of the Fluent Icing window, next to the name of the project that is currently open.
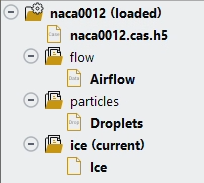
For example, in the image below, Particles is selected in the Simulation_1 object tree. Therefore, Simulation_1 becomes the currently selected simulation, and Project01 : Simulation_1 is listed in the bottom left corner of the Fluent Icing window.
All Fluent Icing user interface operations will function on the simulation that is currently selected in the Outline View.
For example, if you use the Load command to load an out.dat result file, this result file will be loaded into memory as the current state of the simulation that is currently selected.
When running multiple computations in parallel (each in a different simulation session), only the residual convergence plots for the latest computations are displayed.
Care should be taken when using Fluent Icing if multiple simulations are loaded to ensure any operation that is performed is working on the intended simulation.
Note: For details on the parallel-processing features of Ansys Fluent, see Parallel Processing in the Fluent User's Guide.