


Occasionally, contact between two objects (such as the contact between an automobile tire and the pavement surface) contains sharp angles that cannot easily be captured during the meshing process. In such cases, you can use the Create Contact Patch task to create a localized area around the contact surface or a 'patch' that you can use to circumvent the meshing process and avoid meshing issues that could potentially occur in such close contact areas.

Specify a Name for the contact patch object, or keep the default value (
contact-patch-1).Choose whether to Select By the object, label, or zone name in the list below, of items that contain the gap that you want to cover.
Select items in the list, or use the Filter Text option in the drop-down to provide text and/or regular expressions in filtering the list (for example, using *, ?, and []). You can also choose the Use Wildcard option in the drop-down to provide wildcard expressions in filtering the list. When you use either
?or*in your expression, the matching list item(s) are automatically selected in the list. Use^,|, and&in your expression to indicate boolean operations for NOT, OR, and AND, respectively. See Filtering Lists and Using Wildcards for more information.The first list contains potential contact sources (such as a tire). The second list (the Ground Zone list) contains potential contact targets (that is, where the contact is being applied to, such as the ground for a tire).
Specify the Offset Distance that you want to use as the distance of the contact patch geometry from the ground zone. The patch geometry will be thickened by twice this value. Negative values are allowed to apply to opposite/flipped direction, however, contact and intersection needs to occur based on this distance.
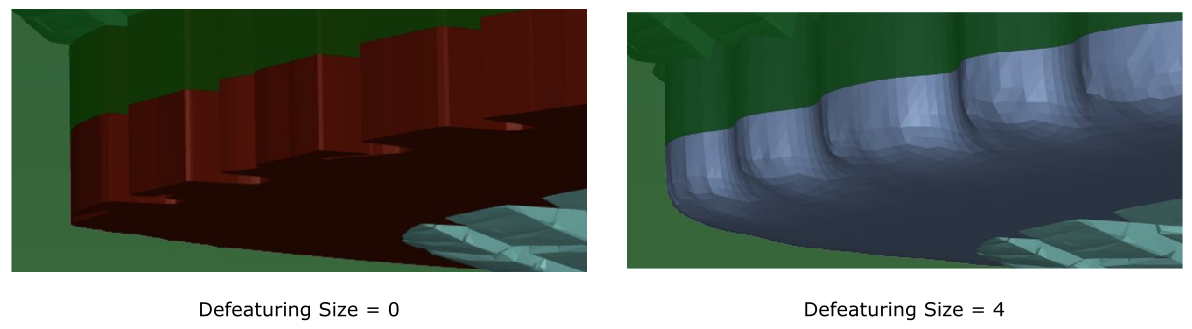
Specify a value for the Defeaturing Size, or keep the default value. This setting controls the smoothness of the contact patch. With the default value of 0, no smoothing takes place. With a value greater than 0, the patch is defeatured to create a smooth patch. This will lead to better quality volume mesh at the contact, for instance, between the tire and the ground.
Specify the Feature Angle (from 0 to 90 degrees) that you want to use to extract features on the contact patch object.
Use the Patch Hole option if you want to create a filled contact patch, as opposed to a hollow contact patch.
Use the Flip option to create the contact patch in the opposite direction.
Once your selection is made, click Create Contact Patch and proceed onto the next task.
If you need to make adjustments to any of your settings in this task, click Revert and Edit, make your changes and click Update, or click Cancel to cancel your changes.