The general procedure for compiling a UDF source file, building a shared library for the resulting objects, and loading the compiled UDF library into Ansys Fluent using the graphical user interface (GUI) is as follows.
Important: Note that when running serial or parallel Ansys Fluent on a Windows
system, it is recommended that you install a supported version of Microsoft Visual Studio or
Clang on your machine, preferably on the C: drive; if the compiler
you installed is an older version that is not supported, then you should enable the use of a
built-in compiler (Clang) that is provided as part of the Fluent installation, as
described in a later step.
Make sure that the UDF source file you want to compile is in the same folder that contains your case and data files.
Important: If you are running the parallel version of Ansys Fluent on a network of Windows machines, you must "share" the working folder that contains your UDF source, case, and data files so that all of the compute nodes in the cluster can see it. To share the working folder:
Open Windows Explorer and browse to the folder.
Right-click the working folder and select Sharing and Security from the menu.
Click .
Click .
For Linux, start Ansys Fluent from the directory that contains your case, data, and UDF source files. For Windows, start Ansys Fluent using Fluent Launcher with the following settings:
Specify the folder that contains your case, data, and UDF source files in the Working Directory field in the General Options tab.
Make sure that the batch file for the UDF compilation environment settings is correctly specified in the Environment tab (see Compilers for further details).
Read (or set up) your case file.
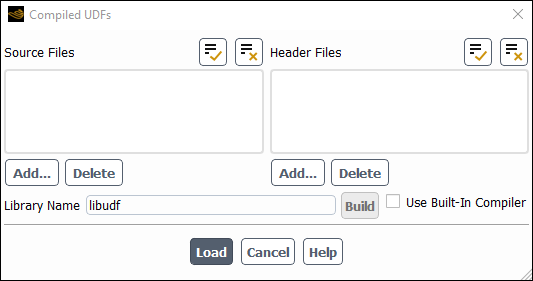
Open the Compiled UDFs dialog box (Figure 5.2: The Compiled UDFs Dialog Box).
 Parameters & Customization → User
Defined Functions
Parameters & Customization → User
Defined Functions  Compiled...
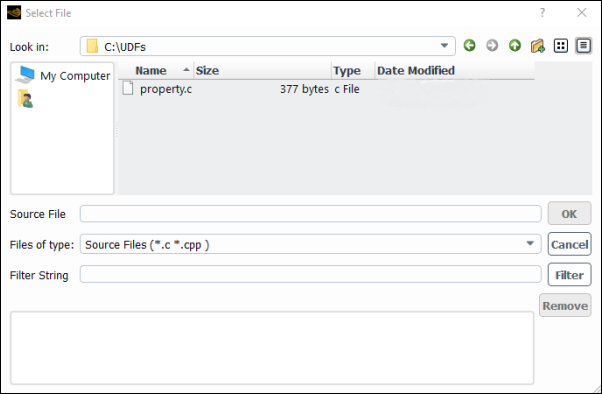
In the Compiled UDFs dialog box click under Source Files to select the UDF source file (or files) you want to compile. This will open the Select File dialog box (shown in Figure 5.3: The Select File Dialog Box).
In the Select File dialog box, click the names of all of the desired files (for example, udfexample.c), so that the complete paths to the source files are displayed in the bottom list. You can remove a selection by clicking the path in the bottom list and then clicking . Click when your selections are complete.
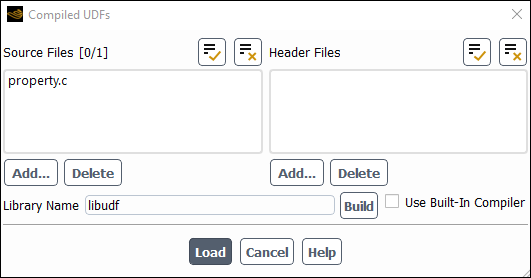
The Select File dialog box will close and the file you selected (for example, udfexample.c) will appear in the Source Files list in the Compiled UDFs dialog box (Figure 5.4: The Compiled UDFs Dialog Box). You can delete a file after adding it by selecting the source file and then clicking in the Compiled UDFs dialog box.
In the Compiled UDFs dialog box, select additional header files that you want to include in the compilation by clicking under Header Files and repeat the previous step.
In the Compiled UDFs dialog box (Figure 5.4: The Compiled UDFs Dialog Box), enter the name of the shared library you want to build in the Library Name field (or leave the default name libudf).
If you are running on Windows and have installed an older version of Microsoft Visual Studio or Clang on your machine that is not supported, then you should enable the Use Built-In Compiler option, in order to request the use of a built-in compiler (Clang) that is provided with the Fluent installation. If Fluent determines that you have not installed a compiler on your computer, the built-in compiler is used automatically, whether or not you have enabled the Use Built-In Compiler option.
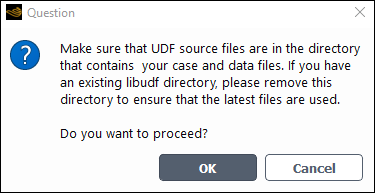
Click . All of the UDFs that are contained within each C source file you selected will be compiled and the build files will be stored in the shared library you specified (for example,
libudf).As the compile/build process begins, a Question dialog box (Figure 5.5: The Question Dialog Box) will appear reminding you that the source file(s) must be in the same folder as the case and data files. Click to close the dialog box and continue with the build.
As the build process progresses, the results of the build will be displayed in the console. You can also view the compilation history in the log file that is saved in your working folder.
Console messages for a successful compile/build for a source file named udfexample.c and a UDF library named
libudffor a Windows architecture are shown below.Copied E:\/E:\udfexample.c to libudf\src Creating user_nt.udf file for 3d_host ... (system "copy C:\Program Files\ANSYS Inc\v242\fluent\fluent24.2.0\src\udf\makefile_nt.udf "libudf\ win64\3d_host\makefile" ") 1 file(s) copied. (chdir "libudf")(chdir "win64\3d_host")# Generating ud_io1.h udfexample.c # Generating udf_names.c because of makefile udfexample.obj udf_names.c # Linking libudf.dll because of makefile user_nt.udf udf_names.obj udfexample.obj Microsoft (R) Incremental Linker Version 12.00.31101.0 Copyright (C) Microsoft Corporation. All rights reserved. Creating library libudf.lib and object libudf.exp Creating user_nt.udf file for 3d_node ... (system "copy C:\Program Files\ANSYS Inc\v242\fluent\fluent24.2.0\src\udf\makefile_nt.udf "libudf\ win64\3d_host\makefile" ") 1 file(s) copied. (chdir "libudf")(chdir "win64\3d_node")# Generating ud_io1.h udfexample.c # Generating udf_names.c because of makefile udfexample.obj udf_names.c # Linking libudf.dll because of makefile user_nt.udf udf_names.obj udfexample.obj Microsoft (R) Incremental Linker Version 12.00.31101.0 Copyright (C) Microsoft Corporation. All rights reserved. Creating library libudf.lib and object libudf.exp Done.In the Compiled UDFs dialog box (Figure 5.4: The Compiled UDFs Dialog Box), load the shared library that was just built into Ansys Fluent by clicking .
A message will be displayed on the console providing a status of the load process. For example:
Opening library "E:\libudf"...
Library "E:\libudf\win64\3d_host\libudf.dll" opened
Opening library "E:\libudf"...
Library "E:\libudf\win64\3d_node\libudf.dll" opened
	stage
Done.
indicates that the shared library named libudf was successfully loaded (on a Windows machine).
Important: Note that compiled UDFs are displayed in Ansys Fluent dialog boxes with the associated UDF library name using the
::identifier. For example, a compiled UDF namedinlet_x_velocitythat is associated with a shared library namedlibudfwill appear in Ansys Fluent dialog boxes asinlet_x_velocity::libudf. This visually distinguishes UDFs that are compiled from those that are interpreted.After the compiled UDF(s) become visible and selectable in graphics dialog boxes in Ansys Fluent, they can be hooked to your model. See Hooking UDFs to Ansys Fluent for details. You can use the UDF Library Manager dialog box to unload the shared library, if desired. See Load and Unload Libraries Using the UDF Library Manager Dialog Box for details.
Note: After you have loaded the UDF, if you click the button again, the UDF will be unloaded, compiled again, and then reloaded. This is useful if you decide to revise a UDF after it is loaded and want to use the revised version.
Write the case file if you want the compiled function(s) in the shared library to be saved with the case. The functions will be loaded automatically into Ansys Fluent whenever the case is subsequently read.
Important: If you do not want the shared library saved with your case file, then you must remember to load it into Ansys Fluent using the Compiled UDFs dialog box or the UDF Library Manager dialog box in subsequent sessions.