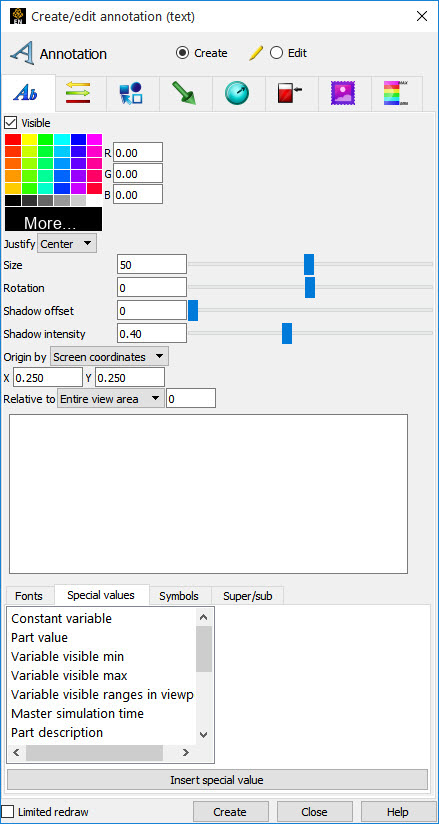
Click Text icon from the Feature Icon Bar to open the Annotation Feature Panel.

Click the Text tab
Click the button, which will create a annotation.
Click on the text string and modify it.
If you hit the Enter keyboard key you will insert a line return into the annotation.
While entering text, you can easily change the script to super, sub, or normal by clicking the , , or buttons found in the Super/Sub tab. These buttons will insert <up>, <dn>, or <no> into the string.
Other Special Coded Items, including changing the font, which can be inserted into a string (by selecting and hitting Insert special item) are discussed below.
To manipulate text string, first select the string(s) of interest in the list then:
To manipulate text string, first select the string(s) of interest in the list then:
To change visibility:
Toggle Visible off or on.
To change color:
Select the desired color from the matrix, enter RGB values in the fields, or click More... to open the Color Selector dialog.
To change justification:
Select the desired Left, Right, or Center justification from the Justify pulldown.
To change text size:
Either resize the text interactively by grabbing the touch-n-go resize handle and dragging, or by precisely specifying the font size in the Size field of the dialog (or using the slider to change the font size).
Important: The text size specified is relative to the size of the Graphics Window. If you increase the size of the Graphics Window, all text will also rescale to maintain the same relative size.
To change text rotation:
The orientation of text about the text justification point may be specified by specifying the rotation angle (in degrees) in the Rotation field (or using the slider to change rotation angle). You can also specify a rotation angle from the Quick Action Icon Bar.
To add shadow text effect:
Enter offset and intensity or use sliders. You can also use the Quick Action Icon Bar.
To change location of the justification point in the graphics window:
Either interactively drag the text to the desired location using the touch-and-go handles, or precisely specify the location in the Origin XY fields.
You can also specify the viewport that the text is to be positioned relative to. If 0, the position is relative to the graphics window.
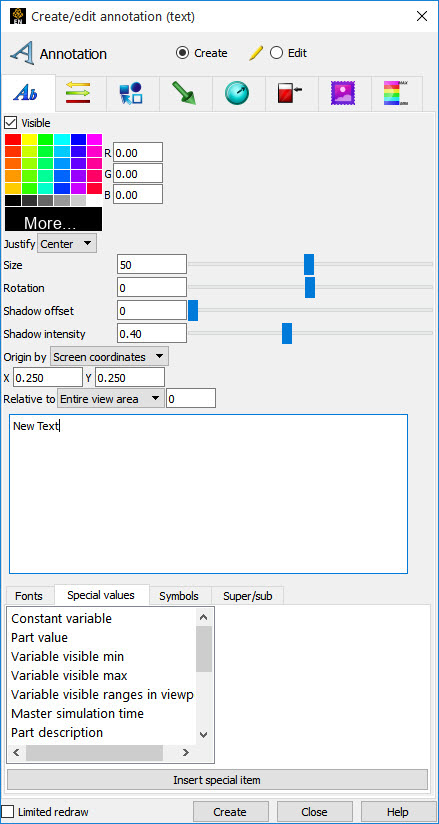
EnSight can automatically build text strings based on information from various sources. To use one of these special strings, select the desired item from the Special String list, select any required options, and click Insert Special Item. A code will be inserted into the Text field.
The following special strings are available. If multiple cases are loaded, any reference to parts or variables applies to the currently selected case (select Case → casename to changes cases)
| Special values |
Values from the operating system, the geometry and the variables.
 |
| Constant variable |
The value of a constant variable (such as Time or Length). Select the variable from the Constant variable list and select the desired numeric display format from the Number Format list. If the constant variable changes, the corresponding text will automatically update. This is very useful for displaying the current solution time during a transient animation. Shown below is an example of the format string for the Constant variable value of Analysis_Time from Case 1.
Also shown below is an example of the format string for the same Constant, but this time including units (Variable Units).
|
| Constant per part variable |
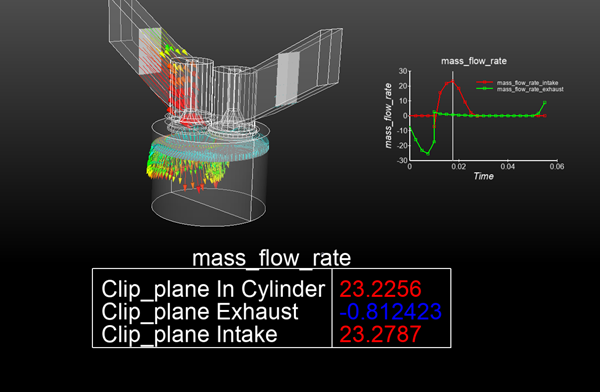
For the value of a constant per part variable, select the variable from the Constant Per Part Variables and select the desired part and the numeric display format from the Number Format list. Shown below is an example of the format string for the constant per part variable mass_flow_rate for part id 5.
See Variables |
| Part value |
The value of a part. Currently works for isosurface and some (ijk, xyz, rtz, plane aligned with axis, or attached to spline) clip parts where the value is the corresponding isovalue or clip location or value. Parts that have a value will appear in the part selection list. Select the part in the Part(s) list and select the desired numeric display format from the Number Format list. Shown below is an example of the format string for the part value of part id 3.
See Text Annotation |
| Variable visible min |
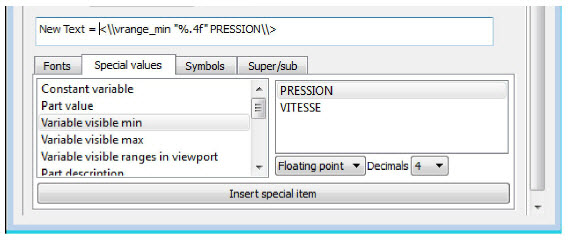
The minimum value of the variable on the visible elements in the visible geometry on the client at the current time. This is, therefore, different from the min function in the calculator, in the query/probe minimum, or the query/plot minimum. The value of this annotation can change when visible parts are made invisible, when the element representation of the part is changed, and when new parts are made visible in the viewport. Shown below is an example of the format string for the variable visible min for variable Pressure
|
| Variable visible max |
The same as the min value only using the maximum value of the variable existing on the visible elements of the part(s) in the graphics window. Shown below is an example of the format string for the variable visible min for variable Pressure <\\vrange_max "%.0f" Pressure\\> |
| Variable visible ranges in viewport |
Display the min/max variable information for all parts visible (taking into account element blanking) in a specified viewport. If parts are colored by multiple variables then multiple annotation strings will be created - one for each variable in use in the viewport. If you change the color by variable(s) the text string will update to reflect the new color change. If you change the part element representation, the text string will update to reflect the visible elements. Shown below is an example of the format string for the variable visible range in viewport for variables in use for viewport 0
|
| Master simulation time |
When there are multiple timelines available, there must be a timeline that has control when stepping through time. This is chosen in the time dialog Shown below is an example of the format string for the master simulation time value.
|
| Part description |
The description of the part as displayed in the main Parts list. Note: You can change this text by editing the Desc field in the applicable Feature Panel for the part. Shown below is an example of the format string for the part description
See Text Annotation |
| Units |
If the variable selection list is empty, then units are not supported. This is either because the solver does not support a unit system, the dataset does not have units saved, or the reader for that format does not support units. This is a somewhat detailed topic, see Variable Units. |
| Date |
Current date. Example: January 1, 2012 Shown below is an example of the format string for the Date
See Text Annotation |
| Time |
Current time. Example: 14:19:12 Shown below is an example of the format string for the current time.
|
| Geometry header |
The first or second text line of the geometry file of the current case. Select Line 1 or Line 2. Shown below is an example of the format string for the geometry header 1 and 2 from Case 1.
See Text Annotation |
| Measured header |
The first line of the measured (discrete) data file of the current case. Shown below is an example of the format string for the measured header from Case 1
See Text Annotation |
| Variable header |
The first line (typically the description line) from a variable file. Select the desired variable from the variable selection list. Shown below is an example of the format string for the variable momentum from Case 1
See Text Annotation |
| Version |
The name and current version number. Example: EnSight Version 2024 R2 Shown below is an example of the format string for the EnSight version
See Text Annotation |
| Fonts |
Brings up the TrueType font selection dialog, allowing a new font to be selected
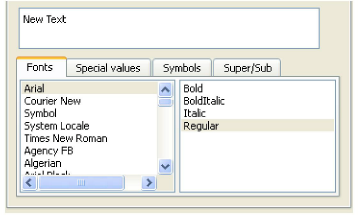 Information on manipulating fonts, including additional text font formatting codes that can be used, are described in Manipulate Fonts. Font format will appear as
Note: The selected font affects what appears after it. For example, shown below are the current date in Courier New, using a Bold Italic, and the EnSight version in Times New Roman Bold.
|
| Symbols |
Brings up a symbol dialog. Click any symbol to insert it at the current character insertion point of the string. The symbol will be inserted in to the string via a <sy>xxx, where xxx is the ASCII number for the selected symbol.
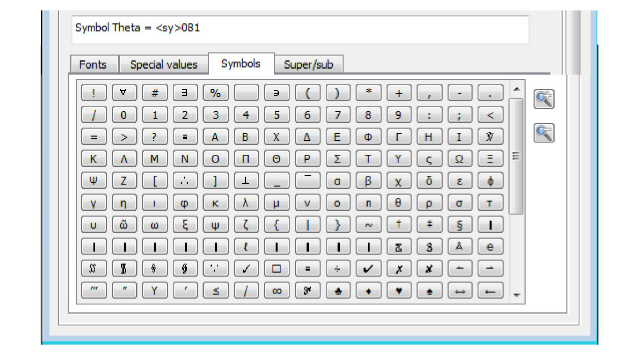 Shown below is the symbol codes for Capital and lower case Pi
See Text Annotation |
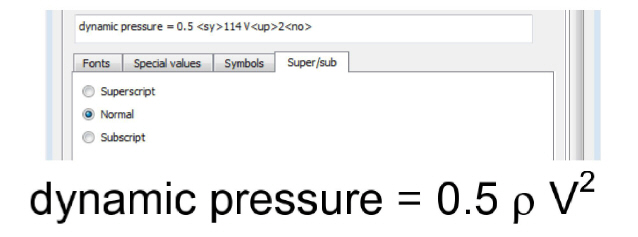
| Super/Sub |
Select the text that you want to be superscripted or subscripted, click on the Super/Sub tab and toggle the appropriate value.
Note: See Text Annotation |
| Command language |
EnSight command language variables can also be inserted into annotation strings via a special item coding option. This coding item does not have an associated, but can be typed directly into the annotation text edit field. The coding has the form:
The format string is the
The annotation string: The value is: would result in the annotation containing the string |
| Frames per second |
Another example uses the built-in EnSight frames per second counter which stores the current rendering rate in frames per second in the ensight variable ensight_fps. This annotation string, containing embedded ensight variable formatting, will display the current rendering rate dynamically in EnSight: Frames per second: |
| Interactive query |
It is also possible to embed the value of an interactive query into an annotation
string. The first value of the interactive query results is always used. The format for
this is the keyword Shown below is an example of the format string which will display an annotation string with the value of interactive query 0 displayed to two places of precision after the equal sign in the annotation. Temperature = |
| Coloration |
If you want to color the entire text, simply click the coloration section and all of the text will be monocolored and your selection will appear in command language, not in the editor window. However, each portion can have its own custom color of the format linked to Font Formatting Codes. |
Each portion of text can have its own custom codes to create Unicode characters, symbols, to control scaling, and font type, see Manipulate Fonts.
If a annotation references a constant variable (See Special Coded Items) it is possible to set up rules that will color the variable value when it is below, between, or over a reference value. If the constant does not pass any of the override rules the constant will be colored by the annotation text string color as specified.
Right-click the constant variable in the Variables list and select the option.
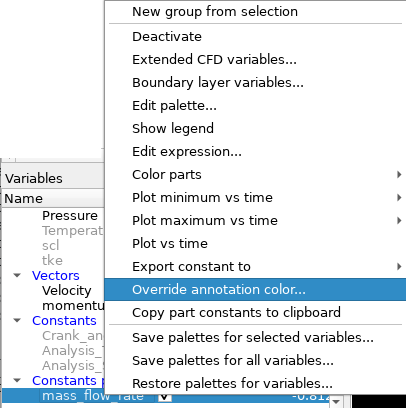

In the resulting dialog you can specify the color override rules for anywhere the constant (or constant per part) variable is shown in an annotation. This is probably most effective in alerting the user to a constant hitting some condition during the display of transient data.
Three rules are possible with an toggle for each. There is a rule for the constant falling below a given Value, a second rule for when the constant is between two values, and a third rule for when the constant is above a given Value. You can also specify that you wish to rule to apply to the absolute value of the constant.