One or more custom tasks can be defined in the element
<tasks>. Each task is defined in a child element
<task>. The base
<task> class represents an extension-based workflow
task that serves as a template from which ACT creates real instances.
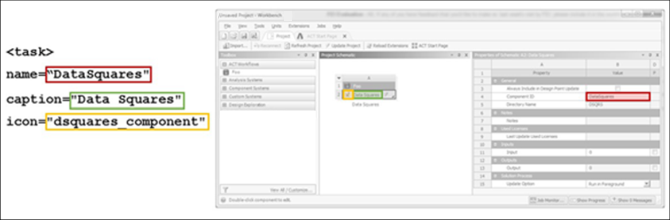
In each task definition, you must include the attributes
name and version. The following
figure maps the task DataSquares to the Workbench
interface.
Child elements are used to specify callbacks, inputs and outputs, properties, parameters, context menus, and remote execution. The basic structure of a task definition follows:
<tasks>
	<task name="" caption="" icon="" version="1" enableGenericTransfer="">
		<callbacks>
			<IsVisible></IsVisible>
			<IsValid></IsValid>
			<GetValue></GetValue>
			<SetValue></SetValue>
			<OnShow></OnShow>
			<OnHide></OnHide>
			<OnInit></OnInit>
			<OnAdd></OnAdd>
			<OnRemove></OnRemove>
			<OnDuplicate></OnDuplicate>
			<OnActivate></OnActivate>
			<OnCancel></OnCancel>
			<OnApply></OnApply>
			<Value2String></Value2String>
			<String2Value></String2Value>
			<OnValidate></OnValidate>
			<OnMigrate></OnMigrate>
		</callbacks>
		<contextmenus>
			<entry name="" caption="" icon="" priority="" type="">
				<callbacks>
					<onclick></onclick>
				</callbacks>
			</entry>
		</contextmenus>
		<propertygroup name="" caption="">
			<property name="" caption="" control="" default="" options="" readonly="" needupdate="" visible="" persistent="" isparameter="" keytype="" valuetype="" elementtype=""/>
		</propertygroup>
		<property name="" caption="" control="" default="" readonly="" needupdate="" visible="" persistent="" isparameter="" keytype="" valuetype="" elementtype="">
			<callbacks>
				<IsVisible></IsVisible>
				<IsValid></IsValid>
				<GetValue></GetValue>
				<SetValue></SetValue>
				<OnShow></OnShow>
				<OnHide></OnHide>
				<OnInit></OnInit>
				<OnAdd></OnAdd>
				<OnRemove></OnRemove>
				<OnDuplicate></OnDuplicate>
				<OnActivate></OnActivate>
				<OnCancel></OnCancel>
				<OnApply></OnApply>
				<Value2String></Value2String>
				<String2Value></String2Value>
				<OnValidate></OnValidate>
				<OnMigrate></OnMigrate>
			</callbacks>
		<property/>
		<parameters>
			<parameter name="" caption="" usage="" control="" version="1"/>
		</parameters>
		<inputs>
			<input/>
			<input type="" count="" format=""/>
		</inputs>
		<outputs>
			<output type="" format=""/>
		</outputs>
		<rsmjob name="" deletefiles="" version="1">
			<inputfile id="1" name=""/>
			<outputfile id="1" name=""/>
			<program>
				<platform name="" path=""/>
				<argument name="" value="" separator=""/>
			</program>
			<callbacks>
				<oncreatejobinput></oncreatejobinput>
				<onjobstatus></onjobstatus>
				<onjobcancellation></onjobcancellation>
				<onjobreconnect></onjobreconnect>
			</callbacks>
		</rsmjob>
	</task>
 </tasks>
See the following topics for additional information:
All attributes set on ACT-defined tasks are persisted and resumed within a project.
...
task = ExtAPI.DataModel.Tasks[0]
task.SetAttributeValue('MyAttribute', 'MyValue')
Save(FilePath=’...’, Overwrite=True)
Reset()
Open(FilePath=’...’)
task = ExtAPI.DataModel.Tasks[0]
task.GetAttributeValue('MyAttribute')ACT provides you with a method of transferring data within the
Project Schematic. All tasks contain a transfer object
of type GeneralTransfer. This object contains one
property, TransferData, of type
Dictionary<string, object>. When the type is
fully created for each task, ACT automatically exposes the type as an output by
default. If you do not want to engage in all transfer possibilities enabled
through the transfer, you can declare this at the task level:
<workflow name="MyWorkflow" context="Project" version="1">
  <tasks>
    <task name="MyTask" ... enableGenericTransfer="False">
      ...
    </task>
    ...
  </tasks>
</workflow>
Once a transfer-enabled task exists in the Project Schematic, the transfer data can be accessed to push and pull data within the data store, which is the repository for storing and managing the data used by Ansys services and products.
A simple property TransferData is exposed off of the
task argument of all task callbacks or tasks retrieved from
ExtAPI or as a callback argument:
def producer_update(task):
    data = task.TransferData
Once obtained, the dictionary TransferData acts like
any other dictionary within ACT. You can both set and retrieve values through
string keys, and you can perform other collection-based
calls such as Add() and Remove().
The custom IDictionary is coded in such a way that if you
try to access a non-existent key, such as when setting a new value, it
automatically adds the key and allows the set to take place.
task.TransferData["Test"] = "Sample text"
One the consumer side, you can easily access the transfer data:
def consumer_update(task):
    container = task.InternalObject
    upstreamData = container.GetInputDataByType(InputType="GeneralTransfer")
    for upstreamDataEntity in upstreamData:
        task = ACT.GetTaskForContainer(upstreamDataEntity.Container)
        data = task.TransferData["Test"]
The transfer data approach eliminates dependency on file and file path transfers. However, if desired, you can still opt to pass file paths via the new transfer data. No further actions or implementations are required to fulfill the basic framework transfer connections.
Note: Downstream processing might require additional actions implemented via ACT workflow callbacks.
In some circumstances, you might want to interrogate a task's source tasks.
For example, this can ease the access of transfer data from upstream sources.
The property SourceTasks is available on all objects of
the type UserTask:
def myTaskUpdate(task):
    sources = task.SourceTasks
    for sourceTask in sources:
        data = sourceTask.TransferData[“Test”]
Tasks can filter or block their source connections by implementing a
task-level callback canconsumedata.
XML Definition File:
<task name="Consumer"...>
    <callbacks>
        <canconsumedata>taskCanUse</canconsumedata>
        ...
    </callbacks>
    ...
</task>
IronPython Script:
def taskCanUse(task, sourceTask):
    if sourceTask.Name == “Foo”:
        return True
    else:
        return False
For a list of Ansys-installed tasks that support general data transfer, see Appendix E: Ansys-Installed Custom Workflow Support.
Custom solver-based systems also support this type of data transfer.
The properties InputData and
OutputData are exposed on the object
UserTask. Additionally,
UserTask exposes a property
TargetTasks that returns all downstream tasks that
consume (hold a connection to) the current task.
| Class | Member |
|---|---|
UserTask
|
InputData
|
OutputData
| |
TargetTasks
|
An example follows.
import System

def consumer_update(task):
    upstreamData = task.InputData["MyData"]
    fileRef = None
    upstreamDataCount = upstreamData.Count
    if upstreamDataCount > 0:
        fileRef = upstreamData[0]
        task.UnregisterFile(fileRef)
        task.RegisterFile(fileRef.Location)
def producer_update(task):
    extensionDir = task.Extension.InstallDir
    activeDir = task.ActiveDirectory
    filePath = System.IO.Path.Combine(extensionDir, "Sample_Materials.xml")
    activeFilePath = System.IO.Path.Combine(activeDir, "Sample_Materials.xml")
    task.UnregisterFile(activeFilePath)
    if System.IO.File.Exists(activeFilePath) == False:
        System.IO.File.Copy(filePath, activeFilePath)
    fileRef = task.RegisterFile(activeFilePath)
    myData = task.OutputData["MyData"][0]
    myData.TransferFile = fileRef
def mesh_update(task):
    upstreamData = task.InputData["MeshingMesh"]
    meshFileRef = None
    upstreamDataCount = upstreamData.Count
    if upstreamDataCount > 0:
        meshFileRef = upstreamData[0]
    meshOutput = task.OutputData["SimulationGeneratedMesh"][0]
    meshOutput.TransferFile = meshFileRef
The class UserTask includes APIs to facilitate easier
management of task-level files. The following APIs are available:
| Class | Member | Description |
|---|---|---|
UserTask
|
ActiveDirectory
| Obtains the active design point directory for the task. |
RegisteredFiles
| A collection of all registered files associated with the task. | |
RegisterFile(filepath)
| Registers and associates a file with the task. | |
UnregisterFile(filePath)
| Unregisters and disassociates a file from the task. | |
UnregisterFile(filePath,
                                    delete)
| Unregisters and disassociates a file from the task. | |
UnregisterFile(fileReference)
| Unregisters and disassociates a file from the task. | |
UnregisterFile(fileReference,
                                    delete)
| Unregisters and disassociates a file from the task. |
A sample implementation of task-level file management capabilities follows.
import System

def update(task):
    activeDir = task.ActiveDirectory
    installDir = task.Extension.InstallDir
    srcImageFilePath = System.IO.Path.Combine(installDir,
                        System.IO.Path.Combine("images", "logo-ansys.jpg"))
    destImageFilePath = System.IO.Path.Combine(activeDir, "logo-ansys.jpg")
    task.UnregisterFile(destImageFilePath)
    System.IO.File.Copy(srcImageFilePath, destImageFilePath)
    task.RegisterFile(destImageFilePath)
    ExtAPI.Log.WriteMessage('task "'+task.Name+'" Registered File Count =
                            '+str(task.RegisteredFiles.Count))
Note: The UnRegister(...) members fully unregister the
files only if they have been associated with the task (through the
task.Register(...) members). Otherwise, the files
remain registered.
Callbacks to IronPython functions are specified in the element
<callbacks>. All callbacks receive, at minimum,
a task object as an argument. The following table lists the available callbacks
and their arguments.
| Callback | Arguments |
|---|---|
oninitialize
|
task
|
onupdate
|
task
|
onrefresh
|
task
|
onreset
|
task
|
onedit* |
task
|
onstatus** |
task
|
onreport*** |
task,
report |
ondelete
|
task
|
canconsumedata
|
sourceTask,
targetTask |
*Definition of the callback <onedit>
automatically creates a default context menu for the
task.
**The callback <onstatus> invokes the method
status when the application asks the task for its
current state. For more information, see Accessing State-Handling APIs.
***The callback <onreport> invokes the method
report when you generate a project report. It allows
the task to access the report object and add its own task-specific reporting
content. For more information, see Accessing Project Reporting APIs.
In the event of task-level callback errors, exceptions are provided to the Workbench framework, allowing the framework to detect failures and correctly manage task states. Exception details are also reported to the log.
If you specify the callback <onedit> in the XML
file, a default context menu option is automatically
created for the task. However, it is possible to define additional interface
operations for each task.
Custom interface operations are specified in the optional element
<contextmenus>. At minimum, the context menu
entry definition must include the attribute name. When
the optional attribute type is defined, it must be set to
ContextMenuEntry.
Each entry in the element <contextmenus> must
have a callback <onclick>, which receives a task
object as its argument.
The basic structure of the element <contextmenus>
follows.
<contextmenus>
	<entry name="" caption="" icon="" priority="" type="">
		<callbacks>
			<onclick></onclick>
		</callbacks>
	</entry>
</contextmenus>
Instead of using parameters to drive your simulation, you can work through the data model, simplifying data access by defining custom properties.
Properties can be defined in the optional element
<propertygroup>. At minimum, each property
group definition must include the attribute name. The
attribute caption is used as the group category name in
the Workbench Property pane if the child properties are
visible.
A propertie is defined in the element <property>,
which can be either a child to the element
<propertygroup> or a stand-alone definition at
the same level. At minimum, each property definition must include the attributes
name and control.
The basic structure of a property definition follows.
<propertygroup name="" caption="">
	<property name="" caption="" control="" default="" readonly="" needupdate="" visible="" persistent="" isparameter="" keytype="" valuetype="" elementtype=""/>
</propertygroup>
<property name="" caption="" control="" default="" readonly="" needupdate="" visible="" persistent="" isparameter="" keytype="" valuetype="" elementtype=""/>
ACT supports the following property control types:
string/textdoublefloatintegerDataReferencebooleanobjectquantityoption/selectfileopenfolderopenlistdictionaryDataContainerReference
Callbacks to IronPython functions can be specified in a task-level property definition. All property callbacks receive, at minimum, the entity (task) and property as arguments. Available property callbacks are listed and described.
-
IsVisible You can define the callback
isvisibleon task-exposed properties. This callback can dynamically control whether or not to display a property. You can key off of any desired condition or other task property to determine the property's visibility, returningTrueorFalseas a result.XML Definition File:
...
<task ...>
    ...
    <property name="Input" caption="Input" control="double" .../>
    <property name="HiddenString" caption="Test String" control="string" ...>
        <callbacks>
           <isvisible>stringVisibilityCheck</isvisible>
        </callbacks>
    </property>
    ...
</task>
...
IronPython Script:
def stringVisibilityCheck(entity, property):
    inputVal = entity.Properties["Input"]
    if inputVal.Value == 2.0:
        return True
    else:
        return False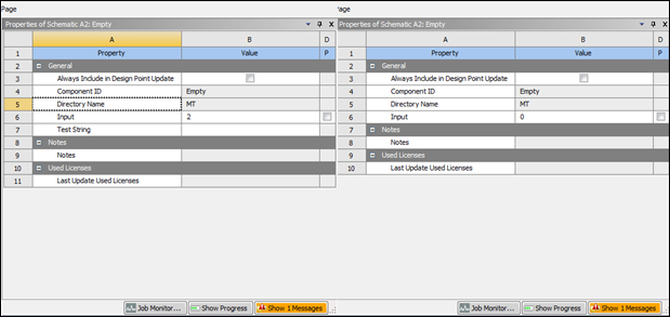
-
IsValid You can define the callback
isvalidon task-exposed properties. This callback can dynamically control whether or not a property is valid. You can key off of any desired condition or other task property to determine the property's validity, returningTrueorFalseas a result.XML Definition File:
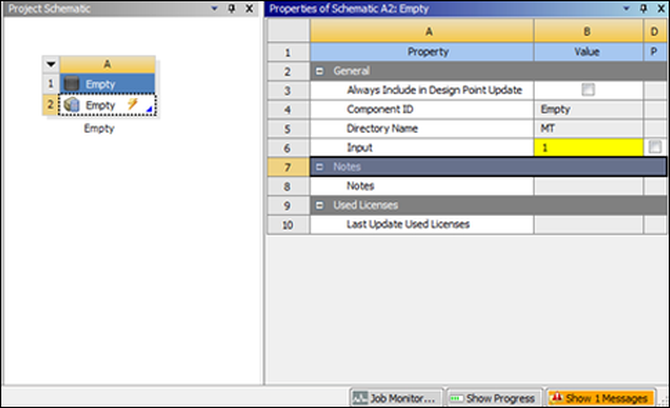
...
<task ...>
    ...
    <property name="Input" caption="Input" control="double" default="0.0" readonly="False" needupdate="True" visible="True" persistent="True" isparameter="True">
        <callbacks>
            <isvalid>validityCheck</isvalid>
        </callbacks>
    </property>
    ...
</task>
...
IronPython Script:
def validityCheck(entity, property):
    if property.Value == 1.0:
        return False
    else:
        return True
In the following figure, the property is valid.
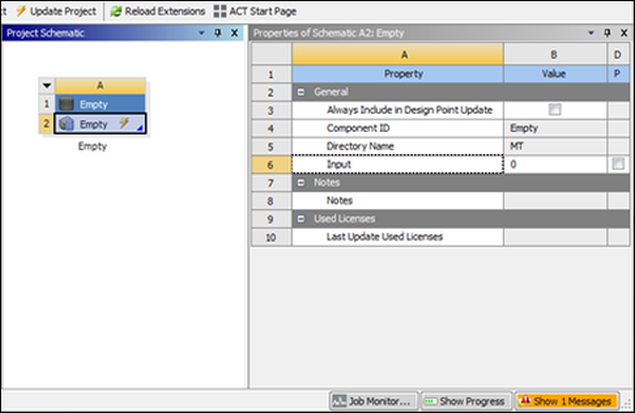
In the following figure, the property is invalid.
-
GetValue You can define the callback
getvalue, which is invoked when a value is obtained from the command line, a script, or through the project itself.-
SetValue You can define the callback
setvalue, which is called when a value is set from the command line, a script, or through the project itself.-
OnShow You can define the callback
onshow, which is called when the Project page is about to display the property.-
OnHide You can define the callback
onhide, which is called when the Project page is about to hide the property.-
OnInit You can define the callback
oninit, which is called when the property is first created on the task object.**This is called at the same location as the callback
onadd.**-
OnAdd You can define the callback
onadd, which is called when the property is first added on the task object.**This is called at the same location as the callback
oninit.**-
OnRemove You can define the callback
onremove, which is called when the property is deleted from the task object.-
OnDuplicate You can define the callback
onduplicate, which is called when the property is duplicated to another task.-
OnActivate You can define the callback
onactivate, which is called when the property is activated in the user interface.**This is called at the same location as the callback
onshow.**-
OnCancel You can define the callback
oncancel, which is called when a property is deactivated.**This is called at the same location as the callback
onhide.**-
OnApply You can define the callback
onapply, which is called immediately after a property value change but before it is actually processed.-
Value2String You can define the callback
value2string, which is called when the propertyValueStringis retrieved.-
String2Value You can define the callback
string2value, which is called when the propertyValueStringis set.-
OnValidate You can define the callback
onValidate, which is called during a property value change.-
OnMigrate As of 17.1, this callback is not supported.
You can get and set property values using standard ACT syntax, as defined
through SimEntity. At the task-level callbacks, the
provided task argument provides the entry point:
propA = task.Properties[“PropertyA”].Value
task.Properties[“PropertyA”].Value = “Foo”
Access is available at the master ExtAPI level.
Assuming that only one task resides in the Project
Schematic:
task = ExtAPI.DataModel.Tasks[0]
propA = task.Properties[“PropertyA”].Value
task.Properties[“PropertyA”].Value = “Foo”
Property groups are treated the same as elsewhere in ACT:
task = ExtAPI.DataModel.Tasks[0]
group1 = task.Properties[“GroupName”]
supProp1 = group1.Properties[“SubPropertyA”]
subProp1Val = subProp1.Value
When you must perform “advanced” Project
Schematic interactions, you can access
task.InternalObject to receive the task’s
underlying DataContainerReference. This might be
needed to execute Workbench-specific scripting commands. For more
information, see the Workbench Scripting Guide.
task = ExtAPI.DataModel.Tasks[0]
container = task.InternalObject
container.SendCommand(Language=”Python”, Command=”print ‘test’”)
Interactions with Ansys-installed tasks operate in the same way. For
example, if you create a Fluent analysis system on the Project
Schematic, you could set the property
RunParallel as follows:
task = ExtAPI.DataModel.Task[0]
task.Properties[“RunParallel”].Value = True
All "set"-based actions performed via
Property.Value calls are recorded in the journal.
Using the last example with a Fluent system, the resulting journal would
contain the following code:
# encoding:  utf-8
# Release 17.1
SetScriptVersion(Version=”17.1.21”)
Reset()
template1 = GetTemplate(TemplateName=”FLUENT”)
system1 = template1.CreateSystem()
setup1 = system1.GetFluentLauncherSettings()
fluentLauncherSettings1.RunParallel = True
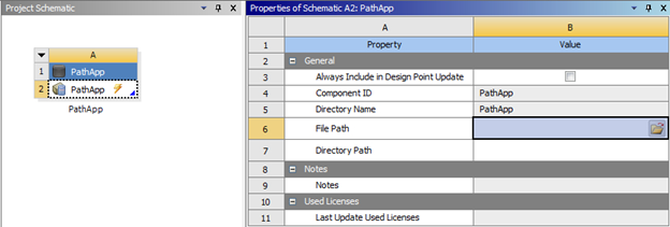
You can specify the controls fileopen and
folderopen on task properties. On task creation
and property display, a folder icon appears in the property value cell.
Selecting this icon displays a dialog box for selecting a file or folder.
File path and folder path access remains the same as if the property was
string-based.
XML Definition File:
<task ...>
    ...
    <property name="Prop1" caption="File Path" control="fileopen" .../>
    <property name="Prop2" caption="Directory Path" control="folderopen" .../>
    ...
</task>
IronPython Script:
def update(task):
    filePath = task.Properties["Prop1"].Value
    dirPath = task.Properties["Prop2"].Value
For string-based task properties, specify text as
the control type.
...
<task ...>
    ...
    <property name="StringTest" caption="String" control="text"...>
 </property>
    ...
</task>
...
For option-based task properties, specify the standard
select control type and use the
options attribute to provide the items to be
populated to the control.
...
<task ...>
    ...
    <property name="ComboBoxTest" caption="My Prop" control="select"...>
 ...
 <attributes options=”one,two,three” .../>
    ...
</task>
...
In the XML file, you can specify default property values to be used on the Project Schematic.
...
<task ...>
    ...
    <property name="MyProperty" caption=”My Property" control="text" default=”Foo”.../>
    ...
</task>
...
You can integrate an external application into the Project Schematic by defining parameters that are created dynamically at initialization.
Parameters are defined in the optional element
<parameters>. At minimum, each parameter
definition must include the following attributes:
name, usage,
control, and
version.
The basic structure of a parameter definition follows.
<parameters>
	<parameter name="" caption="" usage="" control="" version="1"/>
</parameters>
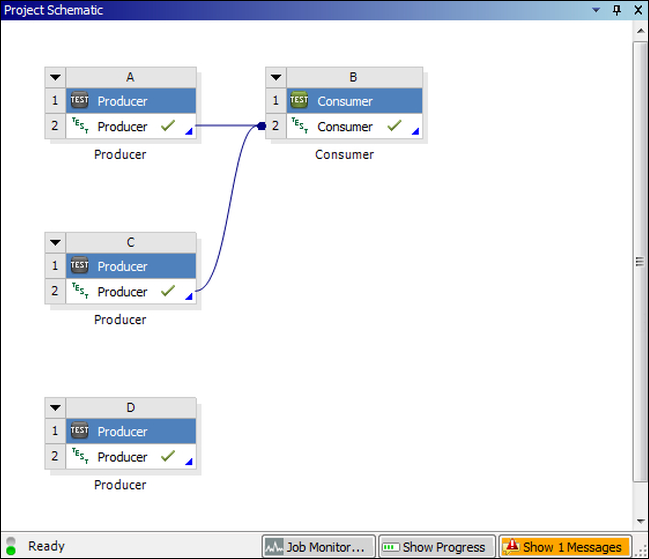
In a Workbench workflow, the Project Schematic connections serve as visual representations of data flow between tasks. These connections depend on input and output coordination. Workbench can establish connections only if an upstream (providing) task exposes outputs whose types also match the inputs for a downstream (consuming) task.
Inputs and outputs are defined in elements
<input> and
<output>.
You can use the attribute type to specify the data
type expected by the connection.
By default, ACT applies an unlimited count to the number of input specifications. You can specify a count according to your own requirements:
...
<task ...>
    ...
    <inputs>
        <input/>
        <input format="" type="GeneralTransfer" count=2/>
    </inputs>
    ...
</task>
...
Certain Workbench types require the use of both the attributes
type and format. For
example, a Mesh task that consumes a mesh and then
passes a mesh to another task group would use these attributes to specify
the mesh type and file format of the input and output files.
This example defines the inputs and outputs for a task within a Fluent
meshing workflow. The meshing-based type values and
FluentMesh format values instruct an upstream
mesh task to output the Fluent mesh file format (MSH).
...
<task name="Mesher" caption="Mesher" icon="GenericMesh_cell" version="1">
	<callbacks>
		<onupdate>update</onupdate>
		<onedit>edit</onedit>
	</callbacks>
	<inputs>
		<input format="FluentMesh" type="MeshingMesh" count="1"/>
		<input/>
	</inputs>
	<outputs>
		<output format="FluentMesh" type="SimulationGeneratedMesh"/>
	</outputs>
</task>
...
For a list of supported transfer types and their corresponding transfer properties, see Appendix C: Data Transfer Types.
For a list of the data types and data transfer formats for each addin, see Appendix D: Addin Data Types and Data Transfer Formats.
Ansys Remote Solve Manager (RSM) enables the remote execution of applications and processes. By leveraging high-performance clusters and efficient job scheduling, users submit jobs either as background solve tasks (local machine) or as true remote cluster and scheduler submissions. Workbench orchestrates the packaging, submission, tracking, and reintegration of job artifacts.
ACT enables you to leverage RSM capabilities, specifying the remote
execution of a task’s processes via the child element
<rsmJob>. This element allows you to
specify all relevant RSM-related information, including supported
platforms, input and output files, process arguments, and the callbacks
needed to execute the remote jobs.
This example shows the basic definition of a remote execution specification. It defines the name and version of the job, specifies that job files should be deleted after execution, and defines job input and output files and callbacks.
...
<task name="MyTask" caption="My Task" icon="my_task" version="1">
 ...
     <rsmjob name="squares" deletefiles="True" version="1">
          <inputfile id="1" name="input1.txt"/>
          <outputfile id="1" name="output1.txt"/>
          <program>
               <platform name="Win64" path="%AWP_ROOT171%\path_to.exe"/>
               <platform name="Linux64" path="%AWP_ROOT171%/path_to.exe"/>
               <argument name="" value="inputFile:1" separator=""/>
               <argument name="" value="outputFile:1" separator=""/>
          </program>
          <callbacks>
               <oncreatejobinput>createJobInput</oncreatejobinput>
               <onjobstatus>getJobStatus</onjobstatus>
               <onjobcancellation>cancelJob</onjobcancellation>
               <onjobreconnect>reconnectJob</onjobreconnect>
          </callbacks>
     </rsmjob>
</task>
...
For more information about how to access RSM capabilities, see External Application Integration with Custom Data and Remote Job Execution.
From a task, you can access and manipulate objects above the task level, such as container-level commands, Workbench-level components or parameters, and the task-containing task group:
ACT provides the ability to invoke journaling and scripting-defined, container-level commands on a task. The following API is available:
| Class | Member | Description |
|---|---|---|
UserTask
|
ExecuteCommand(commandName,
                                        args)
| Invokes a Project Schematic method defined on the task. |
The following code sample shows an implementation of the method
ExecuteCommand.
#assume the first task is a mechanical-based system
task = ExtAPI.DataModel.Tasks[0]
task.ExecuteCommand(“Edit”, [])
ACT enables you to access task-defined Workbench parameters directly from a task. The following API is available:
| Class | Member | Description |
|---|---|---|
UserTask
|
Parameters
| Obtains the parameters defined on the task. |
The following code sample shows an implementation of the method
Parameters.
task = ExtAPI.DataModel.Tasks[0]
myParameters = task.Parameters
myParam = myParameters[0]
myParamValue = myParam.Value
ACT enables you to access an Ansys-installed component directly from a task. The following API is available:
| Class | Member | Description |
|---|---|---|
UserTask
|
Component
| Obtains the underlying Project Schematic component associated with the task. |
The following code sample shows an implementation of the method
Component.
#assume the first task is a mechanical-based system
task = ExtAPI.DataModel.Tasks[0]
myTaskComponent = task.Component
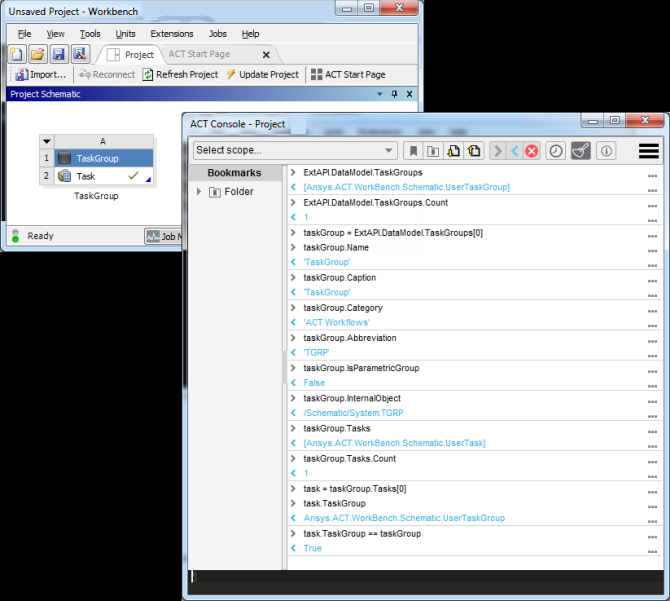
ACT enables you to access specific TaskGroup
instances that have been created on the Project
Schematic. Because a task is owned by
a TaskGroup, you can access the owning
TaskGroup directly from a new
Task. The following APIs are available:
| Class | Member | Description |
|---|---|---|
Task (UserTask)
|
TaskGroup
                                            (UserTaskGroup)
| Obtains the task’s task group owner. |
ExtAPI.DataModel
|
TaskGroups
| The list of all task groups currently on the Project Schematic. |
TaskGroup
(UserTaskGroup)
|
Tasks (UserTasks)
| The list of all tasks owned by the task group. |
Name
| The task group name. | |
Caption
| The task group display name. | |
Category
| The task group toolbox category. | |
Abbreviation
| The task group abbreviation. | |
IsParametricGroup
| Indicates whether the task group falls under the Parameter Set bar, operating only on parameter and design point data. | |
InternalObject
| (System data reference) |