


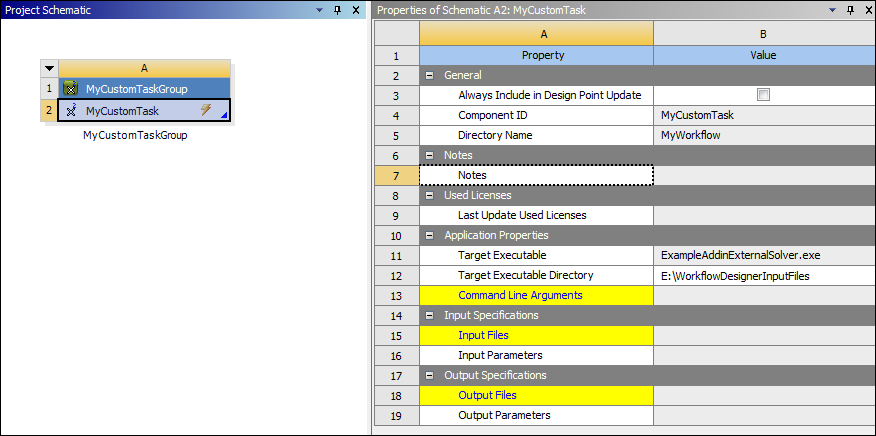
After you add a custom workflow to the Project Schematic, for each task cell, you define input and output files, the values to display as parameters in the Workbench Parameter Set bar, and command line arguments.
In the Project Schematic, right-click the task cell in the custom workflow and select Properties. The Properties pane displays. Properties that require values are highlighted in yellow.
Specify the input file:
Select Input Files, which is a link for opening the Parse Input File dialog box. To the right of the button is a help button
 . Clicking it provides general information about how to set
parameters automatically or manually.
. Clicking it provides general information about how to set
parameters automatically or manually. 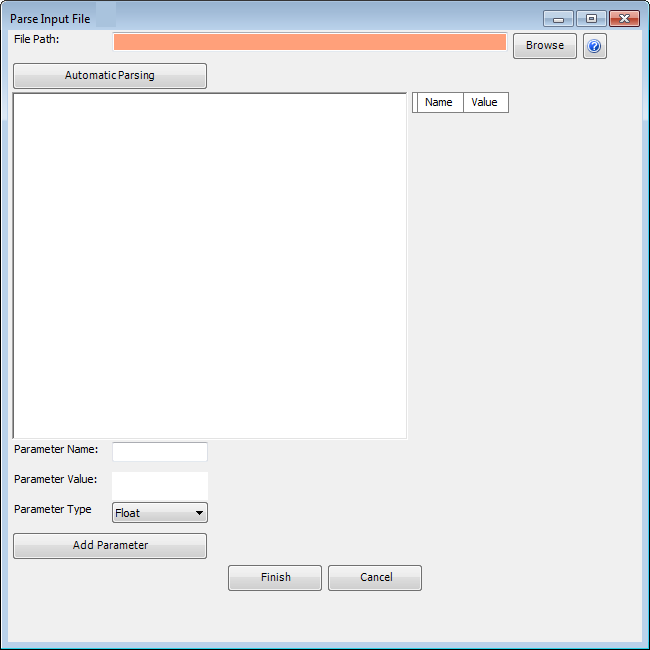
For File Path, browse to and select the input file.
The Parse Input File dialog box displays the content of the file, which should include a list of values that can be used as parameters.
To parse the entire input file and set input parameters automatically, click . The table on the left side of the dialog box updates to display the input parameters.
Otherwise, do the following for each value that you want to manually set as an input parameter:
With the mouse cursor, click the value that you want to include in the Parameter Set bar.
displays the selected value, which will be editable in the Parameter Set bar.
Complete Parameter Name and Parameter Type, specifying the name and data type to use for this input parameter.
Click Add Parameter. The table on the left side of the dialog box updates to include the selected input parameter.
When finished adding input parameters, click Finish.
In the Project Schematic, a Parameters cell is added to the custom workflow and the Parameter Set bar is also added. An upward arrow connects the Parameter Set bar to the Parameters cell to indicate that input parameters are defined.
Workbench converts the input file to a template, adding a suffix of - Template to the end of the filename. This template is necessary as a baseline because filenames change during design point updates.
Workbench copies this template to the project’s local directory. To see all files in this directory, you can select > to add the Files pane to Workbench. In the Files pane, you can then right-click in the Location column for the template file and select Open Containing to open the directory in which the template file resides.
In the Properties pane for the task cell, specify the output file in the same manner as you did the input file in step 2, only select Output Files in the Properties pane to open the Parse Output File dialog box.
Take the same actions indicated in step 3 to either automatically or manually select output parameters.
When finished adding output parameters, click Finish.
In the Project Schematic, a downward arrow now connects the Parameters cell to the Parameter Set bar to indicate that output parameters are defined.
Workbench converts the output file to a template, adding a suffix of - Template to the end of the filename. Workbench copies this template to the project’s local directory, which you can see by performing the steps described in step 4.
In the Properties pane for the task cell, specify command line arguments for the external application:
Select Command Line Arguments, which is a link for opening a dialog box.
In the entry field, specify the arguments needed by the external application.
This might be as simple as clicking Input File and Output File to create the following argument:
[Input File][Output
                                        File]
However, you can also add a switch such as
-bfor batch execution or a flag for using a particular feature.When finished, click .
After performing these steps, no properties for the task cell should be highlighted, which means that you should be able to update the task cell successfully.
Because Workbench uses templates for the input and output files, you can add design points in the Table pane of the Parameter Set bar and update all design points to generate results for output parameters. Then, if you have a license for Ansys DesignXplorer and would like to further explore a particular design point, from the Workbench Toolbox under Design Exploration, you can insert any DesignXplorer system.