This page shows you how to edit a preprocessing mapper to convert data.
Prerequisites: You must have either control's Preprocessing formula
settings window open and have at least one Preprocessing mapper in the
formula.
-
From the Edit formula dropdown menu, select the Mapper that you
want to edit.
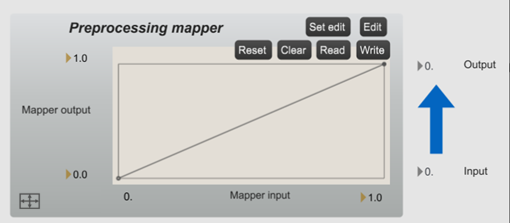
A mapper window is automatically opened.
-
To redefine the mapper’s X (input) and Y (output) ranges, press the XY
limits button
 at the bottom left of the window.
-
Four windows will appear one after the other. Use these windows to set the X
min, Y min, X max, and
Y max values.
-
Press the Edit button.
A text editor window is opened.
-
In the text editor window, edit the values as needed. Each line corresponds to a point
in the graph. The first column lists the X coordinates of the points. The second column
lists the Y coordinates. The third column lists the curvatures of the previous segments.
The curvature on line i corresponds to the curvature of the segment between points
i-1 and i.
Note: Curvature is expressed as a number ranging from -1 to 1. A 0 curvature means no
curvature and a straight segment, which is the default behavior when you add new points.
A negative number corresponds to a convex curvature. A positive number corresponds to a
concave curvature.
-
Close the text editor window.
-
Press the Set edit button.
Tip:
You can also edit a mapper directly from the graph:
- Click, then drag and drop an existing point to move it.
- Click an empty part of the graph to add a point.
- Press Shift + click a point to delete it.
- Press ALT + click a line between two points, then drag the line upward or
downward to add curvature.
-
To save the mapper, press the Write button.
-
To reuse this mapper data for another preprocessing mapper, press the
Read button in the target mapper, and select the
.SEVmapper file saved above.


