


Setting the Audio Output Parameters
The first step of the audio output configuration consists of defining or checking the audio output hardware used (audio device, driver, etc.).
-
If the Output Device drop-down list is available, select the
audio output device to use.
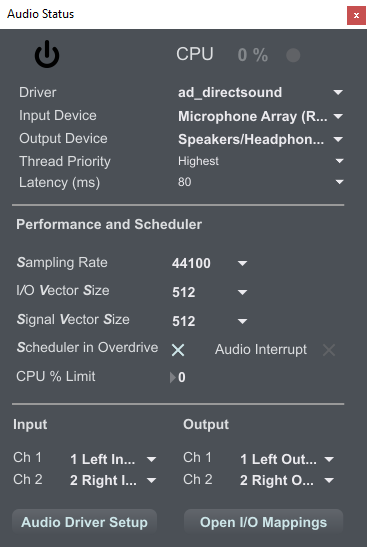
Note: The CPU indicator at the top of the Audio Status window displays how much CPU workload the software is using. Although this indicator varies over time, in most cases, it remains way below 100%, and the sound output is fine. However, if the indicator approaches 100% (generally because of settings changed in the window), you will start to hear audio artifacts, such as audio "clicks", every time it hits 100%.Note: Windows operating software generally natively offers two audio drivers that can be found in the Driver dropdown menu: "ad_directsound" and "ad_mme". Both these drivers are generally ok for desktop, stereo-mode use of the software, and have the advantage of working with any sound card. However, they usually introduce latency to an audible amount (around 100 ms), which can be detrimental to the interactive experience that the software offers.External audio devices often offer an alternative "ASIO" driver. ASIO drivers generally create much lower latencies, although they are usually specific to their dedicated device. For advanced use cases of the software, Ansys recommends using the ASIO driver provided with the external audio device used.
Note: I/O Vector Size and Signal Vector Size define buffer sizes used in ASDforEV. I/O Vector Size corresponds to the buffer size used for communication with the audio device. Signal Vector Size is the buffer size used internally in the software. Signal Vector Size is always equal to or a subdivision of I/O Vector Size. These two parameters can have a strong influence on both the latency and the CPU workload. Smaller buffer sizes alleviate latency-related problems but increase CPU workload. As a consequence, it is sometimes required to adjust these buffer sizes to offer an optimal trade-off between low latency and contained CPU workload.