


Luminance, Contrast and Gamma Measurements
The camera should be set-up and the first measurement should already have been performed.
Reproduce the measurement process for each file of data set 1, 2 and 3:
Download the Data Sets.
Open each file with Windows Photo Viewer in full screen.
The ruler should be removed for these measurements.
Measure the sets following the measurement process.
Launch Virtual Photometric Lab and import the .cos file generated from the first measurement (white map with the ruler).
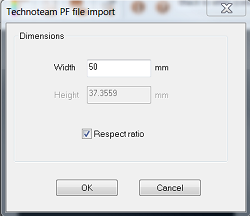
In TechnoTeam PF File window, leave 50mm as width only for the first import.
To find a scale factor between reality and acquisition, replicate the ruler in Virtual Photometric Lab:
Click Measures
 .
. Select an area and from the Shape drop-down list, select User Line.
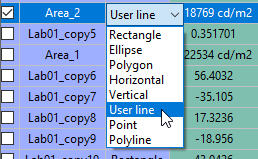
Enter Point 1 and Point 2 coordinates and make them correspond with the max and min coordinates of the ruler displayed on the white map.
Open and fill the Display Size Excel file (from set 0):
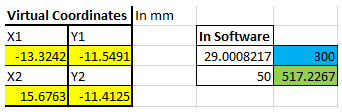
Fill the virtual coordinates of the points in the yellow cells.
Specify the length of the ruler (in mm) in the blue cell.
In Software, report the value obtained from VP lab.
Perform a cross-multiplication and type the result in the green cell.
This value now represents a reference point. You should enter this value in the TechnoTeam PF file window every time you open a new .cos file.
Open the measured white XMP map without the ruler and in the TechnoTeam PF File window, specify the reference value (in the green cell of the excel file).
These values must remain the same for all XMP files until the set-up is changed.
Open each .cos generated file in Virtual Photometric Lab and save them as .xmp files.
Now that all .cos files are under XMP format, create the measurement templates.