


Setting Speos Preferences
This page shows how to set the Speos preferences and general options.
To set Speos preferences:
-
In Precision of parameters, define how many decimals to allow for certain
parameters:
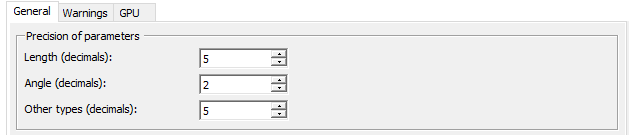
- Define how many decimals need to be available to define the length of rays.
- Define how many decimals need to be available to define angular values.
-
In Results, define the behavior of the simulation results:
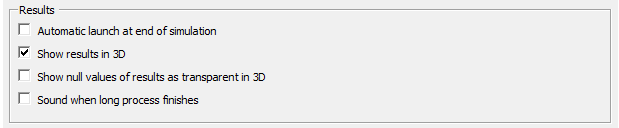
- Check Automatic launch at end of simulation if you want the simulations' results to be automatically opened with their associated viewer at the end of the simulation.
- Deselect Draw results in 3D if you do not want the results to be displayed in the 3D view at the end of the simulation.
-
Select Show null values of results as transparent in 3D if you do not want to display the black part of a 2D irradiance result in the 3D view.
This parameter is only a visualization parameter and does not modify the result.
-
Check Sound when long process finishes to be warned when a feature has finished its computation.
Note: This options only concerns certain processes: Direct and Inverse simulations, 3D Textures, Optical Surface, Optical Lens and Light Guide.
-
In Simulations, adjust simulation behavior:

- Define the Number of thread to use for direct and inverse simulations.
-
Check VR Sensor Memory Management to activate the memory management.
Note: Disabling this option can greatly improve simulation performance, but in that case, make sure that you have enough memory on your computer to generate Speos360 files.You must have more than 6 GB available for immersive sensor and more than X GB available for an observer sensor (X corresponding to the number of positions defined in the sensor).
-
Check Automatic "Save All" before running a simulation if you want to trigger a backup of the project before the simulation is launched.
Note: This option does not apply to interactive simulations because they are automatically updated.
-
In Colorimetry, select the default Colorimetric
Standard to be used for all simulations.

- CIE 1931: 2 degrees CIE Standard Colorimetric Observer Data. Only one fovea, which covers about a 2-degree angle of vision, was used during the experiments leading to the 1931 standard observer.
- CIE 1964: 10 degrees CIE Standard Colorimetric Observer Data. The
1964 standard observer was based on color-matching experiments using a 10-degree area on the
retina. Note: For The CIE 1964, the luminous level is not correct whatever the unit. Only use the CIE 1964 for color display and color analysis with colorimetric and spectral map.
-
In Feature Edition, select the intensity result viewing direction to use
for the sensors:

- Select From source looking at sensor to position the observer point from where light is emitted.
- Select From sensor looking at source to position the observer in the opposite of light direction.
-
In File Management, check Automatically copy selected files
under document's folder to embed any input file selected outside the SPEOS Input Files
directory in the current project.
This option ensures the project's portability as it copies any imported file back into the SPEOS Input Files directory.
If you do not check the option to automatically copy the files, you can still click Copy under document to manually perform the copy to the Speos Input Files directory of the current project._Copy_Under_Document.png) Note: Both options do not apply to *.SPEOSLightBox files, 3D Textures, and CAD assemblies imported using the Geometry Update tool.
Note: Both options do not apply to *.SPEOSLightBox files, 3D Textures, and CAD assemblies imported using the Geometry Update tool. -
In Meshing preview, you can:
_Preferences_Meshing_Preview.png)
-
check Use faster preview in order to display the Meshing preview faster in the 3D view.
Use faster preview option only applies to the Meshing preview option.
Note: Use faster preview can have some minor rendering issues on its visualization. This does not affect the meshing used for simulation. select a specific meshing preview Color for a better visibility of the meshing and objects in the 3D view.
The color applies both to the Meshing preview (Use faster preview) option and the classic meshing.
-
-
In the GPU tab, you can:
- define the GPUs to use to run the simulations with the GPU Compute option. Note: If you select multiple GPUs, simulations will consume the sum of the equivalent cores per GPU.
If you select no GPU, Speos will automatically select the most powerful available.
_Preferences_GPU_Simulation.png)
- Enable GPU-Explore in order to be able to use the whole capabilities
of the Live
Preview as listed in the picture below. Note: When Enable GPU-Explore is activated, the Live Preview consumes the sum of equivalent core per GPU and uses all selected GPUs (rather than just the most powerful of the list).
_Preferences_Live_Preview.png)
- define the GPUs to use to run the simulations with the GPU Compute option.