Group Commands for Modeler Objects
The 3D Modeler allows you to group objects in the History tree. Besides pre-defined folders under History Tree Layout for solids, sheets, and material assignments, a set of Group commands allows you to create groups, ungroup objects, flatten a selected group's hierarchy, and delete empty groups. Groups are not compatible with 3D components, although, you can organize 3D components by definition in the History tree.

The Group commands support the following features:
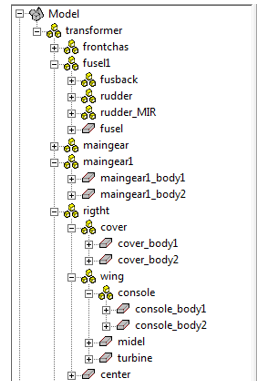
- Group objects in the history tree. When objects are grouped, they show up under a sub-item in the history tree.
- Groups can contain sub-groups and sub-group containing further sub-groups.
- Groups permit moving objects from one group to any other group at any time.
- Groups are purely for organization of history tree. They do not affect solution in any way.
- Groups permit you to bring in MCAD assemblies and sub-assemblies as groups. See: Importing 3D Model Files.
- Groups can contain objects, submodels (for example, UDM, 3D Component, CAD links) and groups. Coordinate systems, planes etc will not have any parent group.
Object groups have following important distinctions from 3D components:
- Groups do not encapsulate history of objects. They do not encapsulate parameters used by those objects.
- Groups do not have history tree operations. For example, Arrange operations apply to all objects of the group rather than the group.
- Groups are not independent. Delete of an object in one group could cause object in another group to be also deleted.
Accessing Group Commands
You can access Group commands in several ways: via Modeler > Group, via the right-click shortcut menu in the History tree, via the right-click shortcut menu in the Modeler window, and via the Group icons on the Model tab.

Group Command Descriptions
Group > Create works with or without a selection. If the History Tree Layout>Show Groups command is disabled, a dialog box reports that groups are currently hidden, and that if you OK to continue, groups will be shown. If there is no selection of objects for new group, an empty group is created under Model. If there are selections, a new group is created under same group as all the selections, provided all selections are under one group. Once a group is created, all selections move under the new group. If selections are under different groups, then a new group is created under Model. Selections could be objects, groups, 3D Components, or User Defined Model. The Group > Create command tries to find a more suitable group name where possible, based on names of all selections. If not, default group names are Group1, Group2, and so on. You can edit group names later.
Group > Ungroup is enabled only when you select one or more groups. Upon ungroup, all the contents of the selected group move under group’s parent and the selected group is deleted. Note that Group > Ungroup is not recursive; it only affects the selected group is and all its children groups remain intact. Ungroup is also different from Delete (under Edit > Delete), which deletes a selected group and everything under it.
Group > Flatten is enabled when you select a group. You can select multiple groups at different levels. All of the selected group's contents (objects, sub-groups, and so forth) come directly under selected group. In a sense this is a recursive ungroup operation as all the children and grandchildren groups of selected group are ungrouped. If the History Tree Layout > Show Groups command is disabled, a dialog box reports that groups are currently hidden, and that if you OK to continue, groups will be shown.
Group > Delete Empty deletes all empty groups under the selected group. If a selected group is empty it is deleted. This command is helpful to clean up empty groups after you have moved objects from one group to another. If the History Tree Layout > Show Groups command is disabled, a dialog box reports that groups are currently hidden, and that if you click OK to continue, groups will be shown.
Operations on Groups
Edit/Delete
Delete operations delete group and all the children, including sub-groups, under the group.
Copy and Paste of Objects in Groups
When you copy and paste objects with groups to another design, group information is carried over, that is, new group in target design is created. If a group with the exact name exists, then the objects are moved under that group and no new group is created. When pasted in the same design, the pasted object moves under same parent group as original object.
Copy and Paste of Groups
When you copy and paste one or more groups in same design or to another design, a new group is created with unique name derived from original group name. Everything under that group, including any sub-groups, is copy/pasted as well.
Copy and Paste of Groups and Objects
If you multi-select a few objects and groups, all of them are pasted correctly. If you select a group and few objects under that group, copy and paste includes the complete group structure. This means that selection of objects under the selected group is ignored. If you want to only copy and paste few objects from group, you should only select those objects and NOT select the group.
Arrange Operations on Groups
You can select group to enable arrange operations like move, rotate and mirror. Note that arrange operations works directly on objects under selected group. So after arrange operation is done, the History tree shows the arrange operation under every object of that group.
Duplicate Operations on Groups
You can select groups to enable duplicate operations. Afterward, the History tree shows a duplicate operation under every object of that group. Newly created objects appear under a new group. There will be new group for every instance of duplicate.
Other Operations on Groups and Objects in Groups
Modeling operations that create new objects, such as Create from Face or Edge, as well as Simplify and Separate. The newly created objects appear under a new group created under the original object's group, based on the tool option settings. See: 3D Modeler Options: Group Options.
Group Properties
A Group’s Property tab is shown when you select a group in the history tree. The Group’s properties include Name and parent Group.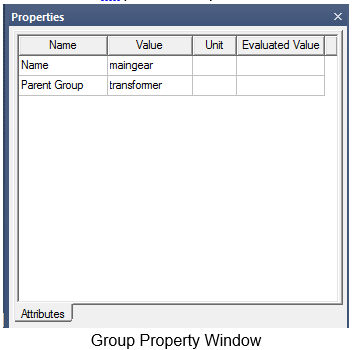
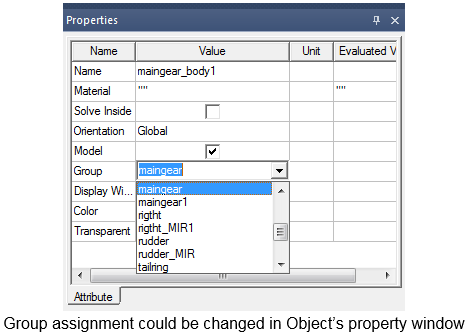
Object, group and submodel properties have a Group property. You can edit the Group Property and this provides another way of setting an object’s (or group’s) group. You can select any of the existing groups listed or create a new group.