


| Applicable Products: | Ansys Multiphysics |
| Level of Difficulty: | Easy |
| Interactive Time Required: | Approximately 30 minutes |
| Discipline: | Structural, thermal, electric |
| Analysis Type: | Static, nonlinear |
| Element Types Used: | Coupled-Field SOLID227 |
| Features Demonstrated: | Importing an IGES model, SmartSizing, selecting entities, applying voltage, temperature, and displacement boundary conditions, plotting voltage, temperature, and displacement results, animating displacement results, listing heat flow and current |
| Help Resources: | Coupled-Field Analysis and Direct Coupled-Field Analysis, and SOLID227 |
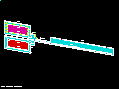
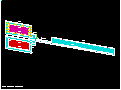
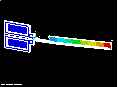
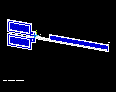
This tutorial demonstrates how to analyze an electrical-thermal actuator used in a micro-electromechanical system (MEMS). The thermal actuator is fabricated from polysilicon and is shown below.
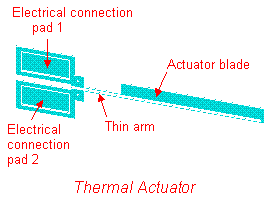
The thermal actuator works on the basis of a differential thermal expansion between the thin arm and blade.
The required analysis is a coupled-field multiphysics analysis that accounts for the interaction (coupling) between thermal, electric, and structural fields.
A potential difference applied across the electrical connection pads induces a current to flow through the arm and blade. The current flow and the resistivity of the polysilicon produce Joule heating (I2R) in the arm blade. The Joule heating causes the arm and the blade to heat up. Temperatures in the range of 700 -1300 oK are generated. These temperatures produce thermal strain and thermally induced deflections.
The resistance in the thin arm is greater than the resistance in the blade. Therefore, the thin arm heats up more than the blade, which causes the actuator to bend towards the blade. The maximum deformation occurs at the actuator tip. The amount of tip deflection (or force applied if the tip is restrained) is a direct function of the applied potential difference. Therefore, the amount of tip deflection (or applied force) can be accurately calibrated as a function of applied voltage.
These thermal actuators are used to move micro devices, such as ratchets and gear trains. Arrays of thermal actuators can be connected together at their blade tips to multiply the effective force.
Primary Objective:
Determine the blade-tip deflection for an applied potential difference across the electrical connection pads.
Secondary Objectives:
Obtain temperature, voltage, and displacement plots.
Animate displacement results.
Determine total current and heat flow.
You are provided with a solid model in an IGES file. Dimensions are in micrometers. The thermal actuator has an overall length of approximately 250 micrometers, and a thickness of 2 micrometers. The given potential difference across the electrical connection pads is 5 volts.
| Material Properties for Polysilicon | |
|
Young's modulus |
169 GPa |
|
Poisson's ratio |
0.22 |
|
Resistivity |
2.3e-5 ohm-m |
|
Coefficient of thermal expansion |
2.9e-6/oK |
|
Thermal conductivity |
150 W/moK |
Coupled-field problems can be solved using the direct method or the sequential method. The direct method performs the coupled-field analysis in one step using coupled-field elements. The sequential method performs the coupled-field analysis in multiple steps, where the results from one step are used as input to the next step. Coupled field elements are not required for the sequential method.
This tutorial uses the direct method to evaluate the actuator. The direct approach is the most efficient method for this problem. If it were necessary to include the effects of temperature-dependent material properties and/or thermal radiation, however, a more efficient option would likely be the sequential method. The nonlinear thermal-electric problem could be solved using SOLID227 elements with only the TEMP and VOLT degrees of freedom active, and the mechanical problem could be solved using SOLID187 elements. The temperatures calculated in the thermal analysis could be applied as loading to the mechanical model using the LDREAD command.
For this problem, you first import the file actuator.iges. Next, you define the element type as SOLID227 using the structural thermoelectric degrees of freedom (KEYOPT(1) = 111): UX, UY, UZ, TEMP, VOLT. The element simulates the coupled thermal-electric-structural response.
To define material properties for this analysis, you must convert the given units for Young's modulus, resistivity, and thermal conductivity to μMKSV units. The units have been converted to μMKSV for you.
| Material Properties for Polysilicon (μMKSV units) | |
|
Young's modulus |
169e3 MPa |
|
Poisson's ratio |
0.22 |
|
Resistivity |
2.3e-11 ohm-μm |
|
Coefficient of thermal expansion |
2.9e-6/oK |
|
Thermal conductivity |
150e6 pW/μmoK |
Next, you mesh the model with the coupled field elements. You then apply voltages to the electrical connection pads and set their temperature to an assumed 30 oC. You then mechanically fix the electrical connection pads in the X, Y, and Z directions.
Finally, you obtain the solution and post process the results to achieve the analysis objectives.
Use the information in the problem description and the steps below as a guideline in solving the problem on your own. Or, use the detailed interactive step-by-step solution by choosing the link for step 1.
Import Geometry
Define Materials
3. Define material properties.
Generate Mesh
Apply Loads
5. Plot areas.
6. Apply boundary conditions to electrical connection pad 1.
7. Apply boundary conditions to electrical connection pad 2.
Obtain Solution
8. Solve.
Review Results
11. Plot displacement results and animate.
Read in the actuator model. It is provided for you in the form of an IGES file.
"No defeaturing"
[OK]
File name: actuator.iges (Click the link to download the file in .zip format.)
[OK]
Specify the element type as coupled-field element SOLID227, and the default degrees of freedom (KEYOPT(1) = 111): UX, UY, UZ, TEMP, VOLT. This problem uses all degrees of freedom.
[Add ...]
"Coupled Field" (left column)
"Tet 10node 227" (right column)
[OK]
[Options]
“Analysis Type K1” choose Structural-thermoelectric
[OK]
[Close]
Enter the material property values for polysilicon. The values are for Young's modulus, Poisson's ratio, thermal expansion coefficient, thermal conductivity, and resistivity. The units for the values are μMKSV.
Select "Structural," then "Linear," then "Elastic," then "Isotropic"
"EX" = 169e3
"PRXY" = 0.22
[OK]
Select "Thermal Expansion," then "Secant Coefficient," then "Isotropic"
"ALPX" = 2.9e-6
[OK]
Select "Thermal," then "Conductivity," then "Isotropic"
"KXX" = 150e6
[OK]
Select "Electromagnetics," then "Resistivity," then "Constant"
"RSVX" = 2.3e-11
[OK]
Plot individual areas in preparation for applying the boundary conditions to the electrical connection pads (performed in subsequent steps). First set Mechanical APDL to display each of the areas in a distinguishing color and number:
(check) "Area numbers" to "On"
[OK]

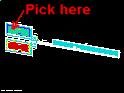
Apply the voltage, temperature, and displacement boundary conditions to electrical connection pad 1. First select this pad area so that you have to perform the picking function only once there, even though you are applying three different types of boundary conditions.
(first drop down) "Areas"
(second drop down) "By Num/Pick"
[OK]
Pick electrical connection pad 1 (the upper pad). Ensure that you have picked the correct area by holding the mouse button down and dragging the mouse until ONLY the pad area highlights, then release the button.
[OK]
Now apply the voltage boundary condition to pad 1.
[Pick All]
By choosing Pick All, you pick only the area representing pad 1 because that is the only entity you currently have selected.
"Load VOLT Value" = 5
[OK]
Notice the voltage boundary condition symbols added to pad 1.
Apply the temperature boundary condition to pad 1.
[Pick All]
"DOF to be constrained" = TEMP
"Load TEMP value" = 30
[OK]
Notice the temperature boundary condition symbols added to pad 1.
Apply the displacement boundary conditions to pad 1.
[Pick All]
"DOFs to be constrained" = UX
"Displacement value" = 0
[Apply]
[Pick All]
"DOFs to be constrained" = UY
[Apply]
[Pick All]
"DOFs to be constrained" = UZ
[OK]

Notice that Mechanical APDL has cumulatively added the displacement boundary condition symbols to the pad after you applied them (that is, X constraint, then Y constraint, then Z constraint).
Apply the voltage, temperature, and displacement boundary conditions to electrical connection pad 2. The procedure is identical to the one you just performed to add boundary conditions to pad 1.
(first drop down) "Areas"
(second drop down) "By Num/Pick"
[OK]
Pick electrical connection pad 2 (the lower pad). Ensure that you have picked the correct area by holding the mouse button down and dragging the mouse until only the pad area highlights, then release the button.

[OK]
Apply the voltage boundary condition to pad 2.
[Pick All]
By selecting Pick All, you pick only the area representing pad 2 because that is the only entity you currently have selected.
"Load VOLT Value" = 0
[OK]

Notice the voltage boundary condition symbols added to pad 2.
Apply the temperature boundary condition to pad 2.
[Pick All]
"DOF to be constrained" = TEMP
"Load TEMP Value" = 30
[OK]

Notice the temperature boundary condition symbols added to pad 2.
Apply the displacement boundary conditions to pad 2.
[Pick All]
"DOFs to be constrained" = UX
"Displacement value" = 0
[Apply]
[Pick All]
"DOFs to be constrained" = UY
[Apply]
[Pick All]
"DOFs to be constrained" = UZ
[OK]

Notice how Mechanical APDL has cumulatively added the displacement boundary condition symbols to the pad after you applied them (X constraint, then Y constraint, then Z constraint).
Before solving the problem, select the entire finite element model.
Plot the temperature results. This is one objective of this analysis.
"DOF solution"
"Nodal Temperature"
[OK]
Refer to the legend beneath your plot for a numerical interpretation of the colors in the plot.
The electrical connection pads are the same color, reflecting the constant temperature boundary condition. There is a change in color in the blade, as viewed from the pads-end to the blade-tip end, indicating that the voltage difference across the pads causes a temperature difference across the blade. The thin arm is at higher temperatures than the blade.
Plot the voltage results. This is one objective of this analysis.
"DOF solution"
"Electric potential"
[OK]
Refer to the legend beneath your plot for a numerical interpretation of the colors in the plot. Note that the electrical connection pads are distinctly two different colors, reflecting the voltage difference across the pads. The change in color of the blade, as viewed from the pads-end to the blade-tip end, indicates that the voltage drop from pad 1 to pad 2 is distributed along the electrical conduction path of the actuator.
Now plot and animate the displacement results. These are two objectives of this analysis.
"DOF solution"
"Y-Component of displacement"
[OK]
Refer to the legend beneath your plot for a numerical interpretation of the colors in the plot. The electrical connection pads are the same color, indicating that the pads are constrained in all directions. Notice the gradual change in color in the blade and thin arm, as viewed from the pads end to the blade-tip end. This display, along with the animation you will generate next, clearly show the bending of the thermal actuator.
The color of the blade tip indicates a deflection of approximately 3.07 micrometers, resulting from the 5 volts applied across the pads. You have achieved the primary objective of this analysis.
Generate the corresponding animation.
(left column) "DOF solution"
(right column) "Translation UY"
[OK]
[Close] after making desired choices in the Animation Controller.
Obtain a listing of results including the total heat flow and current. These are two objectives for this analysis.
(first drop down) "Areas"
(second drop down) "By Num/Pick"
[OK]
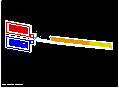
Pick the electrical connection pad on the thin side of the actuator (lower pad as shown below).

[OK]
(first drop down) "Nodes"
(second drop down) "Attached to"
"Areas, all"
[OK]
"1st 10 items"
[OK]
Scroll to the bottom of the list and note that the total heat flow is approximately 8.07e9 pW and the total current is approximately 3.23e9 pA.
When you are done viewing the listing, choose:
(Windows platforms),
or
(Linux platforms)