| Applicable Products: | Ansys Multiphysics, Ansys Emag |
| Level of Difficulty: | Easy |
| Interactive Time Required: | 60 to 75 minutes |
| Discipline: | Electromagnetics |
| Analysis Type: | Linear static |
| Element Types Used: | PLANE13 (archived element) |
| Features Demonstrated: | Axisymmetry, vector plots, element table operations, path operations |
| Help Resources: | Two-dimensional Static Magnetic Analysis, PLANE13. |
A solenoid actuator is analyzed as a 2D axisymmetric model.
The element PLANE13 used in this tutorial has been archived. For more information, see Feature Archive.
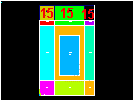
The dimensions of the solenoid actuator are in centimeters.
The armature is the moving component of the actuator.
The back-iron is the stationary iron component of the actuator that completes the magnetic circuit around the coil.
The stranded, wound coil of 650 windings with 1 amp/turn supplies the predefined current. The current per winding is 1 amp.
The air-gap is the thin rectangular region of air between the armature and the pole faces of the back-iron.
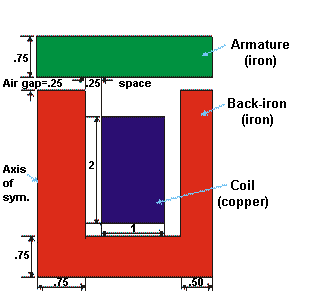
Objective: For the given current, determine the force on the armature.
The magnetic flux produced by the coil current is assumed to be so small that no saturation of the iron occurs, allowing a single-iteration linear analysis. The flux leakage out of the iron at the perimeter of the model is assumed to be negligible. This assumption is made simple to keep the model small. The model would normally be created with a layer of air surrounding the iron equal to or greater than the maximum radius of the iron.
The air gap is modeled so that a quadrilateral mesh is possible. A quadrilateral mesh allows for a uniform thickness of the air elements adjacent to the armature where the virtual work force calculation is performed. This is desirable for an accurate force calculation.
The program requires current to be input in the form of current density (current over the area of the coil).
The assumption of no leakage at the perimeter of the model means that the flux is acting parallel to this surface. The assumption is enforced by the flux parallel boundary condition placed around the model, used for models where the flux is contained in an iron circuit.
Forces for the virtual work calculation are stored in an element table and then summed. The force is also calculated by the Maxwell Stress Tensor method and the two values are found to be relatively close.
Use the information in the problem description and the steps below as a guideline in solving the problem on your own. Or, use the detailed interactive step-by-step solution by choosing the link for step 1.
Input Geometry
1. Read in geometry input file.
Define Materials
3. Specify material properties.
Generate Mesh
4. Define element type and options.
5. Assign material property attributes.
6. Specify meshing-size controls on air gap.
7. Mesh the model using the MeshTool.
8. Scale model to meters for solution.
Apply Loads
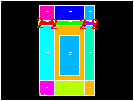
9. Define the armature as a component.
10. Apply force boundary conditions to armature.
11. Apply the current density.
12. Obtain a flux parallel field solution.
Obtain Solution
13. Solve.
Review Results
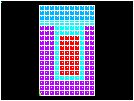
14. Plot the flux lines in the model.
15. Summarize magnetic forces.
16. Plot the flux density as vectors.
Read in the file that includes the model geometry.
File name: solenoid.inp (Click the link to download the file in .zip format.)
[OK]
Set preferences to filter quantities that pertain to this discipline only.
(check) "Magnetic-Nodal"
[OK]
Specify the material properties for the magnetic permeability of air, back-iron, coil, and armature. For simplicity, all material properties are assumed to be linear. (Typically, iron is input as a nonlinear B-H curve.)
Material 1 is used for the air elements, Material 2 for the back-iron elements, Material 3 for the coil elements, and Material 4 for the armature elements.
(double-click) "Electromagnetics", then "Relative Permeability", then "Constant"
"MURX" = 1
[OK]
[OK] to copy Material Model Number 1 to become Material Model Number 2.
(double-click) "Material Model Number 2", then "Permeability (Constant)"
"MURX" = 1000
[OK]
"from Material Number" = 1
"to Material Number" = 3
[OK]
"from Material Number" = 2
"to Material Number" = 4
[OK]
(double-click) "Material Model Number 4", then "Permeability (Constant)"
"MURX" = 2000
[OK]
Review the list of materials, then:
(Windows),
or
(Linux) to close the window.
Define element types and specify options associated with those element types.
[Add...]
"Magnetic Vector" (left column)
"Vect Quad 4nod13 (PLANE13" (right column)
[OK]
[Options...]
(drop down) "Element behavior" = Axisymmetric
[OK]
[Close]
Assign material properties to air gaps, iron, coil, and armature areas.
(drop down) "Element Attributes" = Areas; then [Set]
Pick four areas of air gaps, A13, A14, A17, and A18 (the picking "hot spot" is at the area number label).

[OK]
(drop down) "Material number" = 1
[Apply]
Pick the five back-iron areas, A7, A8, A9, A11, A12.
[OK]
(drop down) "Material number" = 2
[Apply]
Pick coil area, A4.
[OK]
(drop down) "Material number" = 3
[Apply}
Pick armature area, A10, A15, A16.
[OK]
(drop down) "Material number" = 4
[OK]
Toolbar: SAVE_DB
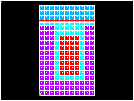
Adjust meshing size controls to obtain two element divisions through the air gap.
Pick four vertical lines through air gap.
[OK]
"No. of element divisions" = 2
[OK]
"Size Control Global" = [Set]
"Element edge length" = 0.25
[OK]
(drop down) "Mesh" = Areas
[Mesh]
[Pick All]
[Close]
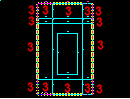
For a simplified model, select a coarse mesh. For production, however, use a finer mesh, especially in the air-gap region.
(drop down) "Elem / attrib numbering" = Material numbers
[OK]
Your mesh may vary slightly from the mesh shown here. As a result, you may see slightly different results during postprocessing. For a discussion of results accuracy, see Planning Your Approach in the Modeling and Meshing Guide.
For a magnetic analysis, a consistent set of units is necessary. This analysis uses MKS units; therefore, scale the model from centimeters to meters.
[Pick All]
"RX,RY,RZ Scale Factors" = 0.01, 0.01, 1
(drop down) "Existing areas will be" = Moved
[OK]
Toolbar: SAVE_DB
Define the armature as a component by selecting its elements.
(first drop down) "Elements"
(second drop down) "By Attributes"
"Min, Max, Inc" = 4
[OK]
"Component name" = ARM
(drop down) "Component is made of" = Elements
[OK]
(highlight) "Component name" = ARM
[OK]
The current density is defined as the number of coil windings times the current, divided by the coil area. This equals (650)(1)/2, or 325. To account for scaling from centimeters to meters, the calculated value needs to be divided by .01**2.
Pick the coil area, which is the area in the center.
[OK]
"Curr density value" = 325/.01**2
[OK]
Close any warning messages that appear.
Apply a perimeter boundary condition to obtain a "flux parallel" field solution. This boundary condition assumes that the flux does not leak out of the iron at the perimeter of the model. Of course at the centerline this is true due to axisymmetry.
Pick all lines around perimeter of model (14 lines).
[OK]
Toolbar: SAVE_DB
Note that a certain amount of undesirable flux leakage occurs out of the back-iron.
[OK]
Close any Notes or Warnings.
Your results may vary slightly from what is shown here due to variations in the mesh.
(highlight) "Component name(s)" = ARM
[OK]
Review the information, then choose:
(Windows),
or
(Linux), to close the window.
"Flux & gradient" (left column)
"Mag flux dens B" (right column)
[OK]
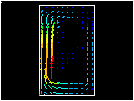
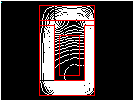
Plot the magnitude of the flux density without averaging the results across material discontinuities.
Select "Magnetic Flux Density," then "Magnetic flux density vector sum."
[OK]

Next, you will see how the flux density is distributed throughout the entire actuator.
Up to this point, the analysis and all associated plots have used the 2D axisymmetric model, with the axis of symmetry aligned with the left vertical portion of the device.
Mechanical APDL continues the analysis on the 2D finite element model, but enables you to generate a three-quarter expanded-plot representation of the flux density throughout the device, based on the defined axisymmetry. The function is purely graphical, and no changes to the database occur.
(check) "3/4 expansion"
[OK]
Obtain an isometric view for a more meaningful representation.
[Iso]
[Close]