Editing a Dimension Annotation

  1. Select the dimension annotation to move, size, or rotate it.

    To move the dimension note, mouse over the edge of the box with the Select tool until the cursor changes to , then drag the note.

    To size the box that contains the dimension note, drag the handles of the note box (the white circles).

  2. Select the text of the note to reformat it.
  3. (Optional) Right-click the dimension and select text formatting options from the mini-toolbar.
    • Click to select a tolerance format, then edit the text of the tolerance.

      See the Limits and Fits Tolerances section below for a description of using Limits and Fits.

    • Click to insert a field. You can select a field type and format from the Insert Field window.
    • Select from the drop-down to insert a symbol.
  4. Click an arrowhead to cycle through alternative leader styles.
    You can also right-click an arrowhead and select Arrow Style to select a style for that arrowhead, or select the arrowhead, then select the style for the head in the Properties panel.
  5. Click the note leaders to modify them.
    You can right-click a leader and select Add Jog Point to add a new point.
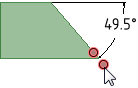
  6. To change the distance between a dimension extension line and its reference point on the object, click the extension line, then hover over the end closest to the object. Drag the red dot to change its distance from the object.

    If you cant' see the extension line, hover over the end of the dimension leader, where the line would be. You will see two red dots that you can drag:

  7. Modify the dimension note properties in the Properties panel. Modify the:
    • Arrow Length and Width properties to set the length and width of the arrowheads
    • Measurement property to change the measurement type. For example, you may want to display the radius of a hole instead of the diameter.
    • Precision property to change the number of decimal places.
    • Upper Limit, Lower Limit, and Type of tolerance property to change the format of the dimension and enter upper and lower tolerance values.
  8. To fit a dimension within the text box, right-click the note and open the Autofit drop-down menu. Choose one of the following options:
    • Do not autofit: The text box adjusts to the size of the text and grows as you type. There is no blank space around the note and making the text larger or smaller adjusts the box accordingly.
    • Resize text height on overflow: The text always fits the width of the box. If you make the box wider, text from the second line will move up to the first line.
    • Shrink text on overflow: The text adjusts uniformly (width and height) and scales to fit in the text box.
    • Shrink text horizontally on overflow: The width of the text changes but the height remains the same.