


Working with Hole Tables
- Use the pull handles on the table or chart to size as needed. Use the round handle at the top of the table to rotate the table or chart.
- Just like a regular table, you can change the values in the Rows and Columns cells in the Properties panel to adjust the number, width, or height of a table element.
- You can change individual axis label text and text properties (text is a single line). For example, you could have X-A coordinates instead of X-Y.
-
- If you make changes to your design, select the table ( or X or Y axis) and use
the RMB to:
- Show Hole Chart to create another chart.
- Show Hole Tableto create an updated table.
- Save Table As a Web (.htm, .html) or XML file.
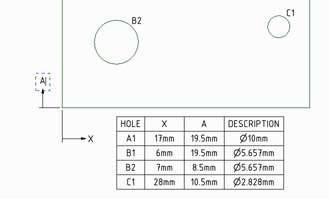
When you change the size of a hole, the values in the table update, and the table re-orders and re-classifies the holes and rows of the table.
When you copy and paste a hole, the table updates to display a new row with the hole's X, Y, and Description values.
After you drag a label to another position on the design, the table updates to the size and position of the new hole. To display your changes in a new table, right-mouse click and select Show Hole Table.
To remove a table or chart, select the table, right-mouse click, and select Cut.