


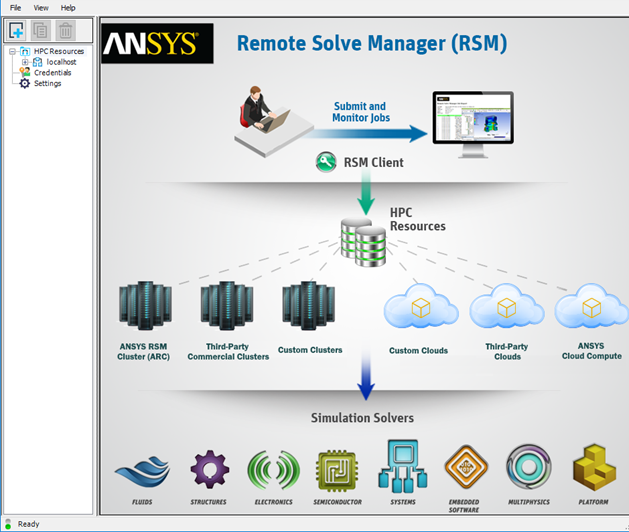
In order for RSM client machines to be able to submit jobs to the ARC submit host (ARCMASTER), we must create a configuration in RSM that establishes communication between the client and submit host, specifies the file transfer method, and specifies RSM queues that map to the ARC cluster queues.
Note: Before creating a configuration, you may want to review or change the location of the RSM configuration directory. See Setting Up the RSM Configuration Directory in Configuring Remote Solve Manager (RSM) to Submit Jobs to an HPC Resource.
Launch the RSM Configuration application as follows:
If you are using a Windows system, select .
You can also launch the application manually by double-clicking Ans.Rsm.ClusterConfig.exe in the [RSMInstall]\bin directory.
If you are using a Linux system, run the <RSMInstall>/Config/tools/linux/rsmclusterconfig script.
To add a new configuration, click
 .
.On the HPC Resource tab, specify a Name for the configuration, set the HPC type to , and specify the domain name of the cluster Submit host. For this tutorial we will assume that the cluster is running on Windows, so ensure that Windows 64 is selected in the adjacent drop-down:
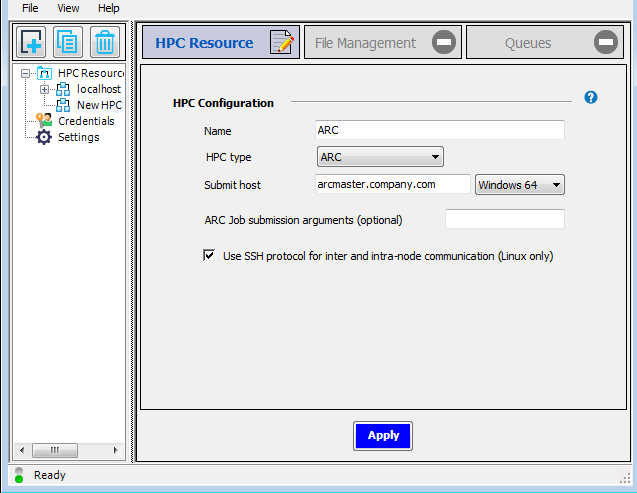
Click . The icon on the HPC Resource tab changes to a green check mark, indicating that the settings on that tab are complete and valid. Notice that the icon on the File Management tab is now an editing icon, indicating that the settings on that tab should be specified next.

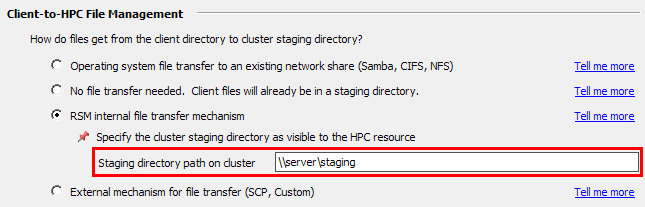
Select the File Management tab. For this example we are assuming that the remote cluster staging directory is not visible to client machines. In the Client-to-HPC File Management section, select RSM internal file transfer mechanism, then specify the path to the directory where job files will be staged (as the cluster sees it):
Note: Although we are using a specific file transfer option in this tutorial, the same file transfer options that are available for commercial clusters are available for the Ansys RSM Cluster (ARC). For more information refer to Setting Up Client-to-HPC Communication and File Transfers.
In the HPC Side File Management section, specify the working directory in the cluster where job (or solver) commands will start running.
- HPC staging directory
This option is recommended if one or both of the following is true:
There is a fast network connection between the execution nodes and the cluster staging directory.
You are using a solver that produces fewer, relatively small files as part of the solution and does not make heavy use of local scratch space (for example, the CFX or the Fluent solver).
- Scratch directory local to the execution node(s)
This option is recommended to optimize performance when one or both of the following is true:
There is a slower network connection between the execution nodes and the cluster staging directory.
You are using a solver that produces numerous, relatively large files as part of the solution and makes heavy use of local scratch space (for example, Mechanical solvers).
All input files will be copied from the cluster staging directory into that local scratch directory. Then, when the job finishes running, the requested output files generated by the job will be copied back to the cluster staging directory.
In the Local HPC scratch directory field, enter the local path of a scratch directory on the execution node (for example,
C:\Shares\Local_Share\ScratchDiron Windows). You can enter the path of the scratch directory manually, or use an environment variable in the format %VAR%.If the cluster is running on Windows, you must create a network share path for the local scratch directory on each node, and then enter this path in the Share path for local scratch field. This path starts with a non-editable
[ExecutionNode]variable. When a job is submitted, the[ExecutionNode]variable will be replaced with the actual machine name of each execution node assigned to the job.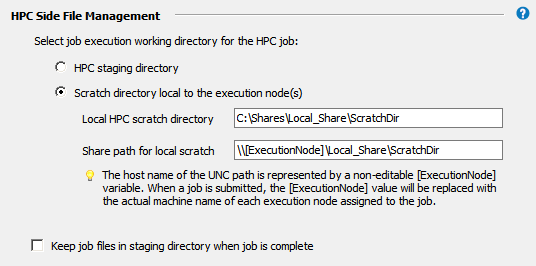
By default, job files will be deleted from the cluster staging directory after the job has run. Choosing Keep job files in staging directory when job is complete may be useful for troubleshooting failed jobs. However, retained job files will consume disk space, and require manual removal.
Click , then select the Queues tab.
Click
 to import the cluster queues that are defined on the
ARCMASTER machine
(
to import the cluster queues that are defined on the
ARCMASTER machine
(default,localandhigh_mem).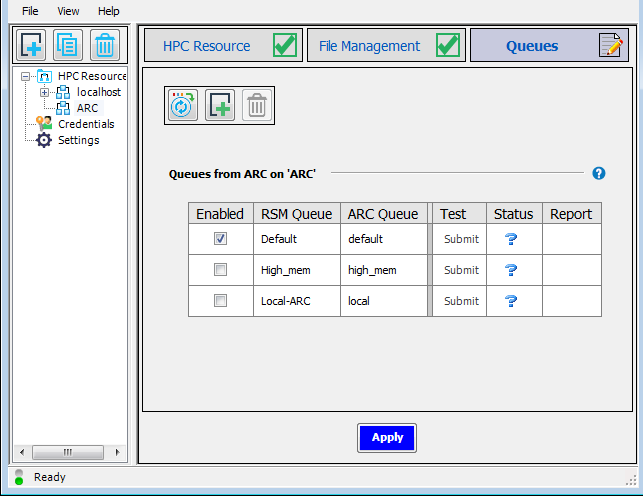
If the credentials needed to access cluster queues have not yet been cached in RSM, you will be prompted to enter them.
Each cluster queue has an RSM queue associated with it. RSM queues are the queues that users will see in client applications when they choose to submit jobs to RSM.
You can also manually add RSM queues to the list and associate existing cluster queues with them.
By default, the RSM Queue name matches the Cluster Queue name.
To edit an RSM Queue name, double-click the name and type the new name. Note that each RSM queue name must be unique.
For each RSM Queue, specify whether or not the queue will be available to users by checking or unchecking the Enabled check box for that queue.
To test a queue, click
 in the queue's Test
column.
in the queue's Test
column.
Note:You may need to click on the Queues tab before being able to submit test jobs.
Only enabled queues can be tested.
The status of the test is displayed in the Status column:

Job is being submitted 
Job is queued 
Job is in progress 
Job completed successfully 
Job completed successfully and released 
Job aborted 
Job aborted and released 
Job failed 
Job failed and released If a test job fails, refer to ARC Troubleshooting.
Click to complete the configuration.