


You can stop the calculation in an interactive Polyflow session by clicking the
close button (![]() ) in the upper right corner of the Polyflow window.
) in the upper right corner of the Polyflow window.
You can also stop a Polyflow calculation in the background by using the Progress Monitor in Workbench. The Progress Monitor is useful if you would like some visual feedback on the progress of your calculations. Typically, the Progress Monitor is hidden, but can be displayed at the bottom of the Project Schematic by toggling the Show Progress button.
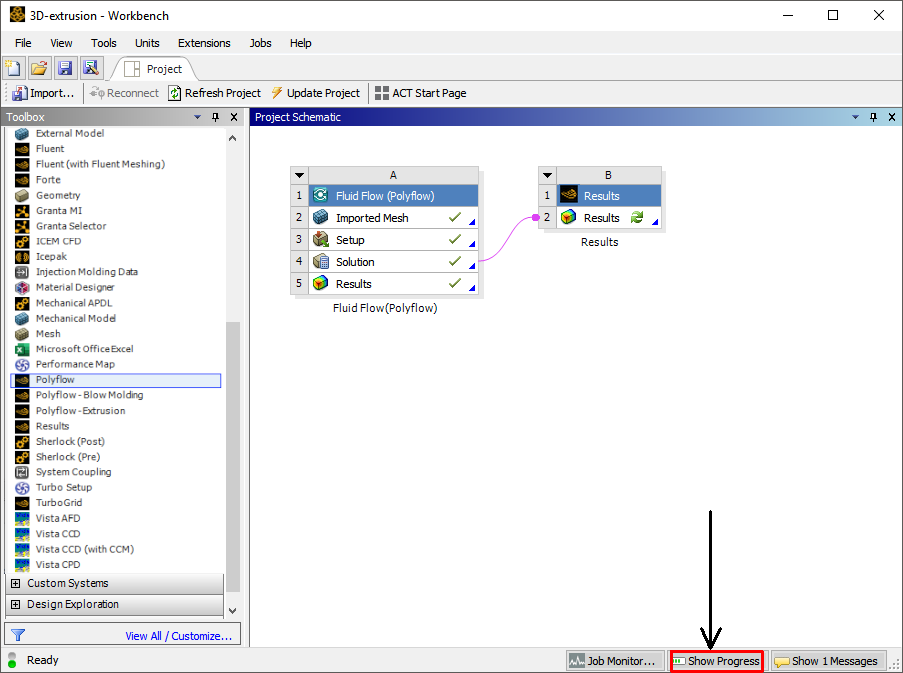
When the Progress Monitor is displayed, the button becomes the button, so the button can be used to toggle the display of the Progress Monitor.
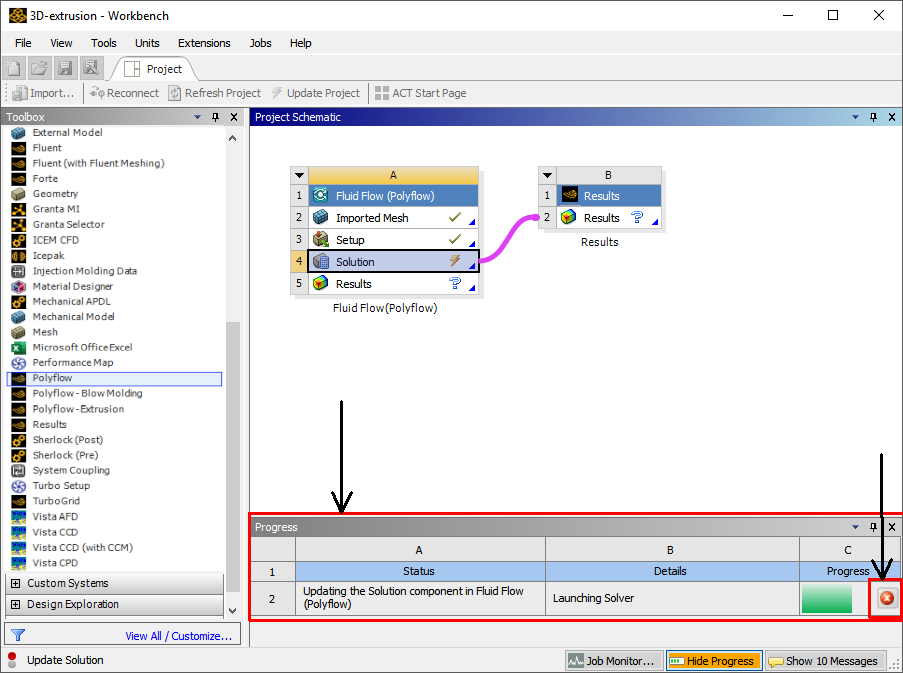
To stop an ongoing Polyflow calculation from Workbench, select the stop button (![]() ) in the Progress Monitor (see Figure 2.9: The Hide Progress Button, the Progress Monitor and the Stop Button in
Workbench). This will display a
prompt (Figure 2.10: The Ansys Workbench Prompt),
confirming that you want to stop the calculations.
) in the Progress Monitor (see Figure 2.9: The Hide Progress Button, the Progress Monitor and the Stop Button in
Workbench). This will display a
prompt (Figure 2.10: The Ansys Workbench Prompt),
confirming that you want to stop the calculations.
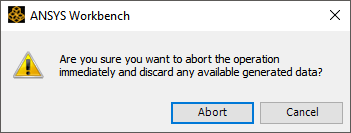
Clicking Yes in the prompt stops the calculation immediately without concern for whether data associated with the current action can be stored. If you are running a transient simulation or one that involves pseudo-evolution, and intermediate results files were generated, the state of the Solution cell becomes Interrupted; the results can be viewed using Ansys CFD-Post. Otherwise, the state of the Solution cell remains Update Required.
After stopping the Polyflow calculation, you have two options:
You can restart the calculation from the beginning. This is accomplished by performing one of the following actions:
Right-click the Solution cell, select Preferences..., and then select Polyflow. Revise at least one of the parameters in the Polyflow options... dialog box that opens, and click . Then update the Solution cell.
Right-click the Solution cell and select Reset. Click in the dialog box that opens, and then update the Solution cell.
If it was a transient simulation or involved pseudo-evolution, you may be able to continue the calculation from where it was stopped by using the files created in the aborted Polyflow calculation, as described in the following steps:
Important: The option to continue an interrupted simulation is only available for Polyflow component systems.
Create a duplicate system by clicking the upper-left corner of the interrupted Polyflow component system and selecting Duplicate.
If there are any upstream connections to the duplicate system you must delete them. (Right-click the connection, select Delete, and click in the dialog box informing you that the operation will delete the selected link(s).)
Important: The remaining actions will all be performed in the newly created, duplicate system.
Right-click the Setup cell and select Import Files (generated by another system)....
Select the interrupted Polyflow system from the Select a system drop-down list and select Last mesh[formatted] from the Select one file: drop-down list and click .
Repeat the previous two steps for Last result[formatted] and Last restart[formatted].
Double-click the Setup cell to open Polydata.
In Polydata, click F.E.M Task 1 (or whatever you named the first task).
Click Numerical parameters and click Start from old result and restart files.
Select the res file and click Open.
Select the rst file and click Open.
Click Upper level menu twice to return to the top-level Polydata menu.
Click Save and exit.
Click Accept then Continue in the Field Management menu.
Click in the Check field support dialog box.
Click in the message dialog box that opens.
Right-click the Solution cell and click Update to resume the interrupted calculation.
Important: When continuing a calculation that involves adaptive remeshing, you must make sure that the mesh, restart, and results files are compatible (that is, all the files are from the same time step).
If you would like to view the listing file to see a record of the actions performed by the solver during the calculation, open the listing viewer as described in Starting a Listing Viewer from a Polyflow-Based System.