


The folder metal_forming contains a slight variation of the previously described example. In practice, eroding has been replaced by varying punch velocity and friction. For Case B, the following parameters are investigated:
Material parameters (random numbers)
Mass density ρ
Elastic modulus E
Poisson ratio ν
Bilinear σ - ε diagram (0-0.5)
Friction μ between blank and binder
Geometric parameters (random numbers)
Shell thickness t
Simulation parameters (random numbers)
Punch velocity
For Case B, all setup files and some of the output files are delivered.
To demonstrate the non-matching meshes feature, two additional meshes are found next to the reference mesh reference_mesh.k used for the simulation process. The file reference_mesh_coarse.k contains a reduced FEM mesh with only 2304 elements, while the file reference_mesh_fine.k contains a finer FEM mesh with 38139 elements.
Note:
Using a different reference mesh significantly influences the time needed to import all designs.
Unless stated otherwise, directory paths for Case B are subdirectories in
examples\lsdyna\metal_forming.
Robustness Analysis
The software requirements for the robustness analysis are:
Products: oSP3D, optiSLang (optional), LS-DYNA (optional), and LS-PrePost (optional)
Platform: Windows
The optiSLang project file deep_drawing.opf and its project working directory deep_drawing.opd contain the predefined Robustness workflow used to generate this example. It has been created and successfully tested on Windows with LS-LS-DYNA and LS-PrePost. All alpha-numerical output files generated by LS-PrePost are in the project working directory in Robustness/Design0*/out/*.k. The file plastic_strain.k for Design0001 is in:
deep_drawing.opd\Robustness\Design0001\out\plastic_strain.k
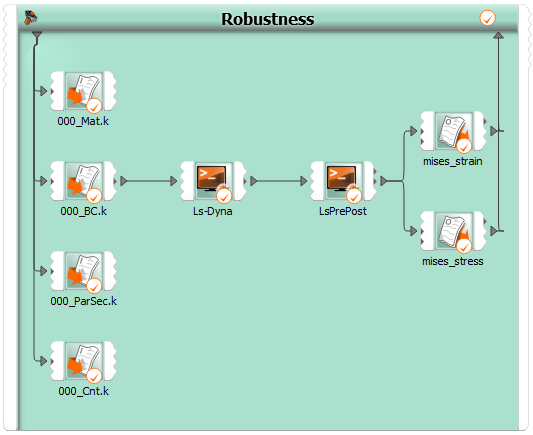
A diagram follows of the optiSLang workflow for a robustness analysis:
When re-executing or even changing this optiSLang project, keep the following information in mind:
All input files used for this project are in the directory deep_drawing_template. Any file mentioned in subsequent bullets can be found in this directory or one of its subdirectories.
The text input parser definition works as long as it is not modified. Otherwise, the file path location must be updated.
The batch script actor named LS-DYNA executes a predefined script building on the following prerequisites:
The actor copies several files before executing the script. The file path locations must be updated.
The actor relies on an environment variable named LSTC_EXECUTABLE defined within this actor. This environment variable must point to the LS-DYNA executable. It is used to generate the following command call, written in line number 16 in the predefined script, assuming four available CPUs:
"%LSTC_EXECUTABLE%" I=000_Main.k NCPU= 4 > console.out
This behavior can be changed by modifying the definition set
LSTC_NUM_CORES=4in line number 7, omitting any space between the equality sign and the number of CPUs.Managing the LS-DYNA license is your responsibility. For more information, see the Ansys LS-DYNA User's Guide or the LSTC home page.
The batch script actor named Ls-PrePost executes a predefined Windows batch script, building on the following prerequisites:
The actor copies the file deep_drawing_template\generate_output.cfile before executing the predefined script. The file path must be updated.
The actor relies on an environment variable named LSPP_EXE_DIR that is defined within this actor. This environment variable must point to the directory of the LS-PrePost executable. It is used to generate the following command call, written in line number 17 in the predefined script:
"%LPP_EXE_DIR%\\lsprepost.exe" c=generate_output.cfile
Field-MOP Analysis
The software requirements for a field-MOP analysis are:
Product: oSP3D
Platform: Linux or Windows
To perform field-MOP analysis:
Start a new oSP3D project and import the file DeepDrawing_fineRef.sdb from
examples\lsdyna\metal_forming.This database was generated using the finest reference mesh in deep_drawing.opd/Robustness/reference_mesh_fine.k with an Incompatible (assuming a smooth boundary) mesh mapper, a search distance given by 5, and a double-sided, node-to-segment projection.
Load the simulation input parameters into this oSP3D instance.
Using the option Import scalars from optiSLang .bin, import the optiSLang postprocessor database file in deep_drawing.opd/Robustness/Robustness_osl3.bin
To complete the field-MOP setup:
Select all scalar input parameters or a subset of interest, although the latter is not generally recommended.
Select one of the random field quantities, such as
pstrain.
Use the option Create Field-MOP to create the field-MOP.
The field-MOP is automatically generated in the background and results are shown:
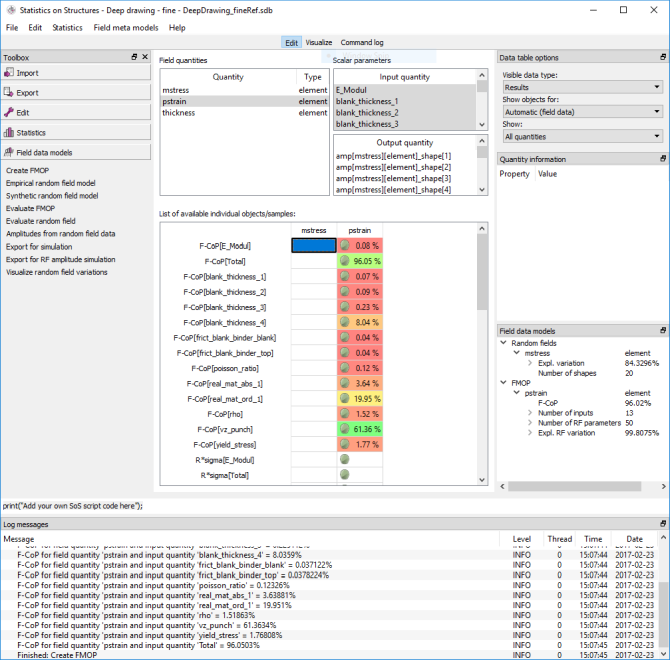
To visualize these F-CoP values only, you can open the file DeepDrawing_fineRef__FMOP.sdb, which has already been prepared, following the given procedure. For an illustrated step-by-step guide and more information, see the appropriate oSP3D tutorial and the description in Creating Field-MOPs.
Random Field Generation
The software requirements for random field generation are:
Product: oSP3D, optiSLang (optional), LS-DYNA (optional), and LS-PrePost (optional)
Platform: Linux or Windows
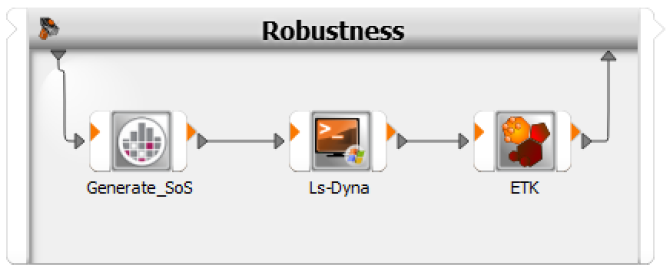
The following diagram shows the optiSLang workflow for generating random fields:
This optiSLang project prepares a consecutive simulation as described in Case A: With Eroded Elements. When using this optiSLang, keep in mind the following:
For information on using the
Generate_oSL3Dnode for random field simulation, in the optiSLang 3D Post-Processing Tutorials, see Using the "Generate_oSL3D" Node in optiSLang.The batch script actor named LS-DYNA executes a predefined script. This actor defines and relies on an environment variable named LSTC_EXECUTABLE. This environment variable must point to the LS-DYNA executable. It is used to generate the following command call, written in line number 16 in the predefined script assuming four available CPUs:
"%LSTC_EXECUTABLE%" I=000_Main.k NCPU= 4 > console.out
You can change this behavior by modifying the definition set
LSTC_NUM_CORES=4in line number 7, omitting any space between the equal sign and the number of CPUs.Managing the LS-DYNA license is your responsibility. For more information, see the Ansys LS-DYNA User's Guide or the LSTC home page.