


 The Associate Face to Surface option allows you to adjust how faces relate to the geometry. By default, edges and faces between two blocking materials (boundary faces) will automatically associate with the nearest active surface.
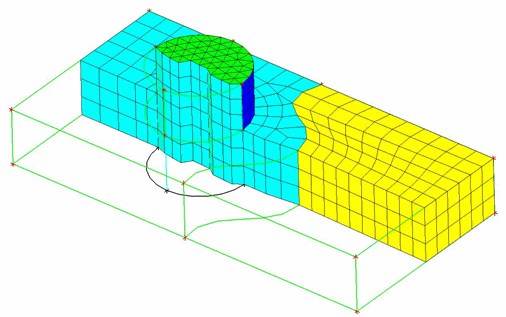
Click the selection icons to select the face(s) and the surface part.
The following options are available for associating faces to surfaces:
- Closest
finds the closest surface for projection. For boundary faces, this returns face association to the default. It can also be used to force internal faces to follow a surface.
- Interpolate
interpolates the shape of the meshed face from the shape of the bounding edges, rather than projecting the nodes to the surface. The surface mesh will still inherit the family name of the closest surface part. Use this feature if a face crosses a missing or poor quality surface.
- Part
projects the face to the surface that is in the specified part. This is useful for closely spaced curved surfaces, such as turbine blades, to ensure that each face projects to the correct surface, and not merely the closest surface.
Note: If you associate the face to a part which contains no surfaces, it will instead interpolate the mesh and place the elements in the specified part. This can be used to control the part name of the interpolated mesh.
- Shared Wall
allows you to set a general projection rule regarding faces between two specific volume parts.
- Create
sets the rule that the faces between the specified volume parts should always be projected to surfaces of the specified surface part.
- Remove Shared Wall
removes the above rule for a given pair of volume parts.
- None
removes the default behavior so that edges/faces between specified volumes do not automatically associate with surfaces. This is useful when there is no boundary between volumes or if you are using volume parts to break up a model for display or selection purposes, but the separate regions don’t represent physical differences which would require a boundary.
- Link Shapes
allows the internal face to have the same shape as the linked boundary face. The faces can be unlinked by disassociating them. Select the boundary face and the associated internal face.
Note: The internal, linked face takes its shape from the nearest parallel face that is projected to the boundary.
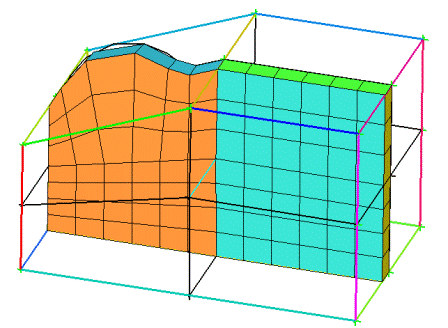
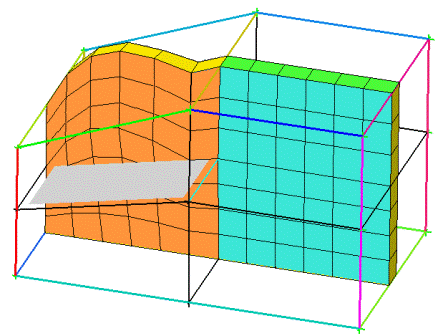
A model with two different materials is shown in Figure 382: Example of Link Shapes. The Shared Wall option is set to None, so there is no projection between the parts.
In figure (A), the internal face is not linked to the face above, near the boundary. The boundary face projects to the curved surface (not shown), but the internal face is interpolated straight across the volume.
In figure (B), the internal face has been linked with the top face. The mesh curvature transition is more gradual, crossing both blocks instead of just the top one.
Figure 382: Example of Link Shapes
(A) Internal Face not Linked to the Boundary Face
(B) Internal Face Linked to the Boundary Face
- Reference Mesh
allows you to use an existing surface mesh to seed an unstructured or swept face. This option can be used to obtain a better quality mesh or to set up node for node contact with a preexisting unstructured mesh.
An example demonstrating the use of the Reference Mesh option is shown in Figure 383: Using the Reference Mesh Option. The Multi-zone blocking on the geometry was generated automatically and one half mapped by default. The other half is an unstructured swept block with "all tri" free faces. To use a reference mesh, load an unstructured surface mesh and make sure the mesh perimeter matches the edge perimeter, including associations to surrounding curves. Verify the sweep direction (see the Reverse Swept Direction option) for the swept block. Select the Reference Mesh option, select the appropriate unstructured face and click . The swept mesh will be seeded with the reference mesh.
Figure 383: Using the Reference Mesh Option
(A) The automatically generated Multi-zone blocking/mesh on the geometry.
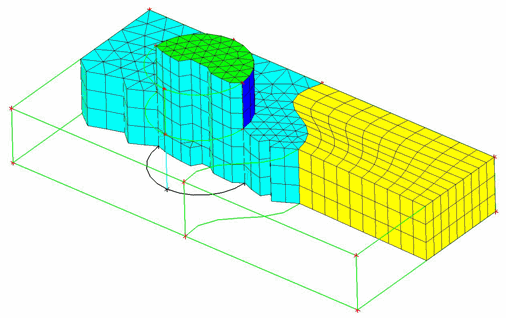
(B) The unstructured quad dominant surface mesh used as the reference mesh.
(C) The resulting swept mesh seeded with the reference mesh.
- Selected Surface
allows you to associate the selected face(s) with the specified surface.