The Fluent Icing workspace uses the remote client/solver framework to maintain a connection to a background Fluent Solution workspace when connected to and calculating a Fluent Icing simulation. When connected to a simulation, both workspaces are active.
Fluent Icing workspace (client)
The user interface where you interact with the simulation.
Typically active on a local machine, or a visualization machine.
Fluent Solution workspace (solver)
Hidden by default
Where the solver is calculated
Can be active on a local machine, or on compute nodes on a cluster
Can be shown at any time by selecting Workspaces → from the Project ribbon, allowing you to modify settings that are not available in Fluent Icing.
The client/solver framework allows for three options for launching Fluent Icing on a cluster using Job Scheduler:
Option 1: (Interactive)
Fluent Icing running on visualization node, and Fluent Solution running on the compute nodes, using the Fluent Launcher user interface panel to specify launching options.
Option 2: (Batch Mode)
Fluent Icing running on a visualization node, with Fluent Solution running on compute nodes, using command line options in Fluent Icing to specify the queuing system options.
Option 3: Custom Script (Advanced)
Fluent Icing running on a visualization node, with Fluent Solution running on compute nodes, using a custom script to specify launching options.
Option 4: Compute Node Only (Expert, Unsupported)
Fluent Icing and Fluent solver both running on compute nodes, using an expert script to specify launching options.
Note: Linux clusters
A newer version of Intel MPI is used and might encounter issues on inter-node (more than one compute node) computations, on clusters with outdated UCX libraries. A typical symptom of this issue would be a freeze of the computation, midway in the solver process. The workaround for this issue are either to:
Ensure the latest UCX libraries are used on the system.
Use a different MPI mode than
intelmpi, or by specifying the FLUENT_INTEL_MPI_VERSION=2018 environment variable.Use the FI_PROVIDER=verbs environment variable, to switch to an alternate communication method.
This environment variable is not suitable for all environments.
In the following sections, a step-by-step process for each method will be shown.
Option 1: Interactive
Fluent Icing workspace is running on a visualization node.
Fluent Solution workspace is running on the compute nodes.
Fluent Launcher user interface panel is used to specify launching options.
Open the Fluent Launcher window (/fluent/bin/fluent) and select Icing to launch Fluent Icing on your visualization node

Specify the appropriate options for the following settings:
Solver Processes.
Open the Scheduler tab.
Enable .
Select the queue type (, , or ).
Set up the Slurm Submission Host, Slurm Partition, Slurm Account, etc…
The following image shows a typical setup for a Slurm type queue.
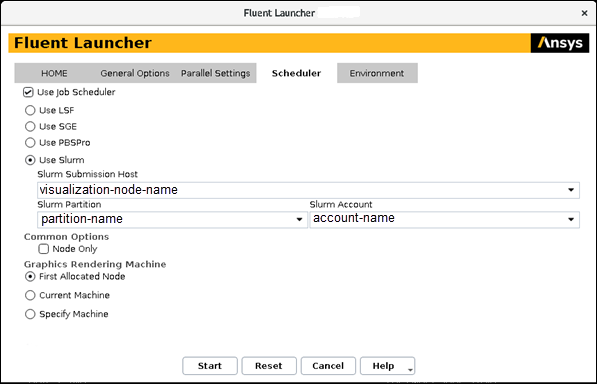
Click .
Fluent Icing is started on the current machine.
Once a simulation is created or loaded, the Fluent workspace will be allocated in the queuing system. You will then be in queue for the cluster compute nodes. Once the nodes are made available to you, the solver process will start, and the simulation will be shown in the Outline View.
Option 2: Batch Mode
Fluent Icing workspace is running on a visualization node.
Fluent Solution workspace is running on the compute nodes.
Command line options are used to specify solver launching options.
From the Project ribbon, select Workspaces → and ensure to disable .
Launch the icing executable with the same command line argument as when running Fluent in batch mode.
fluent/bin/icing -t28 -scheduler=slurm -scheduler_queue=partition-name
  -scheduler_account=account-name
This can be combined with batch mode arguments to execute a python script, for example
-R test.py -N. See Python Console.Create or Open a Fluent Icing project.
Create or load a simulation. The Fluent Launcher panel will be skipped (it will not appear), instead, the solver will be launched using the arguments that were specified when launching icing in the command line.
You will now be in queue for the cluster compute nodes. Once the nodes are made available to you, the solver process will start, and the simulation will be shown in the Outline View.
Option 3: Custom Script (Advanced)
Fluent Icing workspace is running on a visualization node.
Fluent Solution workspace is running on the compute nodes.
A Custom Script is used to specify the solver launching options. This allows the specification of complex, cluster specific settings and launcher files.
First, create two script files: 1)
call-sbatch.sh, and 2)launch-fluent.sbatch. The file call-batch.sh will be used to call the launch-fluent.sbatch file, with the appropriate arguments, and launch-fluent.sbatch will be used to launch fluent using the appropriate cluster specific launch commands in the appropriate format (example: sge or slurm). Example of these files are included below.Example
call-sbatch.sh: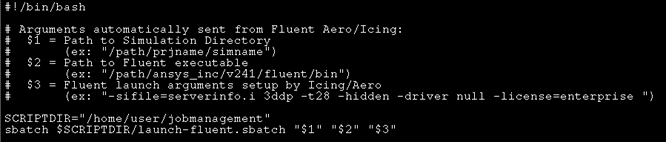
In the Custom Script mode, the $1, $2 and $3 arguments are required, and they are automatically passed to the call-sbatch.sh file by Fluent Icing. They correspond to the path to the simulation directory, the path to the fluent executable, and the standard fluent launch arguments setup by fluent aero, respectively.
call-sbatch.shmust be executable (chmod a+x call-sbatch.sh)Example
launch-fluent.sbatch: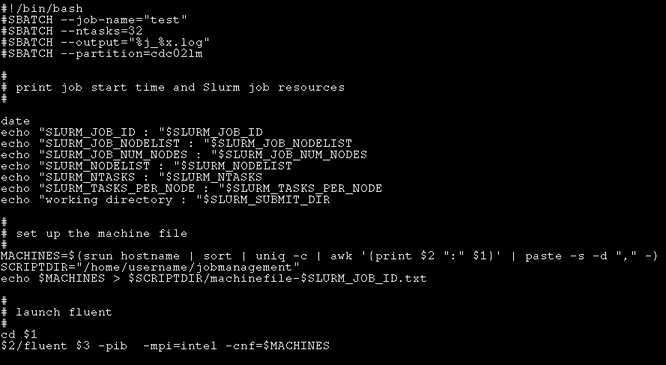
Again, arguments $1, $2, and $3 are required, and their usage is shown on the last 2 lines of the example file above. Typically, the -cnf argument to specify the compute nodes will be used as well, and is shown in the example file. The rest of the file should be configured to be appropriate to your cluster specific usage.
Set the number of cores, ntasks, equal to what you will be setting them in the Fluent Launcher. This is not automatic.
launch-fluent.sbatchmust be executable (chmod a+x launch-fluent.sbatch)
Set the PRJAPP_CUSTOM_LAUNCH_SCRIPT environment variable to the 1st script file,
call-sbatch.sh.
You can set this variable in the terminal where you launch Fluent Launcher, or include it in your startup scripts like
.bashrc
Launch Fluent Icing.
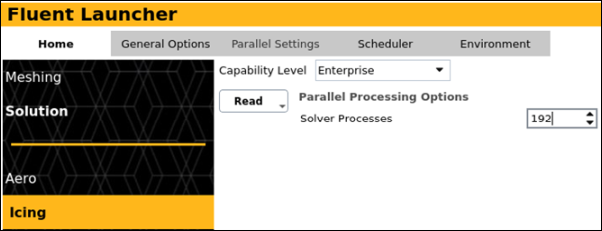
In the Fluent launcher, ensure to specify the correct number of CPUs that you would like to use with your simulation:
Disable any Scheduler commands in the launcher, as these will be specified in the Custom Script file instead:

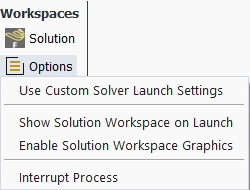
In the Project ribbon, Workspaces → and disable Use Custom Solver Launch Settings.
Create or open a Fluent Icing project.
Create or load a simulation. The Fluent Launcher panel will be skipped (it will not appear). Instead, the solver will be launched using the Custom Script file associated with the PRJAPP_CUSTOM_LAUNCH_SCRIPT environment variable.
You will now be in queue for the cluster compute nodes. Once the nodes are made available to you, the solver process will start, and the simulation will be shown in the Outline View.
Option 4 : Compute Node Only (Expert - Unsupported)
Fluent Icing workspace is running on the compute node.
Fluent Solution workspace is running on the compute nodes.
A custom script file is used to specify the launching options.
While this is not the initial intended usage of the client/solver framework, expert users could construct a script to launch the Fluent Icing workspace (client) in a distributed manner over the compute nodes of a cluster, and furthermore, have the Fluent Solution workspace (solver) also running on the same compute nodes of the cluster. When constructing the script, the following conditions should be met:
The custom launching script should launch the Fluent Icing workspace using the icing executable (/fluent/bin/icing) on the cluster queue directly.
Once Fluent Icing has been launched on the available compute nodes, the machine file should be used to define the PRJAPP_FLUENT_PARAMS environment variable. In this way, when the solver is launched, the machine file will be used to load it on the same machines.
export PRJAPP_FLUENT_PARAMS=”-cnf $MACHINES”, where $MACHINES contains the list of machines used to launch Fluent Icing.
From the top ribbon, Workspaces → → must be disabled, so that the environment variable above is used.
The compute nodes must be graphics enabled for this to work properly.
Important: This is not fully supported by Fluent Icing and should only be attempted by expert users.
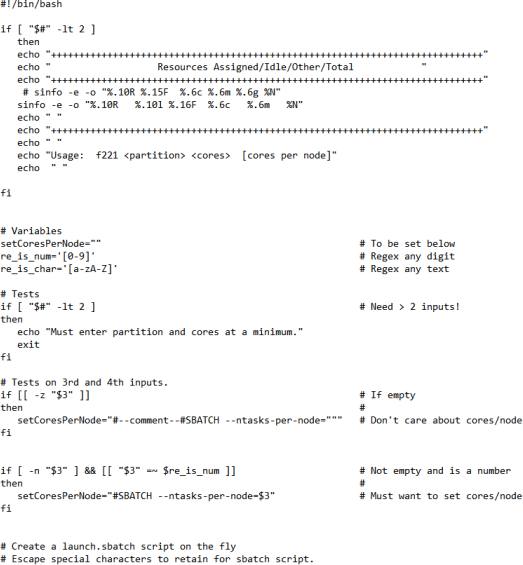
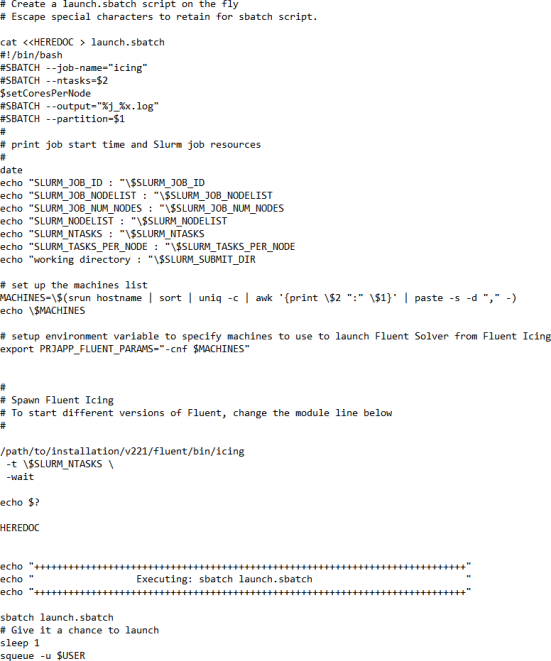
The following image below shows an example custom script file used to launch Fluent Icing on a Slurm type machine. This is only shown as an example, as each machine may need its own custom script.