


For more information, see the following sections:
One option of using Slurm with Fluent is to use the Slurm launching capability
integrated directly into Fluent. In this mode, Fluent is started from the command line
with the additional -scheduler=slurm argument. Fluent then takes
responsibility for relaunching itself under Slurm. This has the following advantages:
The command line usage is very similar to the non-RMS (resource management system) usage.
You do not need to write a separate script.
The integrated Slurm capability is intended to simplify usage for the most common
situations. If you desire more control over the Slurm sbatch
options for more complex situations or systems (or if you are using an older version of
Fluent), you can always write or adapt a Slurm script that starts Fluent in the desired
manner (see Using Your Own Supplied Job Script for details).
Information on usage is provided in the following sections:
The integrated Slurm capability can be activated by simply adding the
-scheduler=slurm option when launching Fluent from the
command line:
fluent <solver_version> [<Fluent_options>] -i <journal_file> -scheduler=slurm
[-scheduler_list_queues] [-scheduler_queue=<queue>]
[-scheduler_account=<account>] [-scheduler_opt=<opt>]
[-gui_machine=<hostname>] [-scheduler_nodeonly]
[-scheduler_headnode=<head-node>] [-scheduler_workdir=<working-directory>]
[-scheduler_stderr=<err-file>] [-scheduler_stdout=<out-file>]
[-scheduler_ppn=<x>] [-scheduler_gpn=<x>]
where
fluentis the command that launches Fluent.<solver_version> specifies the dimensionality of the problem and the precision of the Fluent calculation (for example,
3d,2ddp).<Fluent_options> can be added to specify the startup option(s) for Fluent, including the options for running Fluent in parallel. For more information, see the Fluent User's Guide.
-i<journal_file> reads the specified journal file(s).-scheduler=slurmis added to the Fluent command to specify that you are running under Slurm.-scheduler_list_queueslists all available queues. Note that Fluent will not launch when this option is used.-scheduler_queue=<queue> sets the Slurm partition to <queue>.-scheduler_account=<account> sets the Slurm account to <account>.-scheduler_opt=<opt> enables an additional option<opt>that is relevant for Slurm; see the Slurm documentation for details. Note that you can include multiple instances of this option when you want to use more than one scheduler option.-gui_machine=<hostname> specifies that Cortex is run on a machine named <hostname> rather than automatically on the same machine as that used for compute node 0. If you just include-gui_machine(without=<hostname>), Cortex is run on the same machine used to submit thefluentcommand. This option may be necessary to avoid poor graphics performance when running Fluent under Slurm.-scheduler_nodeonlyallows you to specify that Cortex and host processes are launched before the job submission and that only the parallel node processes are submitted to the scheduler.-scheduler_headnode=<head-node> allows you to specify that the scheduler job submission machine is <head-node> (the default islocalhost).-scheduler_workdir=<working-directory> sets the working directory for the scheduler job, so that scheduler output is written to a directory of your choice (<working-directory>) rather than the home directory or the directory used to launch Fluent.-scheduler_stderr=<err-file> sets the name / directory of the scheduler standard error file to <err-file>; by default it is saved asfluent.<PID>.ein the working directory, where<PID>is the process ID of the top-level Fluent startup script.-scheduler_stdout=<out-file> sets the name / directory of the scheduler standard output file to <out-file>; by default it is saved asfluent.<PID>.oin the working directory, where<PID>is the process ID of the top-level Fluent startup script.-scheduler_ppn=<x> sets the number of node processes per cluster node to <x> (rather than leaving it to the cluster configuration).-scheduler_gpn=<x> sets the number of graphics processing units (GPUs) per cluster node to <x> when using the Fluent native GPU solver (by default, it is set to 0).
This syntax will submit the Fluent job under Slurm using the
sbatch command in a batch manner and return a job ID. This job
ID can then be used to query, control, or stop the job using standard Slurm commands, such
as squeue or scancel. Slurm will start
the job when resources are available. The job will be run out of the current working
directory.
Note:
You must have the
DISPLAYenvironment variable properly defined, otherwise the graphical user interface (GUI) will not operate correctly.Dynamic spawning (that is, automatically spawning additional parallel node processes when switching from meshing mode to solution mode to achieve the requested number of total solution processes) is not allowed under Slurm, except when the
-gui_machine=<hostname> or-gui_machineoption is also used.The combination of Slurm + Open MPI + distributed memory on a cluster is not supported, except when the
-gui_machine=<hostname> or-gui_machineoption is also used.Tight integration between Slurm and the MPI is enabled by default for Intel MPI (the default), except when the Cortex process is launched after the job submission (which is the default when not using
-scheduler_nodeonly) and is run outside of the scheduler environment by using the-gui_machineor-gui_machine=<hostname> option.Process binding (affinity) is managed by Slurm instead of Fluent when you do not use the
-gui_machine=<hostname> or-gui_machineoption.
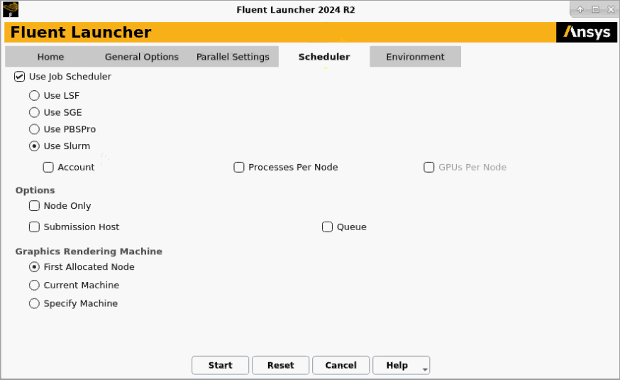
Fluent Launcher has graphical user input options that allow you to submit a Fluent job using Slurm. Perform the following steps:
Open Fluent Launcher (Figure 2.1: The Scheduler Tab of Fluent Launcher (Linux Version)) by entering
fluentwithout any arguments in the Linux command line.Select the Scheduler tab.
Enable the Use Job Scheduler option.
Select Use Slurm.
You can choose to enable the Account option and make a selection from the drop-down list to specify the Slurm account.
You can choose to enable the Processes Per Node option and enter a value in the field below to specify the number of node processes per cluster node (rather than leaving it to the cluster configuration).
If you have enabled the Native GPU Solver option in the Home tab, you can choose to enable the GPUs Per Node option and enter a value in the field below to specify the number of graphics processing units (GPUs) per cluster node.
You can enable the following options under Options:
Enable the Node Only option to specify that Cortex and host processes are launched before the job submission and that only the parallel node processes are submitted to the scheduler.
Enable the Submission Host option and make a selection from the drop-down list to specify the Slurm submission host name for submitting the job, if the machine you are using to run the launcher cannot submit jobs to Slurm.
Enable the Queue option and make a selection from the drop-down list to request a specific partition for the resource allocation.
If you experience poor graphics performance when using Slurm, you may be able to improve performance by changing the machine on which Cortex (the process that manages the graphical user interface and graphics) is running. The Graphics Rendering Machine list provides the following options:
Select First Allocated Node if you want Cortex to run on the same machine as that used for compute node 0. This is not available if you have enabled the Node Only option.
Select Current Machine if you want Cortex to run on the same machine used to start Fluent Launcher.
Select Specify Machine if you want Cortex to run on a specified machine, which you select from the drop-down list below.
Note:Dynamic spawning (that is, automatically spawning additional parallel node processes when switching from meshing mode to solution mode to achieve the requested number of total solution processes) is not allowed under Slurm, except when you have selected Current Machine or Specify Machine from the Graphics Rendering Machine list.
The combination of Slurm + Open MPI + distributed memory on a cluster is not supported, except when you have selected Current Machine or Specify Machine from the Graphics Rendering Machine list.
Tight integration between Slurm and the MPI is enabled by default for Intel MPI (the default), except when the Cortex process is launched after the job submission (which is the default when not using the Node Only option) and is run outside of the scheduler environment by using Current Machine or Specify Machine.
Process binding (affinity) is managed by Slurm instead of Fluent when you have selected First Allocated Node from the Graphics Rendering Machine list.
If you want to set the number of node processes per cluster node (rather than leaving it to the cluster configuration), click the Environment tab and define it using the
FL_SCHEDULER_PPNenvironment variable.Set up the other aspects of your Fluent simulation using the Fluent Launcher GUI items. For more information, see the Fluent User's Guide.
Important: You must have the DISPLAY environment variable properly
defined, otherwise the graphical user interface (GUI) will not operate correctly.
Note: Submitting your Fluent job from the command line provides some options that are not available in Fluent Launcher, such as setting the scheduler standard error file or standard output file. For details, see Submitting a Fluent Job from the Command Line.
Submit a parallel, 4-process job using a journal file
fl5s3.jou:
  > fluent 3d -t4 -i fl5s3.jou -scheduler=slurm
Starting sbatch < user-scheduler-14239.slurm
/bin/sbatch
Submitted batch job 524
In the previous example, note that sbatch returns
524 as the job ID and
user-scheduler-14239.slurm is name of the Slurm script written by
Fluent for submitting this job.
Check the status of the job:
> squeue -f 524
             JOBID PARTITION     NAME     USER ST       TIME  NODES NODELIST(REASON)
              524  partname    fluent-t   user  R      45:23     2 compute[00-01]
The command in the previous example lists the status of the given job. The
squeue command can be used to list all the jobs in the
queue.
After the job is complete, the job will no longer show up in the output of the
squeue command. The results of the run will then be available in
the scheduler standard output file.