


An essential feature of post-processing is the reorientation of the visualized model in order to see it from a number of different vantage points. Basic transformations include rotating (about an axis or axis origin point), translating (up, down, left, right), and zooming (moving the model toward or away from you). When EnSight reads in a geometry file, it assigns all model parts to the same Frame of reference: Frame 0. Frame 0 corresponds to the model coordinate system (defined when the model was created).
Two methods exist to transform a scene. In Global transform mode, the geometry is transformed. In Camera transform mode, the scene does not move but instead a camera is moved. A viewport can either use a global transform mode or can be viewed through a camera.
Using the Frame Mode, it is possible to create additional frames and reassign parts to them. In fact, when you copy a part, a new Frame is automatically created and the part copy is assigned to the new Frame. See Frames.
Just after all parts of your model have been read in, EnSight centers the model in the Graphics Window by placing the geometric center of the model at the Look At Point which is always located in the center of the Graphics Window. Initially - before any Global translations are made -the origin for the Global Axis is located at the Look At Point.
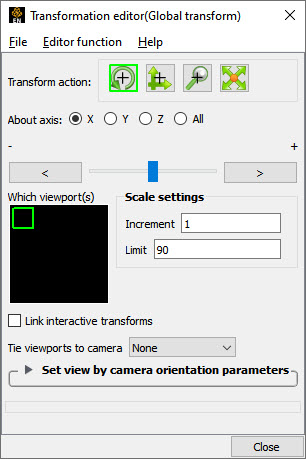
There are several Editor Functions available within the Transformation
Editor: Global Transform, Camera,
Center of Transform, Z-Clip, Look
At/Look From, and several Tools. (The Transformation Editor
dialog is opened by either clicking the
button  and selecting
Transformation editor... or by using the menu option
→ .
and selecting
Transformation editor... or by using the menu option
→ .
- Save View
This opens the Save View dialog which allows you to save in a file the view (orientation) of the model you have created in the Graphics Window and any Viewports by selecting Save View and then entering the name of the file.
- Restore View
Opens the Restore View dialog which allows you to specify the name of a file in which you previously stored a view. Clicking in this dialog restores the view only in the selected Viewports.
- Restore Camera Position
This will read from a Camera Orientation File which must be created manually using the format description, see Camera Orientation File Format because there is no Save Camera file format option.
- Copy Transformation State
Copies the transformations for the currently selected viewport so they can be pasted into another viewport.
- Paste Transformation State
Pastes the transformations into the selected viewport.
See Copy/Paste Transformation State for further details.