


Overview
Since its initial release in 1987, EnSight has been used extensively for animation, due to its easy-to-use keyframe animator and ability to handle transient data. This mechanism allows you to create your own movie sequence to present your results more easily. There seems to be two mind sets when it comes to animation. The first group of people believe animation to be totally trivial - something that can be completely finished in an hour or two by anyone. The other group of people seem to believe that animation is something that takes many days, if not weeks to finish and requires an animation expert to get done. Well, neither of these ideas are correct. While animation is not trivial, it is also not overly complicated. Most animation produced by EnSight is setup during a day, and recorded the same day or during the night to be complete by the next morning. Engineers create and record their own animations. EnSight is intended to be used by end users - this includes the animation module. We do acknowledge, however, that there is a difference between animation, and animation done well. The latter comes with time and experience.
EnSight uses a modified keyframe technique. This technique enables the user to define what the scene should look like at certain times called Keyframe. Each keyframe can be different from a previous keyframe by using any combination of rotate, translate, scale, zoom, look-at, or look-from operations. A given keyframe can also be the same as the previous frame (the purpose of which will be explained shortly). The keyframe technique only works on transformations, and is not used for other items related to what the scene looks like (that is, when to turn on Parts, do isosurfaces, shading changes, etc.). EnSight actually keeps track of the transformation commands performed between keyframes and linearly interpolates these commands when creating frames between the keyframes. These in-between frames are referred to as subframes.
Each keyframe includes the following information:
a set of transformation matrix values, specifying each local frame, the global frame and the Look-At and Look-From Points
the value of all isosurfaces and position of all clip Parts using the plane tool
the specific keyframe attributes
the transformation commands and isosurface values to get the scene and clip Parts to the next keyframe.
When running keyframe animation, EnSight performs the following actions for each keyframe:
any command language commands associated with the keyframe are executed
the specified number of subframes are displayed in sequence, interpolating the transformation commands to get to the next keyframe.
To begin the process of creating an animation sequence, first define the scene you desire for the first keyframe. Then, turn on keyframe animation and create this scene as your first keyframe. You can then proceed to modify the orientation of the model and create your other keyframes.
If you make mistakes during the keyframe definition, click Delete Keyframe... and enter the number of the last keyframe you were satisfied with. Then, proceed to define the subsequent keyframes again. As soon as you have at least two keyframes defined, you may play back the animation to see what it looks like. To do this, select the button in the Animation Panel. The animation process generally proceeds with some keyframe definitions, running what you have so far after some of those definitions, once in a while a delete back to operation, more keyframe definitions, etc., until you are satisfied with the entire animation sequence. You then set up the record information and set the process in motion to produce the images.
When playing back the animation, you do not have to always play the entire sequence. Run From, and To frame capability is provided. You also can abort an animation run by entering the A key in the graphics window.
In order to get the length of animation you want on video, you will need to adjust the number of sub-frames between keyframes in the Speed/Actions tab of the Run Attributes dialog. The total number of frames displayed during animation is the sum of the keyframes plus the sum of the subframes. The NTSC broadcasting standard calls for 30 frames displayed per second. It can be difficult to get a feel for how fast the animation will be once recorded. The speed of the playback on the workstation is related both to its graphics capability and the complexity of the scene, so reducing the complexity will speed things up. Accordingly, you might consider options like making all but a representative Part invisible, use the feature angle option to reduce the visual complexity of the Parts, and/or use the dynamic/static box drawing modes.
Anything that is currently on will be on during the animation. That is, if contours, vector arrows, Particle traces, shaded surfaces, flipbook animation, animated traces, etc. are on, they will be on during animation. If any Parts have an animation delta set or are dependent on a Part that has the delta set then they will be regenerated and change through the animation. This enables you to do any of the flipbook animation techniques within keyframe animation for recording purposes, including the use of transient data (See Create a Flipbook Animation). The advantage for doing flipbook techniques within keyframe animation is that they can be recorded and the amount of memory used is smaller because the whole flipbook is not loaded into memory. This enables the recording of long sequences of changing information that would not be able to be shown fully with flipbook animation because of memory limits of the workstation. Short sequences that you have already loaded into the flipbook can also be used by making sure that the Flipbook Run toggle is on before running keyframe animation.
If dealing with transient data, you should set up the keyframes for display of the model first, play it back, edit, etc. Then, after you are satisfied with the model presentation, you can start dealing with displaying the transient data on the model. You should be careful in doing movement of the model while transient data is being displayed. It can be confusing to have the transient data changing at the same time that the model in the scene is moving. When dealing with transient data, we normally introduce the problem first with some keyframes, then run the transient data without any transformations by defining two successive identical keyframes. Between these two identical keyframes, we animate the transient data using one of the several methods available.
We have attempted to create the animation module to be able to run in a
set-up-walk-away mode to create video. In order to do this, you can issue command language
lines at each keyframe (except the last one). For example if you had a case where you wanted
to first show off some of the model, and then show a hidden line, you could issue a
view: hidden_line ON 0.0000e+00 0.0000e+00 0.0000e+00 command at the keyframe.
It is also possible to play a command language file using this option. Care should be taken to
not issue an anim_keyframe: run command as part of this command
language (which would cause an infinite loop).
When saving images to disk files, be aware that image files can take a great deal of disk space. The file system that you are writing images to should be monitored during the animation run to make sure it doesn't run out of space.
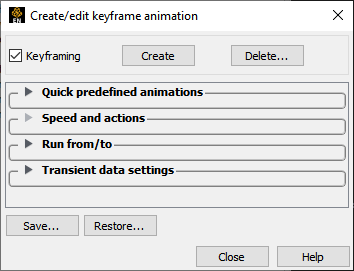
Clicking once on the Keyframe icon opens the Feature Panel for keyframe animation.
|
Keyframing Toggle |
Toggles-on/off Keyframe animation feature. Caution: If you toggle-off Keyframing, all the keyframes previously created will be lost (see Save... below). |
|
|
|
Click this button to create a keyframe. If Keyframing toggle is not turned on then creating the first keyframe will turn it on automatically. Keyframes are automatically numbered in sequence of their creation. As each keyframe is created, a message appears in the Status History Area. |
|
|
Delete... |
Opens the Delete Keyframes pop-up dialog which allows you to specify the number of the last keyframe you wish to retain and then delete all keyframes back to that frame. The keyframe whose number you specify is not deleted. To delete all keyframes enter 0 at the prompt. |
|
|
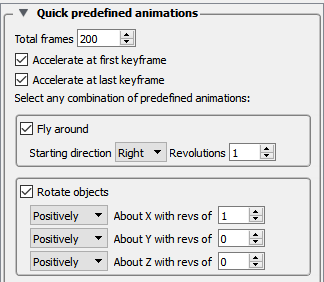
Quick predefined animations turndown |
Opens the Quick predefined animations area which allows you to add keyframes of predefined movement to your animation. Currently implemented are fly around, rotate objects, and exploded view. One or a combination of these can be used.
|
|
|
Total Frames |
When the button is pressed one or more keyframes will be created. The total frames (keyframes plus subframes) will be the number specified here. |
|
|
Accelerate at first keyframe |
If on, transformations will accelerate out of the first keyframe created when Create Keyframes is pressed. |
|
|
Accelerate at last keyframe |
If on, transformations will de-accelerate at the last keyframe created when Create Keyframes is pressed. |
|
|
Fly Around |
If on the look-from point will be revolved around the scene by the number of revolutions specified. The viewer can either rotate to the Right or the Left. The keyframes will be added when the button is pressed. |
|
|
Rotate Objects |
If on the objects will be rotated about the x, y, and/or z axis by the number of revolutions specified. The keyframes will be added when the Create Keyframes button is pressed. |
|
|
Explode View |
If on the objects will be assigned local axis systems and animated Distance units in the Direction given about the origin specified. The global axis direction is used. |
|
|
The origin about which the explode Origin XYZ will occur. |
||
|
Get transform center Sets the About Origin to be at the current transform center. |
||
|
Direction The direction of the explode transform. The choices are:
For example, if the origin given is 0,0,0 and the explode direction is X, a part with a centroid at X=1 will translate in the positive X direction while a part with a centroid at X=-1 will translate in the negative X direction |
||
|
Distance The total translation to be used. |
||
|
Create predefined animation Creates the keyframe(s) given the selections in the dialog. If keyframe animation is currently not on it will turn it on and create an initial keyframe, then add the predefined transform indicated. |
||
|
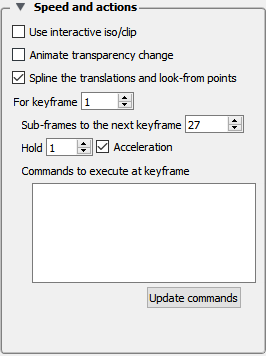
Speed and actions turndown |
Opens the Speed and actions turndown of the Keyframe Feature Panel.
|
|
|
Use interactive Iso/Clip |
By turning this toggle on, any clip or isosurface moved interactively during the keyframe will animate. |
|
|
Animate transparency change |
By turning this toggle on, transparency changes to parts during the definition of the keyframes will be part of the animation. |
|
|
Spline the translations and Look-From points |
By turning this toggle on, translations and look-at/from transforms will be interpolated on a cubic spline. |
|
|
For keyframe |
This field and the stepper buttons are used to select which keyframe to edit. |
|
|
Sub-Frames to the next keyframe |
The Sub-Frames field specifies the number of subframes between that keyframe specified and the next one. More subframes make the transformations to the next keyframe smoother and slower. |
|
|
Hold |
This field specifies the number of frames to hold at the keyframe. |
|
|
Acceleration |
By turning on this toggle, acceleration will be used at the keyframe. If on for a previous keyframe it will decelerate. |
|
|
Commands to execute at keyframe |
This command text area is used to specify up to 20 commands to
execute before displaying the keyframe referenced in the For Keyframe field (this can be
used for all keyframes except the last one). You may use any command except commands
corresponding to nonpermitted actions, such as loading another dataset. Also, there is
no point in using |
|
|
Update Commands |
This button will accept the commands entered above. |
|
|
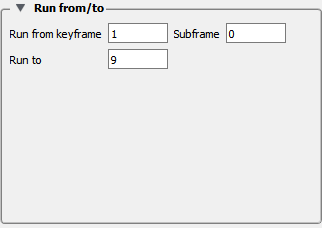
Run from/to turndown |
Opens the Run from/to turndown of the Keyframe Feature Panel.
|
|
|
Run from keyframe / Run to |
These fields specify the numbers of the keyframe to start from and the keyframe to run to when the button is pressed. Must be integer numbers of already created keyframes. Default is Run From 1 and Run To number of keyframes you have created. |
|
|
Subframe |
Allows for the run to start at a finer, subframe level. |
|
|
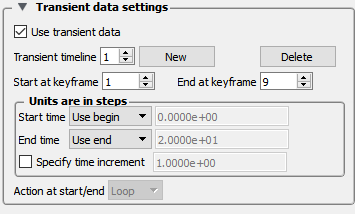
Transient data settings turndown |
Opens the Transient data settings turndown of the Keyframe Feature Panel.
|
|
|
Use Transient Data |
Toggles-on/off transient data as defined in the timelines (see below). |
|
|
Transient timeline |
Transient data is always used according to the definitions of the transient timelines. In a timeline you can specify the start and end time, how to increment time, etc. By default a single timeline exists which spans the total number of keyframes. Only one timeline can exist for each keyframe. The timeline shown is the one being edited. The up/down arrows will advance/decrement to the next/previous timeline if it exists. |
|
|
New |
Will create a new timeline. If the previous timeline currently spans all available keyframes a pop-up dialog will result and no new timeline will be created. |
|
|
Delete |
Will delete the timeline indicated. |
|
|
Start at keyframe |
Transient data will start at the keyframe indicated. |
|
|
End at keyframe |
Transient data will end at the keyframe indicated. |
|
|
Units Are In Steps Area |
Controls the time step to be shown at the Start Keyframe. The choices are: |
|
|
Start time |
Controls the time step to be shown at the Start Keyframe. The choices are:
|
|
|
End time |
Controls the time step to be shown as the End Keyframe. The choices are the same as Start Time. Note: If the data is changing connectivity then you cannot specify the end timestep, only the beginning timestep and the integer timestep increment. |
|
|
Specify Time Increment |
If off, EnSight will interpolate time such that the Start/End Time values match up with the Start/End keyframes specified. If on, you can specify the increment in time which occurs for each frame during the timeline. Note: If the data is changing connectivity then interpolation is impossible, and this time increment must be an integer timestep increment. |
|
|
Action at start/end |
If you have specified a Time increment this option controls what will happen if you arrive at the Start/End Time time. The choices are:
|
|
|
|
In order to save a created keyframe animation, either click on the record button icon found at the bottom tool ribbon or do a File>Export Animation from the main menu. See Record Animation Icon for details on how to do the recording. |
|
|
Window Size |
Brings up the Image/Movie Format and Options dialog. |
|
|
NTSC - (704 x 480 pixels) format suitable for older recording media PAL - (704 x 576 pixels) format suitable for older recording media Detached display - DVD NTSC - (720 x 480 pixels) DVD PAL - (720 x 576 pixels) HD 720p - (1280 x 720 pixels) HD 1080p - (1920 x 1080 pixels) Normal - (current graphics screen size) - machine/graphics/monitor dependent User Defined - (user entered horizontal x vertical pixels) - not limited to screen size. |
||
|
The keyframe animation will be recorded using the selected format. (see Saving Graphic Images and Print/Save an Image). |
||
|
Save... |
Opens the File Selection dialog to allow you to save the specifications of the current keyframe into a file. This saves only the keyframe specifications, not the animation images or Part information. If you perform a Full Backup, the keyframe specifications are saved as Part of the Backup. |
|
|
Restore... |
Opens the File Selection dialog to allow you to restore keyframe specifications from a file. This restores only the keyframe specifications; you must also load Part data and set the Part attributes. (see Create a Keyframe Animation). |
|
Troubleshooting Keyframe Animation
| Problem | Probable Causes | Solutions |
|---|---|---|
| Graphics Window flashes at start of animation run. | New graphics window is opened to display the animation. | Hardware specific. Does not affect frames sent to recorder. |
| Lines crawl across the screen when I play the animation. | Lines are only 1 pixel wide which would cause crawling. | Use a line width greater than 1. |
| During playback the action of the video starts as soon as the picture comes up and it is hard to recognize what is happening that quickly and then it goes away. | When creating a video it is best to have the model come up with a hold of 3 seconds or more before starting the animation. The animation should run for a reasonable length of time and then it should hold for 3 or more seconds again at the end. On complex models the hold may need to be as much as 10. | Holding a video at the beginning and the end and showing enough frames in-between will allow your audiences eyes to adjust and increase comprehension of the video. Adding annotation strings and pointers to point out areas of interest also helps. Also, showing the whole model with a hold and then zooming way in on the area of interest will help comprehension. |
| Video is too fast when played back, but it looked fine in EnSight. | Video playback speed is independent of model complexity. Rendering speed in EnSight is more dependent on graphics hardware. | Increase the number of frames recorded by adding more subframes or use speed controls in video player. |
| Transformation of my object in the animation is not smooth. | Not enough subframes. | Adding more subframes will cause more finely interpolated scene between keyframes. For instance the model should probably not rotate more than 3 degrees between frames being recorded. |
| Model is being clipped away as the animation proceeds. | Running into the Z-Clip plane or the regular plane tool with Clipping on. | Make sure the Z-Clip planes and the plane tool are far enough away from the model
for the whole animation sequence. Note: The distance between the Z-Clip planes could affect the clarity of the image. The Z-Clip should be kept as close to the model and as close to each other as possible for better results. |