


EnSight enables you to save an image of the Main View to a file.
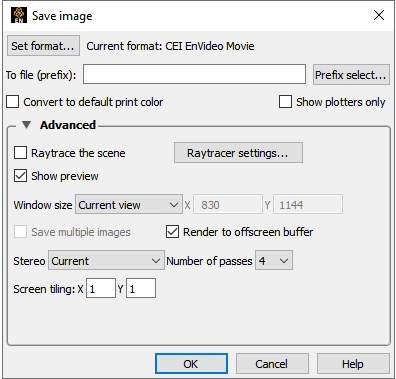
You use the Save Image dialog to specify the format and destination of an image to save. You also access the Image Format options dialog for the various image types from this dialog.
File → Export → Image...
Set Format...
Click to select a format. Image formats: EnVideo, Flash, GIF, JPEG, LLNL Streaming, Microsoft AVI, Microsoft Bitmap, MPEG, MPEG4, PNG, Postscript, PPM, QuickTime, SGI RGB, TIFF, and XPixmap.
Note: The following are movie (animation) formats AVI, EVO, FLASH, MPEG, QUICKTIME, and LLNL streaming movie. If an animation format is selected for an image export, a single-frame animation will be saved. The default format is EVO, which is Ansys' image and animation format which can be viewed using EnVideo.
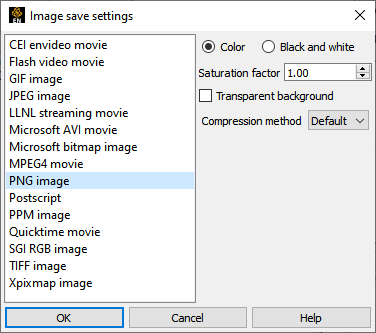
Color/Black & White
Color versus Black and White toggle selects either the normal color image or a black and white image.
Saturation Factor
At a value of 1.0, no change to the image. At lower values, a proportionate amount of white is added to each pixel. At a value of 0.0, the image would be all white.
Transparent Background
Toggle saving of PNG images with transparent backgrounds.
Note: Each format can have other options specific to that format.
To File
The image will be saved to this file name prefix. An appropriate suffix, according to the file format chosen, will be added.
Convert to Default Print Colors
This is useful for making a white background for copying into a document or for printing. Clicking this toggle on will convert all black to white and all white to black but will leave all other colors as they are.
Show Plotters Only
Clicking this toggle will cause the graphics window to only display plotters.
Raytrace the Scene
Toggle to raytrace the image. Raytracing is an advanced rendering technique in computer graphics, where simulation of the light transport is performed between the image pixels, objects in the scene, and the light sources. This technique is capable of generating high realism images, but at a much higher cost than that of typical rasterization-based techniques. Raytracing is suitable for rendering a wide variety of optical effects, such as reflection, refraction, soft shadow, etc.
Raytracer Settings
Opens the Raytracer Settings dialog.
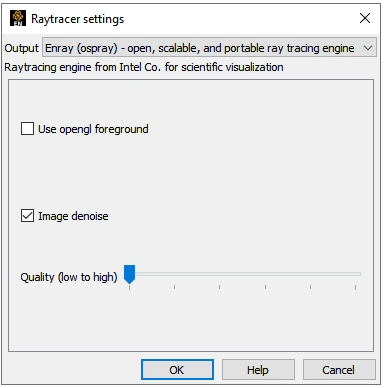
Output
Specifies the resulting output type.
EnRay
EnSight's built-in raytracing renderer. It is tightly integrated, with support for many visualization styles.
Use OpenGL Foreground
Toggles the 2D overlaying using the graphics hardware rendered result to the raytracer. EnSight's graphics window usually contains not only rendering results from 3D geometry, but also 2D illustrations, such as palettes, plots, and tables. The raytracer does not have the capability of rendering the 2D layer. Therefore, when we set this option on, the system will output the hardware rendered 2D layer as an image and composite it with the raytracing result.
Image Denoise
The rendering results of the ray tracing algorithm may contain a lot of noise, since the Mente Carlo sampling approach is widely used in simulating global illumination effects. This can be especially obvious when choosing low rendering quality. To combat this problem, an image denoise pass can be opted in. Sometimes, this may introduce over-smoothing in the resulting image. You can uncheck this option to prevent image over-smoothing.
Quality (Low to High)
Slider that specifies the image quality of the raytracing result. There are currently 6 levels, where 0 is the lowest quality and 5 is the highest quality. We hide the detailed raytracing parameters from the user, such as number of samples per pixel, recursive depth, etc.
Window Size
Specifies the resulting image size in pixels.
Normal
Use the current size of the graphics window.
Full
Use the size of a full screen window.
User Defined
Enter a width and height in pixels in the X and Y fields.
NTSC
Use the NTSC standard window size (704 x 480).
PAL
Use the PAL standard window size (704 x 576).
Detached Display
Uses the detached display (as specified with
-dconfig option) as the source for the output.
DVD NTSC
Use the DVD NTSC standard window size (720 x 480).
DVD PAL
Use the DVD PALsize, (720 x 576).
HD 720p
Use the HD 720p standard window size (1280 x 720).
HD 1080p
Use the HD 1080p standard window size (1920 x 1080).
Save Multiple Images
If using a detached display (as specified with a
-dconfig option), you may save an image from each display or a single
image.
Render to Offscreen Buffer
Controls where to render the image prior to saving. Toggle ON to render in an off screen buffer prior to saving the image, and toggle OFF to render on-screen prior to saving the image. On screen rendering has the disadvantage that overlaid images, such as screen savers, can interfere with the saved image. However, some platforms and graphics cards do not support off-screen rendering.
Stereo
Render two images from slightly different viewpoints to produce a stereo (3D) effect.
Current
If the graphics window is mono, save a mono image. If stereo, save a stereo image.
Mono
Save a mono image.
Interleaved
Save a stereo interleaved image. Two full-color images will be generated. If the EnVideo EVO format is specified, both images will be saved in a single EVO file. For other formats, the images will be saved in separate files, for example, image_l.png and image_r.png. In addition an MTM (multi-tile movie) file will be generated, for example, image.mtm. The MTM file can be read by EnVideo to display image_l.png (left image) and image_r.png (right image) in stereo. Interleaved stereo requires a specialized monitor with paired, polarized lenses; it uses polarized lenses for the left and right eye and preserves the coloration of the parts.
Anaglyph
Save a stereo color separated image with left/right eye color as specified. (Cyan/Red, Red/Cyan, Blue/Red, or Red/Blue). This is not recommended if the parts are colored by a variable as the coloration will distort the above color shift.
Number of Passes
The number of rendering passes. The higher the number, the better the quality (but slower).
Screen Tiling
For powerwall environments, specify the number of images in x and y that will be produced. For example, by selecting 2x2, a file prefix of image, and PNG format, EnSight will save image_d00.png, image_d01.png, image_d02.png, image_d03.png, and image.mtm. Each PNG file would have one fourth of the image, and the MTM file can be used by EnVideo to view the images stitched together.
See Print/Save an Image.
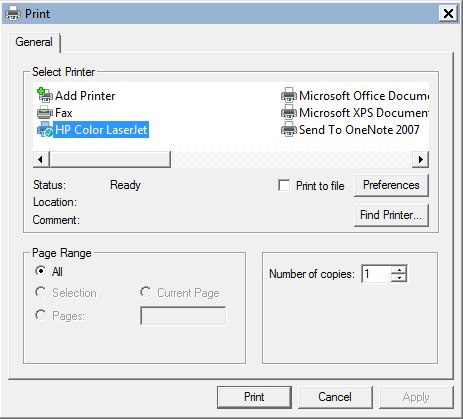
You use the Print Image dialog to specify the destination printer and options when producing a hard copy of an image. When you choose to print an image, you will be presented with the standard system print dialog.
→
After you choose your printer and options, you'll see the EnSight print option dialog.
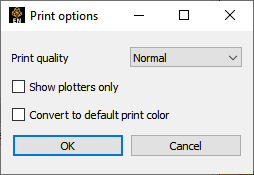
Print Quality
Select the output quality - Draft, Normal, High, Best. Higher quality requires longer to render.
Show Plotters Only
Clicking this toggle will cause the graphics window to only display plotters.
Convert to Default Print Colors
Clicking this toggle on will convert all black to white and all white to black but will leave all other colors as they are.
| Problem | Probable Causes | Solutions |
|---|---|---|
|
Image has blotches or ghosts of other windows in it |
A viewport or menu was popped in front of the Main Graphics Window as the image was being saved. |
Use off screen rendering when possible. Note: Volume rendered images on the Mac must be on screen. |
|
Error while saving image file |
Directory or file specified is not writable |
Rename the file or change the permissions. |
|
Ran out of disk space |
Check the file system you are using then remove any unnecessary files to free up disk space. | |
|
Image format not selected |
Select an image format before saving. | |
|
Image looks bad when printed |
Original on-screen image has low resolution |
Select user defined size or a pre-defined size such as HD 1080p |
|
Image has been dithered during processing |
Do not enlarge or reduce the image until it is in your word processor. | |
|
Non-integral ratio of printer resolution to image resolution at final size |
The image is a pixel-map image. For best results, the number of printer-dots per image-dot should be an integer. For example, if the original image resolution is 72 dpi, reduced to 48% the final-size resolution is 72/.48 = 150 dpi. On a 600 dpi printer, each image pixel is exactly 4 printer-dots on a side. | |
|
Move/Draw PostScript output is unavailable. |
Move/Draw PostScript have been disabled. |
Image Pixel output is all that is available. |