


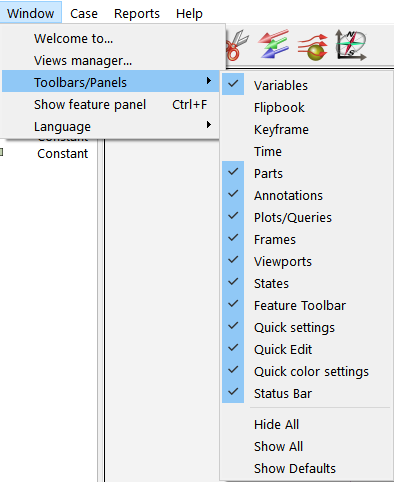
The Window menu in EnSight provides access to the Welcome to EnSight screen, the Views manager..., language settings and the toolbars and dockable object list dialogs. The menu appears like this:
Welcome To...
Displays the Welcome to EnSight dialog.
Views Manager
Displays the Views manager dialog.
Note: You can also click on the button in the Tools Icon Bar and select the Views… menu to bring up the same dialog.
Toolbar/Panels
The EnSight graphical user interface consists of a number of toolbars and dockable object lists and other graphical user interface panels. This menu contains a list of all of the core dockable panels, the toolbars and any currently open user-defined graphical user interface panel extensions. The visibility of these items can be toggled by selecting items from the sub-menu under this menu option.
Show Feature Panel
This menu is a quick way for you to open the Feature Panel. This is the same panel that is opened when a feature button is selected.
Language
This sub-menu allows you to select the language to be used for the EnSight graphical user interface. Various languages may be listed, but is the default. There will also be an option for system Locale. This option will cause the language setting for EnSight to track the default system language (the system Locale setting).
Note: On some machine installations, it is possible for the choice of non-English languages to display empty boxes or some other glyph. A workaround to this font issue is to set the following environment variables for your system or for your shell.
FONTCONFIG_FILE to $CEI_HOME/apex242fonts/fonts.conf
FONTCONFIG_PATH to $CEI_HOME/apex242/fonts
If you change the language setting, but still see ‘????’ displayed in various locations, your system region/locale settings must be modified. For details on how to update the setting, see User Interface Language Translation.
This dialog allows you to create, save, restore, and apply views interactively. A view comprises all the viewing parameters and viewport parameters along with a thumbnail image of your data taken with the view.
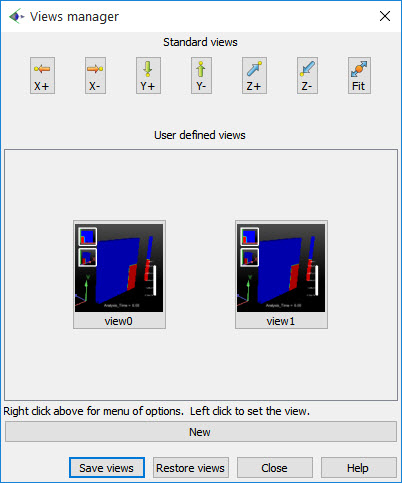
Along the top of the views manager are standard views down the major axes designed to orient your model in the main graphics window. The center of the dialog contains a collection of thumbnail images for the views defined interactively you. To create a new view right click on an empty area in the User Defined Views area and select New or click the button. A new view will be created in the User Defined Views area from your model viewing parameters in the main graphics window. To save your views to a folder, click the button. To load (restore) views from a file, click the button. A view can be applied to the current scene by simply clicking the associated icon. There are a number of other options that can be accessed by right clicking in the space containing the user-defined views or on the views themselves. For more details, see Manage Views.