


To use the Solution Time Player (which comes up by default for transient models):
To change one step lower.

To play steps in reverse order.

To stop a running play.

To play steps in forward order.

To change one step higher.

The slider can also be used to manually change time.

To control what happens when playing and the limit is reached.
To stop when it reaches the limit.

To cycle, starting at the first again.

To reverse order and continue. (bounce back and forth)

The Beg and End fields control the available time range (and also the range of the slider action). You can enter new values into the fields and press Return.
The Cur field sets the current time step. Either move the center slider or enter a new value in the field and press Return.
Open the Create/edit Transient Animation dialog for additional controls. (Same as hitting the Solution time icon).

You control more by opening the Create/edit Transient Animation dialog.
Click either the Solution time icon or the ... button.

Make changes as desired.
Click the Display time annotation in the graphics window.
Set Scale Type to Discrete or Continuous (see above for details).
Set Units to Step or Sim. Time (see above for details).
Set the # of cycles in the time range.
Click to view/modify timeset details (see Advanced Usage below).
Set the size for the slider arrows. Must be an integer if Scale Type is Discrete.
If the button is available, you may choose an update method for monitoring the availability of new time steps. This is only available if your data reader supports this feature (for more details see the advanced feature in Solution Time.
Recording an Animation of Your Data
You can record the timesteps to images or animation formats by clicking the Record current graphics window animation icon
 to bring up the Save
animation dialog.
to bring up the Save
animation dialog.Set the transient data settings and set the number of frames to record (by default this will be the number of available time steps).
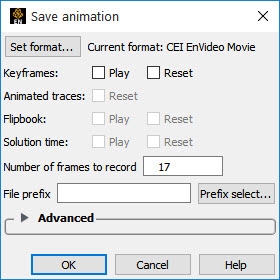
Specify a file name.
The images or movie file will be created after you click the icon.
The options for this dialog are explained in Print/Save an Image.