


The following topics are included in this section:
EnSight allows geometry and variables to behave in a transient manner on
different timelines, that is, a variable called Temperature can be defined at t
= 0., 3., and 6. while a variable called Pressure can be defined at t = 0.,
2., and 5.5. The button will bring up the
Timeset Details dialog which allows the user to view the various timelines
as well as specify how the variables will behave when they are not defined.
The EnSight case file defines the timesets (name and associated time values) and associates a timeset with each of the variables and geometry.
By default the Solution Time player will show a composite of all of the timesteps that exist across all of the timesets. This can, however be changed to show just the time values associated with a particular timeset.
In the Timeset Details dialog shown below, multiple timesets exists. Two timesets (from the Which Timeset(s) list) are selected and are therefore shown in detail. The graphics for each timeset shows (a) the minimum and maximum overall time value, (b) green tick marks indicating the time values defined for the timeset, and (c) the current time value (indicated with the long green line) associated with the timeset. (See Timeset Details... Time sets Tab for more info.)
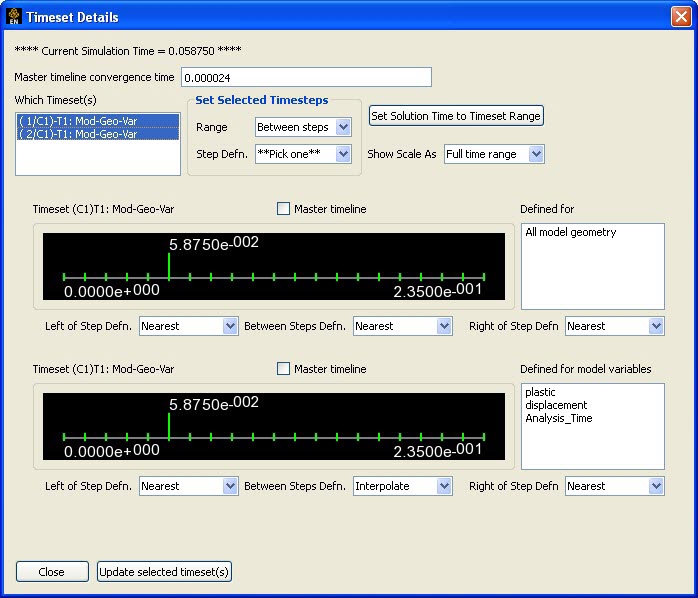
Which Timeset(s) selects the timeline to be viewed.
**** Current Simulation = **** displays the current solution time (as set in the Solution Time dialog).
To modify all the timelines to behave the same way, select which Range is to be modified, then select how they will be displayed.
The timeset can either be shown having a time range over the total number of time values or can be shown according to the timeset’s range under Show Scale As.
By default the Solution Time dialog shows the composite timeline. The will modify the Solution Time dialog’s Beg and End values to those of the selected timeset.
Timeset (C1)T1: Mod-Geo-Var shows the time value being used at the current time.
The timeset used by the variables (or geometry) is shown under Defined for.
Toggle ON the toggle, then click on the button to use only the timesteps in this timeline.
When the current time (from the Solution Time dialog and indicated in the upper left corner of this dialog) is set to a value greater than what is available for this timeline, use the Nearest value or make the variable Undefined.
When the current time (from the Solution Time dialog and indicated in the upper left corner of this dialog) is set to a value that does not exist for this timeline, Interpolate between defined time values, use the Left, Right, or Nearest value, or make the variable Undefined.
When multiple transient cases are loaded it is entirely possible that the number of time values as well as the time values themselves do not match up between the cases. By default EnSight creates a master timeline which is the composite timeline across all the cases, that is, it finds all of the unique time values and places these on the master timeline.
It is often desirable to define a master timeline. This can be done by either redefining the master timeline or by allowing the master timeline for any case to become the master timeline for EnSight and occupy the VCR controls for time.
As soon as you read more than one case into EnSight the Solution Time dialog will show an extra section where you can control not only which timeline might become the VCR player controls but also indicate how the various cases will behave when time is changed.
In the image shown here there are two cases. The first case has 21 timesteps and the second has 5 timesteps. The only time value that overlaps between the cases is the first with t=0. and thus the Master timeline has 25 timesteps. You can see that the current timestep for Case 1 is the last time step (20) and Case 2 is also currently at the last timestep (4).

Any one of the timelines can be shown as the transient data controls in the EnSight Time panel (the VCR controls).
When time is changed the Case will be updated to the new time value only if the toggle is set. You can use this to "freeze" a case at a specific time value.
In this dialog we have changed the toggle to indicate that Case 1 is in control.
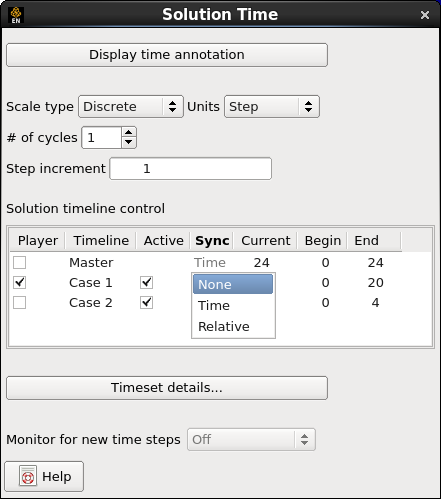
Once you choose a case to have control you can set how a change to time for the controlling case will modify the other cases. Three options are available:
None - indicates that when a time change is made the other active cases will not be affected.
Time - indicates that the other active cases will attempt to change to the same time value.
Relative - means that the other active cases will be modified to have a time value offset by the current difference, that is, if the time is stepped forward by one step the other active cases will also be stepped forward by one step.
The Current, Begin, and End columns are shown for informational purposes to help you see where each case timeline is currently located.
If you want to create your own Master timeline, click the button.
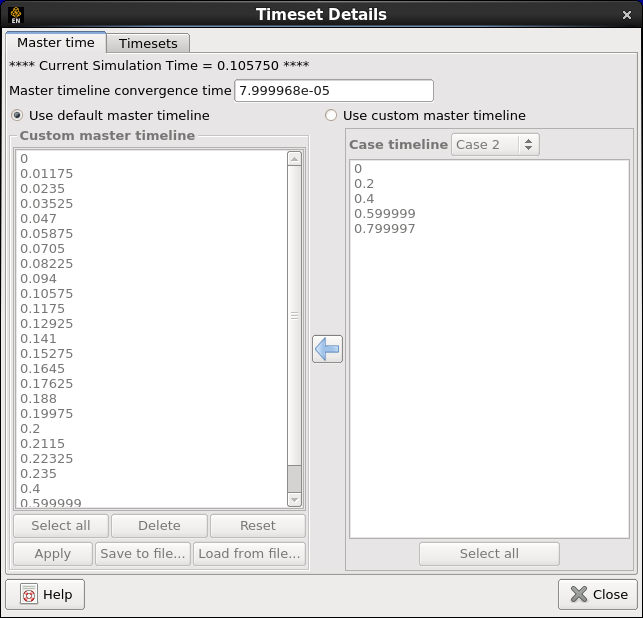
The dialog above shows the time values for the composite master timeline.
Toggle on to create a new master timeline
You can select time values in the left column and remove them with the button
You can select time values in the right column and push them into the left column via the arrow icon.
Change the Case timeline pulldown to see time values for the various loaded cases.
When completed, click the button