

The parallel animation saving feature is released as Beta in EnSight 2022 R2. To gain access to it, set the following environmental variables before starting EnSight:
ENSIGHT_ANSYS_ALPHA_FLAG = 1
ENSIGHT_ANSYS_BETA_FLAG = 1
The parallel animation saving feature allows you to take advantage of multiple EnSight sessions to save an animation. In this way, the computational power of multiple EnSight sessions and multiple computers can be harvested to improve the performance of the saving process.
This feature can only be used in the following situations:
The animation to be saved must be a solution time animation or a keyframe animation. A flipbook animation can not take advantage of the parallel animation saving feature.
The EnSight sessions to be used to parallelize the animation saving process need to be run on computers that have access to the dataset that EnSight is loading via the same absolute path as the main EnSight session. This means that it is not possible to use the parallel save animation feature with computers of different operating systems.
To access the feature, go to → → . If the environment variables are set correctly, a Record mode option will appear. By default, Record mode is set to . Modify it to . The options for the Save animation dialog will change as well. See Figure 1.1: Save Animation in Parallel Mode.
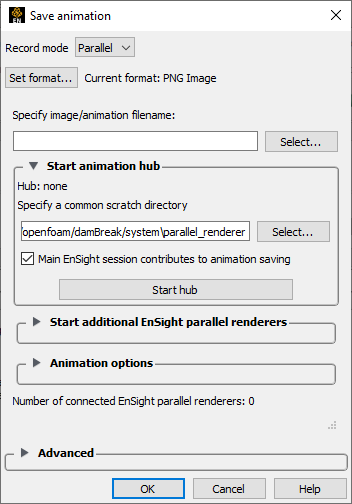
Most of the options contained in this dialog are the same for both the and recording mode, for example, the formats available and the Advanced options. The mode dialog contains additional fields that allow you to control how the additional EnSight sessions will be launched.
When using the mode option, EnSight will launch a Start animation hub that connects to all additional EnSight sessions and coordinates the save animation process among them. This hub will be launched by default on the same computer as the main EnSight session.
The additional EnSight sessions will be launched in batch mode without a graphical user interface. They do not require any additional license. For higher performance, launch them on computers where a graphics card is available.
Note: These additional EnSight sessions need to be launched on computers that can access the dataset currently loaded with the exact same pathname as the main EnSight session. This implies that they cannot be launched on computers with an OS different from the one of the main EnSight session.
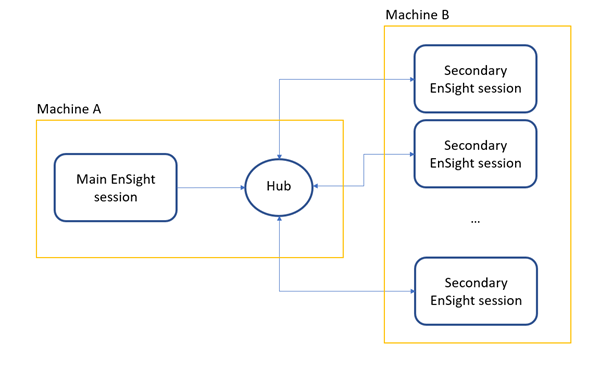
The main EnSight hub will connect to the additional EnSight sessions and distribute the work among them in a dynamic way. This means that if a new EnSight session becomes active, it will automatically attach to the hub regardless of the current status of the export operation. Similarly, if one of the EnSight sessions terminates for any reason (including the computer where it is running becomes unavailable), then the hub will redirect the remaining work to the other EnSight sessions. This allows for a dynamic set of additional EnSight sessions, whose number can change at any moment without breaking the save animation process.
See Figure 1.2: Schematic Representation of the Architecture for Parallel Mode Animation Saving. SCHEME presents a schematic of how the parallel mode animation architecture works.
To start the hub, expand the Start animation hub section of the dialog (see Figure 1.3: Start Animation Hub Options).
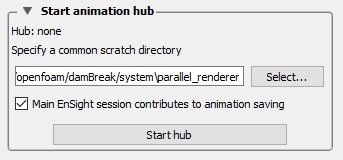
Enter the pathname of a directory, under Specify a common scratch directory, which can be used to store temporary and security files. The security file contains information needed by all EnSight sessions to establish authenticated connection to the hub. This directory needs to be located in a directory with write access, and which can be accessed by all EnSight sessions with the exact same pathname. By default, the location is set to the same path as the loaded dataset.
The toggle allows you to choose if you want to have the main EnSight session contribute to the animation saving process (toggle on, default behavior), or to leave this process to the secondary EnSight sessions, freeing the main session for more analysis. In the first scenario, a progress bar will appear showing the status of the animation saving process and EnSight will be unavailable as long as the saving progress is not completed. In the latter scenario, the animation saving process is passed onto the hub, and EnSight immediately becomes available to you for further work.
Note: Parallel save animation processes can not be utilized again until the current parallel save animation process has completed. The hub can currently only handle one save animation process at a time.
Use the button to launch the hub. The options will become grayed out and the button will display . Clicking will terminate the hub. Closing the EnSight main session while the hub is still running will also terminate the hub.
Note: Once the hub has started, you can hover over the Hub: running text to reveal a tooltip containing the grpc connection string and the security token.
Now that the hub is running, you can begin the additional EnSight sessions needed for the parallel animation saving process.
Note: While the hub is running, you can start the additional EnSight sessions needed for the parallel animation saving process. This can only be done after the hub has been launched.
The following options are available:
| This launches a new dialog allows you to set up additional EnSight sessions via the slurm scheduler. This option is an alternative to the option. See The Slurm Option for more details. | |
| This opens the EnSight launcher allowing you to set up additional EnSight sessions. This option is an alternative to the option. See The Launcher Option for more details. | |
| If toggled on, additional EnSight sessions will use EGL for rendering. This requires them to be running on a computer with graphics card. | |
| If toggled on, additional EnSight sessions will be running in software rendering mode. | |
| If toggled on, verbose output will be generated by the additional EnSight sessions. |
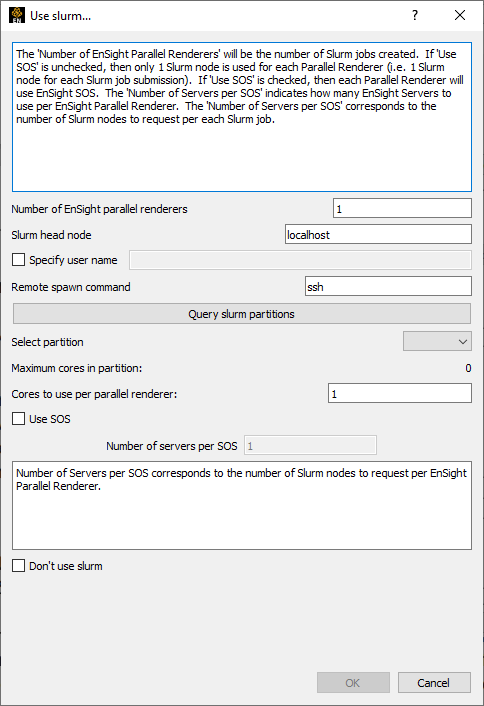
If the button is used, a dialog for setting up EnSight sessions via slurm will appear. See Figure 1.4: The Slurm Launcher Dialog.
The following options are available:
| Number of EnSight parallel renderers | Enter the number of additional EnSight sessions to launch. |
| Slurm head node | Computer name for the slurm head node. |
| If toggled on, enter the username for the slurm head node. | |
| Remote spawn command | The executable to use to connect remotely to the slurm computer. |
| Returns the partitions available to slurm in the Select partition pulldown menu. | |
| Select partition | Pulldown with all the partitions available to slurm. |
| Cores to use per parallel renderer | Controls the number of Treads each of the secondary EnSight
sessions are using. This should be set between
8 and 48. |
| If toggled on, the secondary EnSight sessions will be running in parallel via SOS. | |
| Number of servers per SOS | Enter the number of EnSight servers per session. |
| If toggled on, this dialog will connect to the remote computer set in the slurm head node and launch the secondary EnSight session, without using the slurm job scheduler system. |
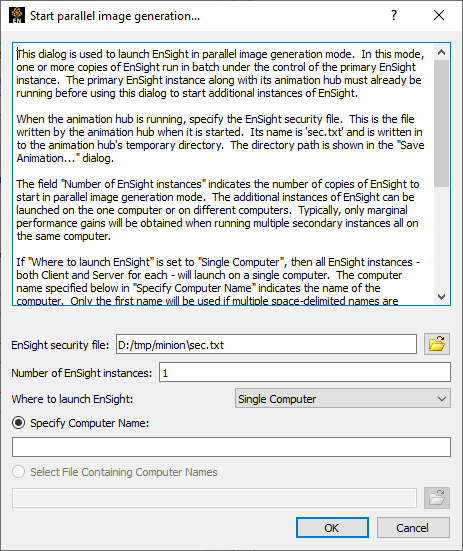
If the button is used, the Start parallel image generation... dialog appears warning you that the EnSight Launcher will be executed. Click to continue. This will bring up the EnSight Launcher (see EnSight Launcher for more details).
The following options are available:
| EnSight security file | This field will be filled with the security file that has been generated when launching the hub. This file is in the hub scratch directory and is named sec.txt. |
| Number of EnSight instances | The number of secondary EnSight sessions to run. |
| Where to launch EnSight | If a single computer is selected, all the secondary EnSight sessions will be executed on the same computer. If is selected, then the EnSight sessions will be launched in a round robin fashion among the computers set in the following fields. |
| Enter the name of the computer where you would like to run the secondary EnSight sessions. If more computers are selected, enter multiple names separated by a space. | |
| This option is only available if Where to launch EnSight is set to . Allows you to upload a file that contains the names of the computers used to launch the secondary EnSight sessions. |
The Animation options allow you to select the type of animation to save via parallel mode rendering. See Figure 1.5: Animation Options.
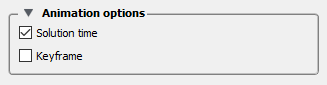
Only two options are currently available: or .
Select → →
Set the Record mode to .
Use to select the format of the animation to export. See Changing the Save File Format.
Set the name of the file to export under Specify image/animation filename.
In the Specify a common scratch directory field, enter the path to the directory where EnSight can store the security hub file and temporary files.
Toggle off if you do not want the main EnSight session working towards the parallel save animation process. This will allow you to keep using EnSight while the animation is being generated, but will result in slower performance.
Click the button.
Under Start additional EnSight parallel renderers, select if you want to use Slurm (Figure 1.4: The Slurm Launcher Dialog) or the EnSight Launcher (The Launcher Option) to start the additional EnSight processes.
Toggle on if you want additional EnSight processes to use EGL graphics for better performance.
Toggle on if you want additional EnSight processes to use software rendering.
Note: and are mutually exclusive. You cannot choose both options together.
Toggle on to generate more information from additional EnSight processes.
Under Animation options, select or based on the type of animation you want to save.
Select any Advanced options. The Advanced toggle brings up the following options. These are described in detail in Use Raytrace Rendering.
Select to begin recording the animation.
Progress is displayed in a progress bar within this dialog. The recording can be aborted by pressing the button.
You should notice the number of renderers reported in the dialog, ensuring that you are running in parallel as anticipated.
Use Slurm
The following dialog appears when selecting to start additional EnSight sessions for the parallel save animation process.
Set the number of additional EnSight sessions to launch under Number of EnSight parallel renderers.
Enter the slurm computer name under Slurm head node.
Toggle on and enter the user name if it differs from the one on the current computer.
Enter the command to use to connect to the slurm head node in Remote spawn command.
Click to populate the Select partition drop-down.
Use the Select partition drop-down to set the partition.
Specify the Cores to use per parallel renderer field to set the number of cores available for each additional EnSight session. This is interpreted as the number of threads used by EnSight. Default values range from 8 to 48.
Toggle on the if you wish for the additional EnSight sessions to be run in SOS mode.
If is toggled on, specify the Number of servers per SOS.
Toggle on to ignore all the slurm settings and simply spawn the additional EnSight sessions on the remote computer.
Use Launcher
The following dialog appears when selecting to start additional EnSight sessions for the parallel save animation process.
EnSight security file will be prefilled with the security file generated by the hub. You can make changes if the file name generated is incorrect.
Enter the number of additional EnSight sessions you wish to start for the parallel save animation capability under Number of EnSight instances.
Use Where to launch EnSight to launch these additional sessions on a or on (Multiple computers).
Use to set the name of the computer where to start the additional sessions. If more computers are selected, enter multiple names separated by a space.
If using multiple computers, will be available. This option allows you to browse and add a file that contains the list of computers separated by a space.