


It is possible to specify a boundary condition based on the interpolated values from a data file. This is useful to use the results of a previous simulation or experimental results as a boundary condition for the current simulation. CFX-Pre will generate CEL expressions that refer to the imported data, using interpolation functions. This data is automatically generated when creating a boundary condition using the Profile method.
To implement profile boundary conditions, follow these steps:
Create a boundary condition profile file. This can be accomplished by using the Export feature of CFD-Post.
For details, see Type in the CFD-Post User's Guide.
The data file format supports face and element definitions. Although not used in CFX-Pre and CFX-Solver, CFD-Post reads this data and displays values using the face/element information. A list of valid variable names that can be used in profile files is available. For details, see Standard Variable Names.
Alternatively, create your own data file (you may want to use an exported boundary condition profile file from CFD-Post as a template).
For details, see Profile Data Format in the CFX-Pre User's Guide.
Initialize (read in) the profile in CFX-Pre.
Do this by selecting Tools > Initialize Profile Data and selecting the profile file and data to load. You can load multiple profile files and each file can contain profile data for more than one locator.
For details, see Initialize Profile Data in the CFX-Pre User's Guide.
Optionally edit the profile function (which appears in the Outline tree view under
Simulation>Expressions, Functions and Variables>User Functions) to associate value fields of the profile data with CEL parameters. This association facilitates the automatic configuration of boundary condition settings when profile data is used to create a boundary condition. For details, see Associating Profile Data with CEL Parameters in the CFX-Pre User's Guide.Assign the profile data to a boundary condition.
Do this by editing the boundary condition. On the Basic Settings tab, select Use Profile Data. For details, see Use Profile Data in the CFX-Pre User's Guide.
Profile boundary conditions are always evaluated with reference to the local coordinate frame. Select the appropriate coordinate frame from the Coordinate Frame drop-down list. Additional information on coordinate frames is available in Coordinate Frames in the CFX-Pre User's Guide. For details, see Coordinate Frames.
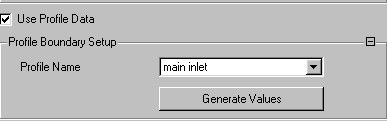
Select the appropriate profile from the drop-down list, and then click Generate Values. The Boundary Details tab will be modified to use the profile data. These changes to the Boundary Details tab will not be applied unless you click Apply. If you later modify profile values using CEL, and you would like to re-apply the profile data that came from the profile file, click Generate Values again.
The profile boundary condition (as well as other boundary conditions) can be visualized in CFX-Pre by using the Plot Options tab in the Boundary Conditions details view. You can create a Boundary Contour or a Boundary Vector plot of the profile data. For details, see Boundary Plot Options Tab in the CFX-Pre User's Guide.
The profile data is read into the CFX-Solver each time the solver is started/restarted (that is, the profile file can be edited between solver runs without returning to CFX-Pre).