


When you execute commands, the entries that display in the command history are color-coded by item type. To work with these entries, you use key combinations, icons, and context menu options.
History Color-Coding
In a command history entry, you identify the type of each item by its text color:
| Text Color | Item Type |
|---|---|
| Black | Inputs |
| Blue | Outputs |
| Red | Errors |
History Key Combinations
To move between command history entries, you use the following key combinations:
| Key Combination | Action |
|---|---|
| Ctrl + up-arrow | Go to the previous entry |
| Ctrl + down-arrow | Go to the next entry |
Additional keyboard shortcuts are described in Using Console Keyboard Shortcuts.
Command History Toolbar Buttons
To work with command history entries, you use these buttons on the toolbar:
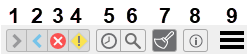
Show or hide the history of inputs.
Show or hide the history of outputs.
Show or hide the history of errors.
Show or hide the history of warnings.
Display the last executed commands (maximum of 500).
Search command history for an entered search string.
Clear the command history log.
Open the Help window.
Show hidden icons (visible only when the ACT Console window is not wide enough to display all icons in the toolbar).
History Search
When you click the search toolbar button (![]() ) to search the command
history, a reverse search is performed using the text currently entered in the command
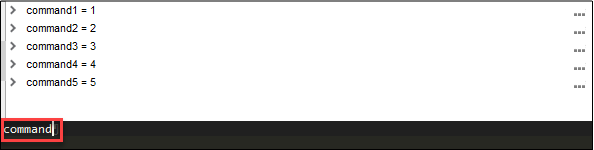
line. The following figure shows five executed commands and
) to search the command
history, a reverse search is performed using the text currently entered in the command
line. The following figure shows five executed commands and
command entered in the command line.
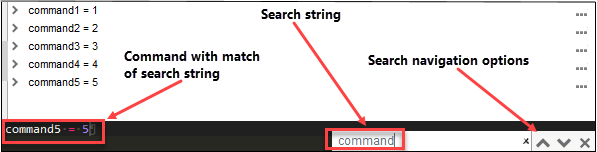
To start the search, either click the search toolbar button (![]() ) or press
. A search box appears to the right of the command
line. Besides displaying the current search string, the search box provides buttons for
stepping backward
) or press
. A search box appears to the right of the command
line. Besides displaying the current search string, the search box provides buttons for
stepping backward  and forward
  through the
command history entries and a button for closing
through the
command history entries and a button for closing  the search box.
When the search starts, it immediately steps backward through the command history,
stopping when it finds an entry with a match. In this example, the search stops when it
finds
the search box.
When the search starts, it immediately steps backward through the command history,
stopping when it finds an entry with a match. In this example, the search stops when it
finds command5 = 5, displaying this entry in the command line. If
you wanted to execute this command again, you would press .
To resume the reverse search, you either press or
click the up arrow button for the search
box. To change the search direction to step forward rather than backward in the history,
you either press or click the down arrow button
for the search box. To clear the search string, you click the button with the small X
to the right of the search string.
As long as the result in the command line matches the current search string, no
change occurs. When the result no longer matches the search string, the search
automatically steps backward to find the next match. Assume that you enter
command2 as the search string. Because command5 =
5 no longer matches command2, the search steps
back through the command entries to find a match, displaying command2 =
2 in the command line. Now assume that you enter
command21 as the search string. The search box turns red
because no match exists in the command history.

If you enter command as the search string once again, the
search box is no longer red. Because command2 = 2 still matches
the current search string, it remains displayed in the command line.
If the search reaches the end of the history without finding a match, it wraps around
to the beginning of the command history. When you finish searching, you click the close
button for the search box.
History Context Menu
For a command history entry, you can access a drop-down menu and select an action to apply to it. When you click the button with the three dots to the right of an entry, the following actions are available:
: Copy the command text to the clipboard.
: Add the command text to the Snippets panel. For more information, see Using Snippets.
: Paste the command text into the command line so that it can be executed again later.
