


Eyebox
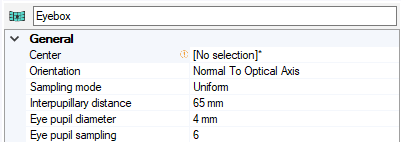
The Eyebox section allows you to configure the eyebox(es) used by HOA.
To configure the Eyebox settings:
-
In the 3D view, click
_HUD_Eyebox_Center.png) and select a point to place the eyebox
center.
and select a point to place the eyebox
center. -
In Orientation, define the vertical direction of the Eyebox:
-
Select Normal to optical axis to set the vertical direction of the Eyebox as normal to the optical axis defined in the Target Image section.
-
Select Normal to vehicle axis to set the vertical direction of the Eyebox as normal to the vehicle axis defined in the General section.
_HUD_HOD_Orientation.png)
-
-
In Sampling mode, select which sampling mode to use for the eyebox:
-
Select Adaptive if you want to define the sampling of the eyebox with a file that describes the coordinates of each sample.
-
Select Uniform if you want the sampling of the Eyebox to be a uniform grid. With this mode, three grids can share sample to represent the Eyebox: One Binocular grid representing the position of the eyes and two monocular grids, each representing the position of one eye. The binocular Eyebox is the union of the two monocular Eyeboxes.
-
In Interpupillary distance, specify the distance between the eyes.
-
-
In Eye pupil diameter, corresponds to the average human pupil diameter (2-4mm in a luminous environment and 4-8mm in a dark one).
-
In Eye pupil sampling, define the number of samples on the pupil of the driver's eyes (samplings are on the circle of the eye).
Eye Pupil Diameter and Eye Pupil Sampling may affect both the position (slightly affect if the windshield is very flat) and the accuracy/computing times of the best focus point computation. If the sampling is high then the computation of the best focus points will be more accurate but longer.
-
In Size, define the sampling and size of the eyebox:
-
If you selected the Adaptive sampling mode, browse and load a file.

The file contains the coordinates of each sample in millimeter where Center is the origin point, Vehicle direction * Top direction is the X axis and Orientation is the Y axis.
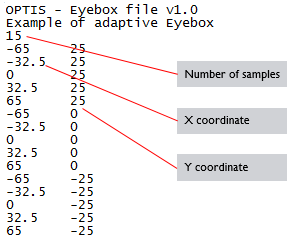 Note: The file must end with an empty line. Download an . example file
 -
If you selected the Uniform sampling mode, define the sampling and size of the eyebox manually:

-
Define the binocular horizontal size and monocular horizontal sampling of the eyebox.
-
Define the vertical size and sampling of the eyebox.
Note: Number of shared samples gives the number of sampling shared between the monocular eyeboxes. The binocular and monocular Eyeboxes share the vertical parameters.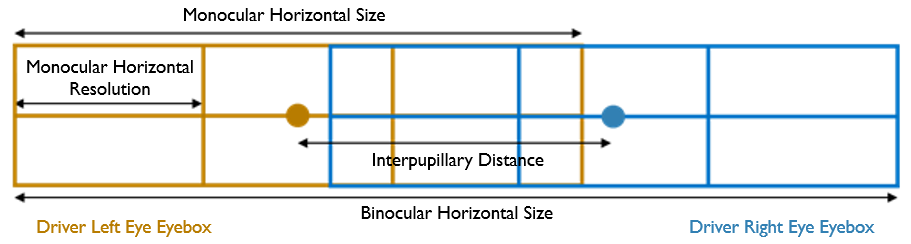
-
-
-
If you want to analyze your system according to different eyeboxes, activate the Multieyebox mode:

The default eyebox, nominal Eyebox, is the Central Eyebox with a 0mm-offset. Each added Eyebox is created by moving in translation from the nominal Eyebox to a distance corresponding to the Offset.
-
From the Position Direction drop-down list, specify the direction used to apply the offsets:
-
Select Normal to Central Eyebox Optical Axis, to set the position direction as normal to the nominal driver optical axis defined in the Target Image section.
-
Select Normal to Vehicle Axis to set the position direction as normal to the Vehicle Axis defined in the General section.
_HUD_HOD_Projection_Direction.png)
-
-