


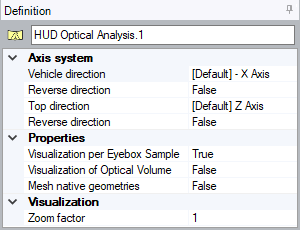
General
The general settings allow to specify the axis system used by HOA and the calculation type to run according to the 3D visualization you want to display.
If no axis system is set, a default axis system is used: Vehicle direction = -X Axis and Top direction = +Z Axis.
_HUD_HOD_Axis_System_Vehicle.png)
-
If you want to define a custom axis system:
- Click
_HUD_Vehicle_Direction.png) and select the line that defines the vehicle direction.
and select the line that defines the vehicle direction. - Click
_HUD_Top_Direction.png) and select the line that defines the top direction.
and select the line that defines the top direction.
- Click
-
In Properties, define what parts of the results you want to visualize after computation:
- Activate Visualization of Optical Volume if you want the optical volume to be displayed in the 3D view at the end of the computation. This option is useful to check if something obstructs (for example, dashboard too high) the driver field of view to see the Target Image.
Activate Visualization per Eyebox Sample if you want to access the Eyebox sample option after computation.
Note: To access the Eyebox sample option, activate the Visualization per Eyebox Sample and run the HOA computation.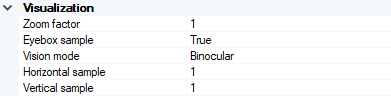
- Set the Eyebox sample option to True to visualize the Target Image result from different positions on the Eyebox according to the human vision.
- From the Vision mode drop-down list, select which view to display.
- Set the horizontal and vertical sampling of the eyebox. The position (1,1) corresponds to the bottom left sample of the Eyebox.
- Activate the Zoom factor option to zoom the size of the Best Focus Spot, Tangential Spot, Sagittal Spot, Static Distortion and Pixel Image in the 3D view.