Creating a Human Eye Sensor
The Human Eye Sensor takes into account the physiological characteristics of the eye to accurately replicate human vision and perception.
This sensor should not be used with transparent diffusive materials in direct simulation because:
- Its ray-acquisition capability appears fairly low with diffusive parts (due to the smallness of the integration angle that drastically reduces the probability for enough rays to fall into it.)
- Simulations might take too much time to run.
- Simulation results might present noise, grain or blur whilst appearing more sharp.
To create a Human Eye Sensor:
- From the Light Simulation tab, click Human Eye
_Sensor_Human_Eye.png) .
. -
Set the Axis System of the sensor by placing two points in the scene:
- In the 3D view, click
_Origin_Point.png) and select one point to place the eye in the scene.
and select one point to place the eye in the scene. - In the 3D view, click
_Sensor_Target_Point.png) and select one point to define a target point.
and select one point to define a target point. If you want to modify the vertical direction (Y by default), select a line in the 3D view.
A preview of the sensor appears in the 3D view.

- or click
_Axis_System_Autofill.png) and select a coordinate
system to autofill the Axis System.
and select a coordinate
system to autofill the Axis System.
Important: Make sure the sensor is not tangent to a geometry. - In the 3D view, click
If you want to use an XMP Template to define the sensor, in XMP Template, click Browse to load an .xmp file.
Note: An XMP Template is an .xml file generated from an XMP result. It contains data and information related to the options of the XMP result (dimensions, type, wavelength and display properties).When using an XMP Template, measures are then automatically created in the new .xmp generated during the simulation based on the data contained in the template file.
_Sensor_XMP_Template.png)
In General, from the Type drop-down list:

Select Colorimetric to get the color results without any spectral layer separation (in cd/m2 or W/sr.m2).
Select Spectral to get the color results and spectral data separated by wavelength (in cd/m2 or W/sr.m2).
From the Layer drop-down list:
Select None to get the simulation's results in one layer.
Select Source if you have created more than one source and want to include one layer per active source in the result.
Tip: You can change the source's power or spectrum with the Virtual Lighting Controller in Virtual Photometric Lab or Virtual Human Vision Lab.
Determine the field of view of the observer:

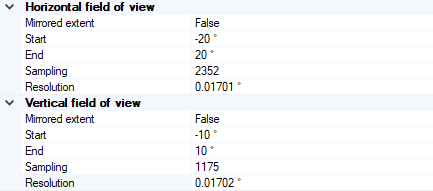
Adjust the Start and End values of the horizontal and vertical fields view.
Tip: You can either use the manipulators of the 3D view to adjust the sensor or directly edit the values from the definition panel.Define the Resolution of the observer's eye in degrees.
The sampling is automatically calculated and depends on the eye's resolution.
Tip: The Resolution corresponds to the visual acuity of the observer. The value taken here as a reference (1 arc minute = 0.0167 degrees) corresponds to the normal visual acuity of an observer.Set Mirrored Extent to True if you want to symmetrize the sensor by linking Start and End values.
In Wavelength, edit the sampling if needed.
Note: The Wavelength Start and End values are inherited from the human eye sensitivity.
If you need to modify the pupil diameter of the observer, type a value in mm.

The pupil diameter corresponds to the physical aperture of the eye. By default, the diameter is set to 4mm.
Note: The pupil dilation strongly depends on the environment. The default value used here (4mm) corresponds to the pupil dilation in broad daylight. In a bright environment the pupil contracts and can reach 2mm. In a dark environment the pupil dilates and can reach 9mm. The pupil's dilation capacity also depends on a lot of factors (age of the observer, disease etc).In Optional or advanced settings
_Speos_Options.png) , adjust the preview to
display in the 3D view if needed.
, adjust the preview to
display in the 3D view if needed.
The Human Eye Sensor is created and appears in Speos tree and in the 3D view.


